Scott Kelby’s Guide to Lightroom’s Print Module November 14, 2016 – Posted in: Photography – Tags: how do I do that in lightroom, Lightroom, lightroom printing tips, printing in lightroom, scott kelby lightroom, Scott Kelby's Guide to Lightroom's Print Module
Lightroom Guru, best-selling author, photographer, and all-around stellar guy, Scott Kelby shares his tips for preparing your photos for printing using Lightroom’s Print Module. So sit back, rexlax, and enjoy Scott Kelby’s Guide to Lightroom’s Print Module!
How Do I…Choose my Paper Size?
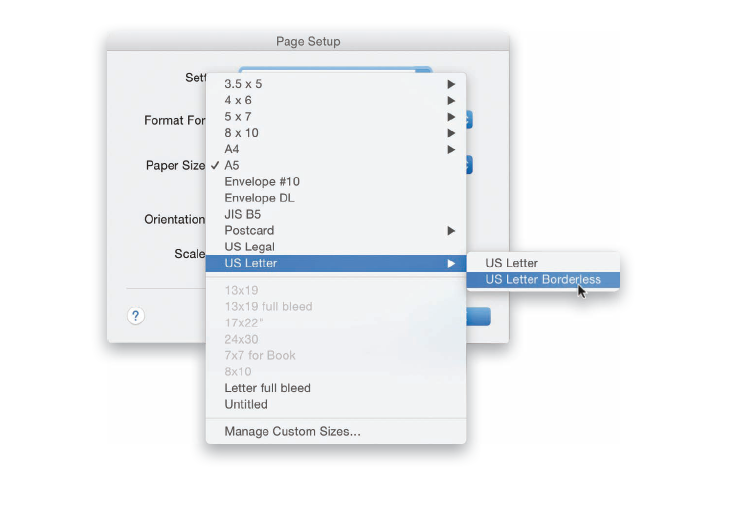
In the Print module, click on the Page Setup button at the bottom of the left side Panels area. When the Page Setup dialog appears (shown above; this is the Mac version), choose your Paper Size from one of the presets in the pop-up menu (here, I chose the standard US Letter size, 8.5×11″, with borderless [edge-to-edge] printing). That’s it— pick one of the preset paper sizes and click OK.
How Do I…Make a Custom Paper Size?
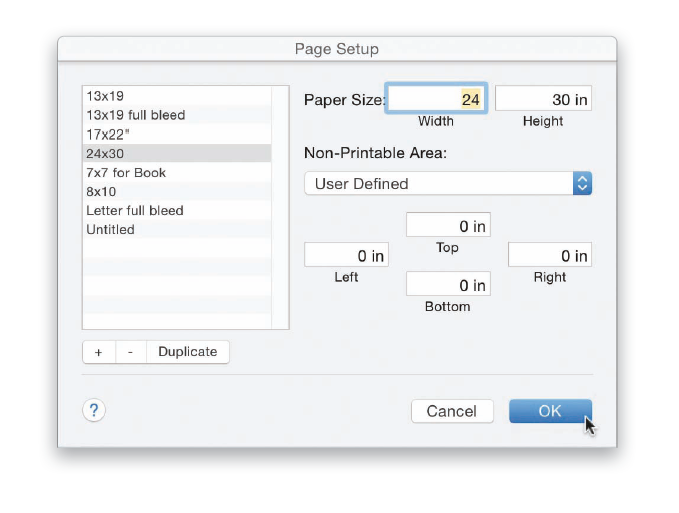
You see that menu above?? The one where you chose your paper size? Yeah, that one. At the bottom of that menu is Manage Custom Sizes (PC: User De ned). Choose that and it brings up the dialog you see above. To enter a size that didn’t appear in the preset menu on the previous page, just type in the size you want up in the Width and Height fields. While you’re there, in the fields marked Top, Left, Right, and Bottom, you can enter any page margins you want, or just type in “0 in” (like I did here) if you want the image to print all the way to the edges (provided, of course, you have a printer that has the edge-to-edge printing feature, but luckily most photo printers today seem to have that feature).
How Do I…Choose How Many Photos Per Page?
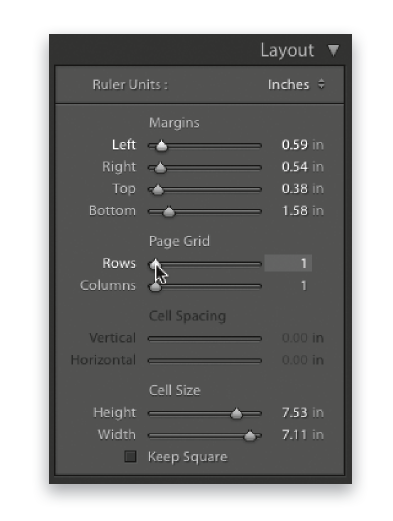
There are a couple of different ways, but we’ll start with probably the most-used method, which is choosing how many rows/columns of images you want on your page. In the Page Grid section of the Layout panel (in the right side Panels area), if you choose 1 for Rows and 1 for Columns, you get one image (makes sense, right?). If you want more than one image per page, you just increase either the number of rows or columns. For example, if you drag the Rows slider to 3, you will now have a page with three images stacked vertically, one of top of the other. If, instead, you dragged the Columns slider over to 3, you’d have three images side by side. You’ll get a single row or column as long as one of those two sliders stays set to 1. If you move both sliders, the math kicks in. For example, if you drag the Rows slider to 3 and the Columns to 3, you’ve got a page set up for nine photos (3×3). Another way to choose a multi-photo page is to choose one of the pre-made page templates that come with Lightroom CC—just go to the Template Browser (in the left side Panels area), click on one of the multi-photo presets, and you’re good to go.
How Do I…Create My Own Layout?
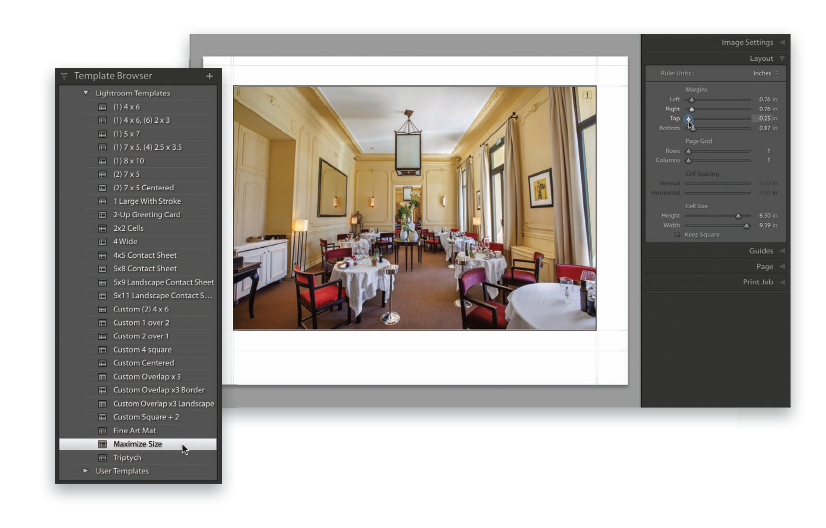
When I want to start from scratch and create my own layout, here’s what I do: First, I click on the Maximize Size preset in the Template Browser (as seen above in the inset) in the left side Panels area. It’s kind of a good neutral starting place. Next (and this is really important), click on the Page Setup button at the bottom of the left side Panels area and choose your paper size now. If you wait to do this until later, your layout will be resized to fi t and chances are it won’t look the same as you just designed it, but you can sidestep that problem by choosing your paper size and orientation now. From there, the rest is easy: just go to the Layout panel (in the right side Panels area) and drag the Margins sliders to move the image where you want it on the page. By default, that template is just a single-image template, but you can make it a multi-image print by moving the Rows and Columns sliders (just below the Margins sliders).
How Do I…Overlap Images?
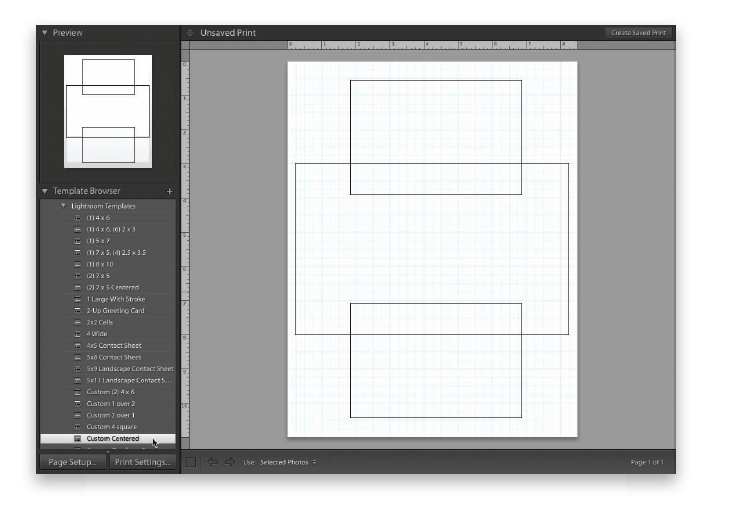
The easiest way to do this is to start by choosing a template that already has an image overlaying another. For example, try clicking on the template called “Custom Centered” over in the Template Browser in the left side Panels area (as shown above). That brings up the layout you see above, with two image boxes overlapping a larger image box. If you only want one image overlapping, just click on the one you want to delete and hit the Delete (PC: Backspace) key. You can resize either of the two remaining boxes by just clicking on them and dragging the corners or sides. Once they’re positioned where you want, at the sizes you want them, drag-and-drop images into those cells right from the Filmstrip at the bottom. To change the order of the images (which image appears in front of which), Right-click on an image and choose either Send to Back or Send Backwards (Send Backwards moves it back one level at a time, which is handy if you have more than two images. With just two, it doesn’t matter). There are also Send Forwards and Bring to Front choices, which bring your image forward or to the very top of the stack.
How Do I…Add Sharpening to My Print?
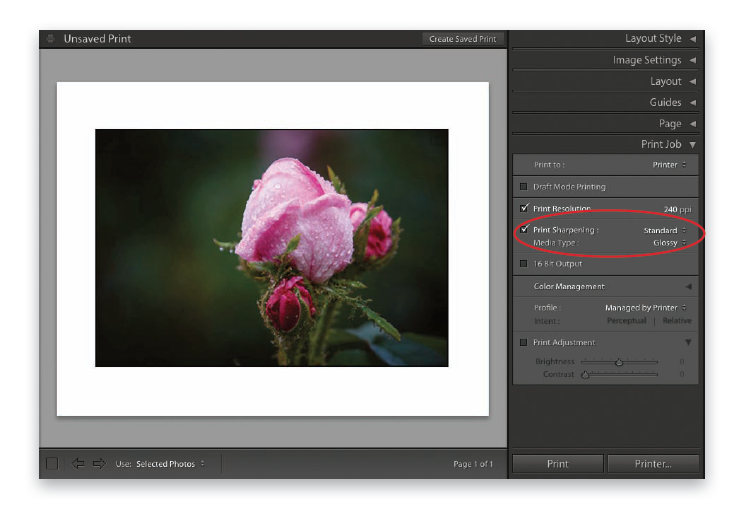
To add print sharpening (yes, we add this even after we’ve sharpened the image using the sharpening found in the Develop module’s Detail panel), just go to the Print Job panel (in the right side Panels area) and turn on the Print Sharpening checkbox. When you do this, you have to tell Lightroom two things: (1) Which type of paper (media) will you be printing on? You make this choice from the Media Type pop-up menu—choose either Glossy or Matte. And, (2) the amount of sharpening you want: Low (which is really low), Standard, or High. Then, Lightroom does the math for you, looking at your paper choice, image resolution, and so on, and chooses the proper amount of sharpening for print—it actually does a pretty nice job. The only downside is that it doesn’t show you a preview onscreen. You only see the effects of this print sharpening after the image is printed. Just thought you’d want to know.
How Do I…Make My Prints Brighter?
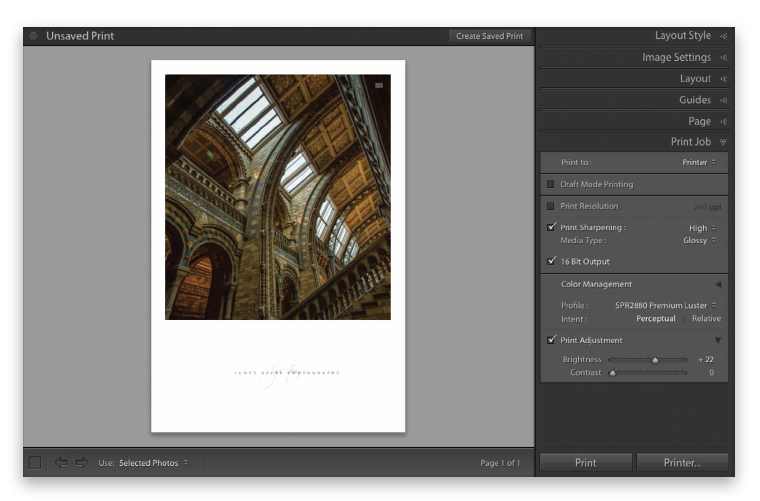
If your prints seem a bit darker than your monitor, that’s not unusual. After all, you’re looking at a super-bright, backlit, shiny screen, and then printing to non-backlit, not super- bright, porous paper. In my experience, my prints usually print around 20% or so darker than my monitor. Luckily, there’s a way to compensate for this, and make your prints brighter without actually having to adjust the actual image (that way, the image will still look correct onscreen, but just print brighter). You do this in the Print Job panel (in the right side Panels area): at the bottom of the panel, turn on the Print Adjustment checkbox and drag the Brightness slider to the right. Of course, the only way to know how far to drag the Brightness slider is to do a few test prints at different amounts until you find the amount that most closely matches your monitor. The good thing is, once you know that number, you’ll just use it every time. There’s also a slider for increasing Contrast during the printing process, but you’d only use that if the image not only looks too dark, but also had an overall loss of contrast. Again, you’d have to do a few test prints with different settings to find out how much to increase (or decrease) your Contrast amount. Just remember: when making test prints, you don’t have to use large sized paper—use something like 4×6’s, so test prints are cheap and print quickly.
How Do I…Add a Stroke Around My Image?
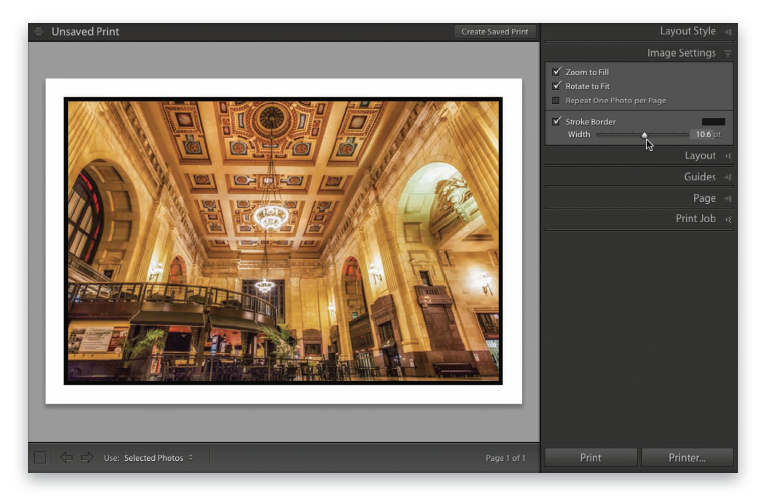
If you couldn’t find this one easily, it’s because Adobe stuck it in an unexpected place— it’s in the Image Settings panel in the right side Panels area (I think the panel is misnamed. Maybe “Page Options” or something like that would make more sense, but clearly I’m not on the Lightroom naming committee). Anyway, there you’ll fi nd a checkbox for Stroke Border. Once you turn this on, you can choose the color of your stroke by clicking on the color swatch to the far right of the Stroke Border checkbox. You control how thick the border will be using the Width slider.
And Lastly…How Do I…Tweak My Image Before it Prints?
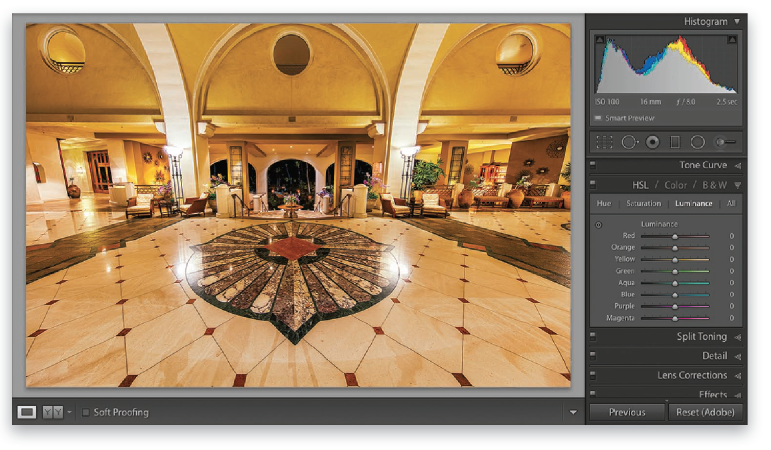
If you have your image all set in a print layout and you’re ready to roll, but you decide you want to change something (white balance, contrast, highlights, whatever), all you have to do is press the letter D and it takes your image over to the Develop module, where you can use all the controls there to tweak the image as you’d like. When you’re done, press Command-Option-6 (PC: Ctrl-Alt-6) to return to the print layout you were last working on.
For more Lightroom Module printing tips and over 100 additional Lightroom tricks from Scott Kelby, be sure to check out How Do I Do That in Lightroom? Available now!

