Mastering the Olympus OM-D E-M5 Mark III: How to Use Auto-Exposure Bracketing January 19, 2022 – Posted in: Photography
The following is an excerpt from Mastering the Olympus OM-D E-M5 Mark III by Darrell Young and James W. Johnson
AE BKT (Auto Exposure Bracketing)
Auto Exposure bracketing allows you to shoot from two to seven images in a bracket. The exposure of each shot varies by 0.3, 0.7, or 1.0 EV steps. Later you can select the best image from the series or combine the images into one high dynamic range (HDR) image with software such as Photoshop. AE bracketing does not rely on in-camera modification of an image to generate the bracketed versions of the image. Rather, it modifies the appropriate exposure component and reshoots the image. If you are shooting in Program (P) mode, both the aperture and shutter speed can be modified; if you are shooting in Manual (M) or Shutter (S) mode, the aperture will be modified; and if you are shooting in Aperture (A) mode, the shutter speed will be modified.
Let’s examine how to select and use AE BKT.
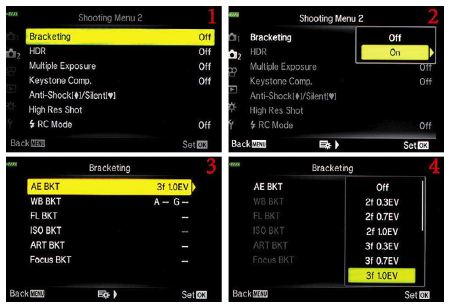
Figure 4.1A: Using Auto Exposure bracketing (AE BKT)
Use these steps to configure AE BKT:
1. Choose Bracketing from Shooting Menu 2 and scroll to the right (figure 4.1A, image 1).
2. A small menu will open and allow you to select Off or On. Highlight On and scroll to the right (figure 4.1A, image 2). Or you can disable all bracketing by selecting Off and pressing the OK button (then skip the rest of these steps).
3. Highlight AE BKT and scroll to the right (figure 4.1A, image 3).
4. A menu will open with many bracketing choices that look like this: 3f 1.0EV (figure 4.1A, image 4). The first two characters represent the number of frames in the bracket, from two to seven frames (2f to 7f ). The second group of characters represent the EV variation between images in the bracket. Your choices are 1/3 EV step (0.3EV), 2/3 EV step (0.7EV), and 1 EV step (1.0EV). If you choose 3f, 5f, or 7f, skip step 5 and go directly to step 6. If you choose 2f, move on to step 5 because the three 2f choices bring up an extra screen.
5. If you choose any of the three 2f choices, you will need to decide if the second image in the bracket will be overexposed (Over Exp. Pic.) or underexposed (Under Exp. Pic.). Figure 4.1B shows the screens you use to make your selection. Image 1 is the same as figure 4.1A, image 4, except 2f has been selected. Use the up/down menu shown in figure 4.1B, image 2, to choose either an overexposed image (Over Exp. Pic.) or an underexposed image (Under Exp. Pic.) for the second picture in the 2f bracket series. Press the OK button to lock in your choice, and take your pictures. If you are using single-frame shooting, you must press the Shutter button for each of the bracketed exposures. If you are using one of the sequential shooting options, then press and hold the Shutter button, and the camera will automatically stop capturing images when it has exhausted the number of frames specified. For [Self-timer] Custom shooting, you need only press the Shutter button once; the camera will manage the image capturing based on the [Selftimer] Custom settings. Skip step 6.
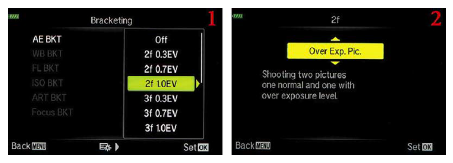
Figure 4.1B: A 2f exposure variance is selected
6. Highlight3f, 5f, or 7f and press the OK button. (There is no1.0EV option for the 7F selection.) The screen in figure 4.1A, image 2, will reappear. Press the OK button to lock in your choice, then take your pictures. If you are using single-frame shooting, you must press theShutter button for each of the bracketed exposures. If you are using one of the sequential shooting options, then press and hold theShutter button, and the camera will automatically stop capturing images when it has exhausted the number of frames specified. For [Self-timer] Custom shooting, you need only press the Shutter button once; the camera will manage the image capturing based on the [Self-timer] Custom settings.
Note: Be sure to disable AE BKT when you are done taking exposure-bracketed pictures, as the bracketing settings will remain enabled until they are intentionally reset, even if the camera is turned off. This is a convenient feature, but it can certainly cause unexpected results if you forget bracketing is enabled.
Settings Recommendation: If you are shooting a two- or three-frame bracket, it may be best to choose a 1.0EV. That will result in enough difference among the exposures to combine them or choose the best one. When you shoot a five- or seven-frame bracket, so much extra light is captured that you may get by with smaller variations between the images (e.g., 0.3EV or 0.7EV). Experiment with this to see what works for you. Auto Exposure bracketing is a useful tool for HDR shooters and people who want to have the best exposure and don’t mind the extra shots.
1 Comment
Don DeGregori January 18, 2023 - 20:11
I sent a message about my order for pocket guide for OM-D E-M1 Mark iii.
My error. I would like to cancel this order.
I really wanted OM-D E M5 Mark iii
I now see you don’t carry this guide, even though I have seen it elsewhere on the net.