How to Reverse Engineer a Photograph January 19, 2017 – Posted in: Photography
Being able to look at pictures and reverse engineer, or break down, how they were lit is an incredibly useful skill. Determining how many light sources were used by examining the shadows, highlights, and catch lights and observing whether the light is soft or hard not only tests your knowledge and understanding of light, but also will help you to replicate looks and go on to create your own unique images.
Catch lights in a subject’s eyes are always a good place to start, but these days we can’t trust them completely because they may have been moved or even eliminated in post-production. Fake light sources can also be added in post-production, and this can make lighting appear much more complicated that it actually is.
The goal here is to have an understanding of how a picture could have been lit. It will be easier to determine the lighting setup for some images than it is for others, and it may be that you’re not one-hundred percent accurate in figuring out an exact setup, but that’s not a problem because who’s to say a similar type of light couldn’t be achieved with a slightly different setup? The idea is to get the gray matter working by looking at the clues. This exercise, in addition to spending plenty of time behind the camera, will help you to keep building your knowledge and understanding of light and photography.
Let’s look at two simple setups to see how the size, position, and type of modifiers used affects the appearance of catch lights, highlights, and shadows.
Setup 1

Figure 1
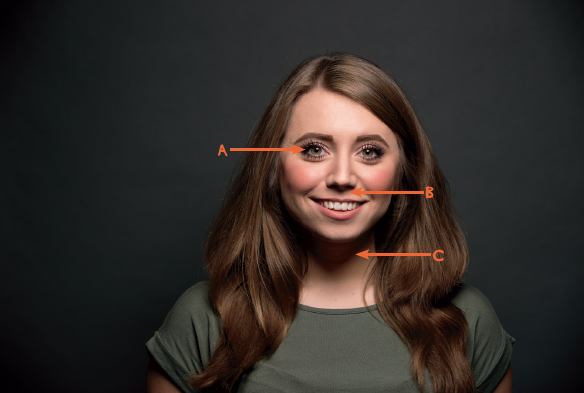
One of the first clues we can see in Figure 1 are the catch lights in the eyes (A). There is one round catch light in each eye at the twelve o’clock position (top and middle). This would initially suggest the use of a single light source like a beauty dish (because it’s round) on a boom.
We can see that there is one shadow directly beneath the model’s nose (B) and one under her chin on her neck (C). The shape of the shadows—how each one comes to a point in the middle—suggests that the light source was in front of the model, in line with her face on the camera axis, positioned up high and angled downward. Also note how the shadow areas on either side of the model’s face are quite even, again suggesting that the light source was in line with the model’s face on the camera axis.
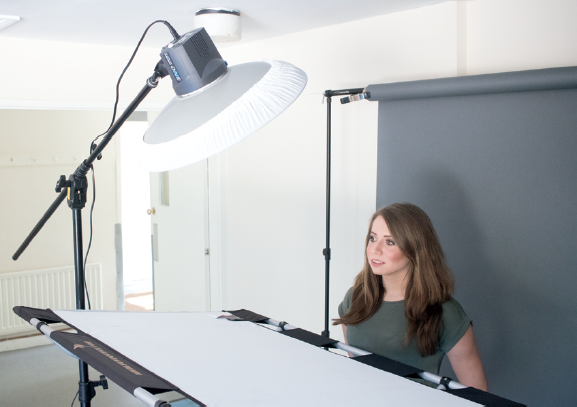
Figure 2 shows a behind-the-scenes look at the lighting that created the catch lights and shadows; however, the reflector you can see at chest height was not used to create the image in Figure 1.

Figure 2
Setup 3

Figure 3
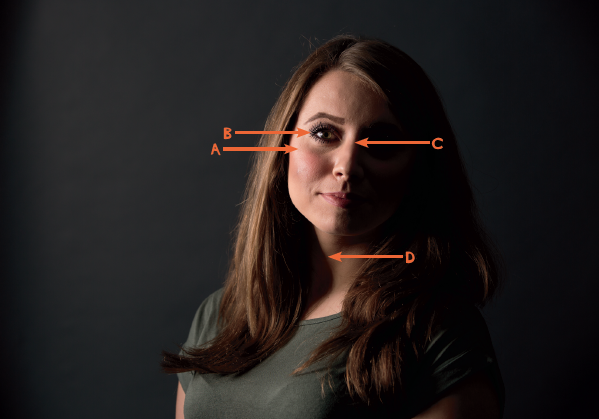
In Figure 3 just one side of the model’s face is lit (A). This suggests that there was a light source aimed at the model directly from the side—in this case, from camera left.
We can see from the catch light (B) that the light source is round, which would mean it’s something like a beauty dish. The catch light is in the nine o’clock position, which tells us the light was positioned at the same height as the model’s head at camera left. The fact that the edge of the shadow runs straight down the middle of her face (C), rather than at an angle, is another clue that the light was positioned at head height.
The lines where the highlight and shadow areas meet are very pronounced, especially on the model’s neck (D), meaning the light source was quite hard.
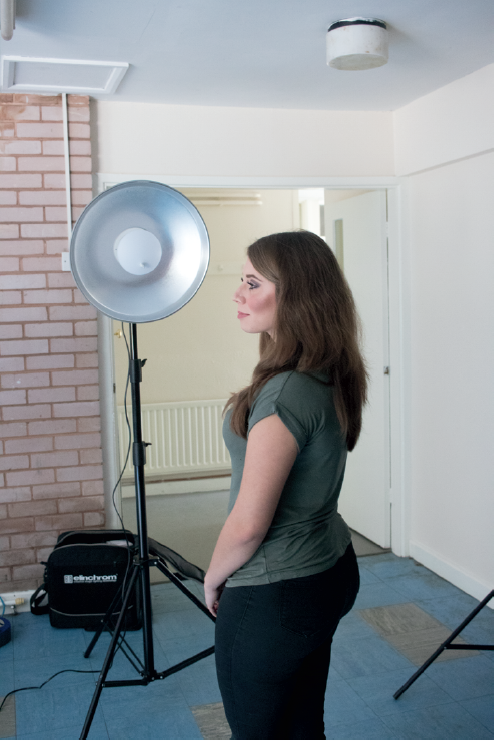
Figure 4 is a behind-the-scenes picture showing the setup. In this case, the beauty dish did not have any diffusion material across the front to soften the light, and it was positioned at head height and directly to the side.

Figure 4
This was excerpted from Photograph Like a Thief by Glyn Dewis, available in April 2017.


