The following is an excerpt from Lindsay Adler’sThe Photographer’s Guide to Posing
Posing isn’t just a formula. Like a dance, the core moves may be the same, but each dancer gives the performance something unique based on their body type and personal style.
I approach posing as a process. Well over a decade of practice has made this process instantaneous—I’m not checking off the steps in my mind; instead, I smoothly transition between steps as I shoot. This 10-step process helps me create endless variations in my portrait sessions without memorizing hundreds of poses. Instead, I only need to remember a few base poses. From there I can build on these base poses and never feel stalled for ideas.
If you can master this process, you’ll always have enough material to create a large number of useable images with each portrait session. I’ve provided my suggestions, but I welcome you to research your favorite images online or other photographers you admire to come up with your own unique list of base poses.
10 Steps to Posing Success
1. Select a base pose (you can use the go-to poses at the end of each chapter).
2. Adjust the pose or change angles to draw attention to or away from specific body parts.
3. Check for foreshortening and mergers (adjust pose if necessary).
4. Ensure good hand position and posture.
5. Engage the subject to get a good expression.
6. Shoot!
7. Vary your subject’s hands, expression, and shoulder placement.
8. Try different camera angles, camera positions, crops, depths of field, and lens choices for variety.
9.Repeat!
10.Analyze your images and learn from your successes and mistakes.
STEP 1: Select a Base Pose
Begin by selecting your base pose. This may be one of the five go-to poses you’ve memorized, or perhaps you’ve been inspired by images you’ve seen elsewhere. These poses will create the foundation of the shot, and you can make adjustments to build off of this.
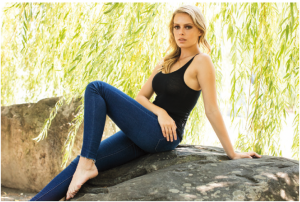
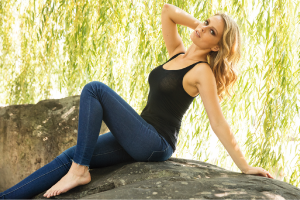
For this example, my subject is posed on a rock underneath a willow tree. I didn’t give her much direction other than asking her to sit comfortably. This pose has some issues that need to be addressed.
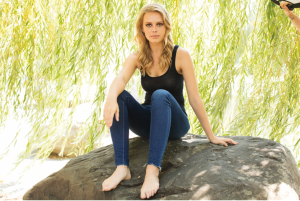
My subject has taken a seat on a rock for the base pose, which I will tweak to get the shot.
STEP 2: Adjust the Pose or Change Angles to Draw Attention To or Away From Body Parts
Take a look and analyze your shot and your subject. What is your eye attracted to in the pose? What looks largest? What is demanding the most attention? Is the attention where you intend it to be? If not, you will need to make some tweaks. Do you need to have the subject lean toward you or bring an asset closer to the camera? Maybe you need to get to a higher angle or move to the side to better control where the viewer’s eye looks. Remember, whatever is closest to the camera will appear the largest, whereas whatever is farthest from the camera will appear smallest. You can control this by moving the subject or by moving yourself.
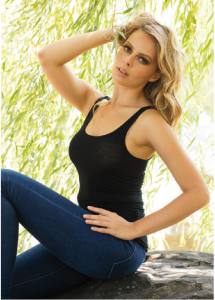
In this example, the subject’s body suffers from foreshortening (legs coming toward the camera): her feet look large (they are close to the camera), and her body looks compressed. To fix these problems, I change my camera angle by moving to the side, which puts everything back into a more pleasing perspective.
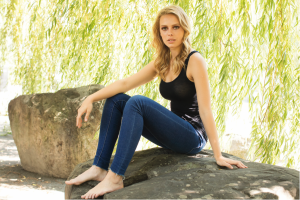
I adjust my camera angle to the side to create a more pleasing perspective and give better shape to the subject.
STEP 3: Check for Foreshortening and Mergers
Take a look and see if your image or pose is suffering from any problems with foreshortening or mergers. Is anything coming toward or away from the camera, making the image look compressed (that is, foreshortened)? If so, adjust the pose or camera angle to remedy this. Are mergers a problem in the pose? Are the arms making the body look wider? Are there any unfortunate mergers coming out of the back of the head? If so, use negative space or in-body posing to fix the problem.
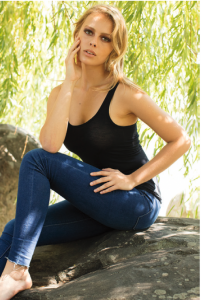
Here, I am able to reduce foreshortening by changing my camera angle. Unfortunately, her left arm is straight beside her body, creating a merger (no negative space visible), and both her feet are at even levels ( creating a more stagnant shape). To fix this, I lower one leg and create a bend to the arm closest to the camera. now the pose has been improved to avoid mergers and foreshortening, but there are more changes to make.
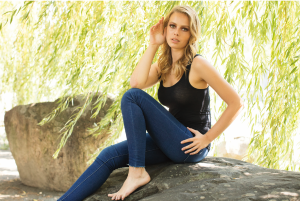
I adjust the pose to avoid mergers (with the arm beside the body) and reduce the stagnant look of even feet (dropping one leg down).
STEP 4: Ensure Good Hand Position and Posture
The pose is starting to look good, but watch out for two possible problem areas. First, make sure that the subject has good posture. Remember to have your subject pull up through the top of the head and elongate. If the head position or chin needs help, have your subject place their chin out and down.
Also, let’s take a look at the hands. Are we looking at the pinky side? Are they relaxed and not showing tension? Make sure the hands are not distracting in the photo.
Analyzing the shot we are working with, there is still a problem with her hands. The hand closest to the face shows too much palm (creating visual distraction), and the hand on the hip appears too large due to its placement. Thankfully, there are a few easy adjustments to improve the hand placement. First, rotate the hand next to her face so that the pinky side is toward the camera, creating a more elegant curve.
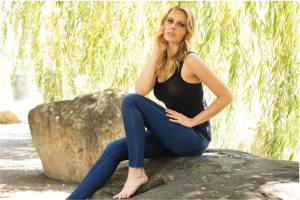
In this image, I’ve adjusted both hands so that the pinky sides face toward the camera, creating more elegant curves and less distraction from the hands.
STEP 5: Engage the Subject to Get a Good Expression
Now it is time to engage the subject to elicit a good expression. Maybe you are seeking a laugh, and ask the subject to giggle aloud. Maybe you want a sad and pensive look, and you direct the subject to get that soft expression in their lips and eyes. Remember the importance of having the subject emote something that the viewer can connect to. A blank stare, bored look, or awkward expression ruins a shot with even the best pose.
STEP 6: Shoot!
Now you have a good pose, you’ve fixed major problems, and you have a strong connection between the camera and subject. Time to shoot! get your focus on the eye closest to the camera, and make sure the composition and depth of field are what you want. Everything is taken care of in the posing department, so be sure the rest of your photographic elements are up to par. This, of course, is just one shot, and you are going to want some variety.
STEP 7: Vary Your Subject’s Hands, Expression, and Shoulder Placement to Create New Poses
Now it’s time to introduce some variety into your photographs. How do you do this? Each time you vary the position of the head, hands, or feet, you’ve created a variation of your original shot. Each time you change the expression or where the eyes are looking, that’s a new look to work with.
You’ve got your beautiful base pose in place, so what digits can you change to tweak the pose slightly? Can you move the hand from the hip, to the thigh, to the face, and across the chest? Each change creates a new pose, even if the base stays the same. Each time the hand moves, the expression changes. Sometimes she looks straight toward the camera. Sometimes she laughs into her shoulder. other times she looks off into the distance. Each combination of hand placement and expression is a new shot.
In short, keep the base pose and vary the feet, hands, arms, eye contact, and expression for different combinations and variations.
STEP 8: Try Different Camera Angles, Camera Positions, Crops, Depths of Field, and Lens Choices for Variety
So far, everything we have discussed has been in regards to posing and changing the position of the subject’s body. now let’s put the camera and photographer to work.
For each pose, you can create a great deal of variation in the shots based on your camera angle, lens choice, crop, and depth of field. Depending on the subject and environment, you can take this to the extreme and create some really unusual images.
You can change the following:
• the crop
• depth of field
• point of focus
• camera angle side to side
• camera angle up and down
• lens choice
Choose the base pose, and now change your angle. When you change your angle, perhaps change your depth of field. now vary your crop. Maybe a change in lens would change the look of the shot.
Shot variety isn’t all about changing the subject’s pose. A single pose can look very different depending on the photographic techniques you apply. Of course, on location you have a bit more flexibility, but you can still make some basic adjustments in the studio as well.
Now it’s time to revisit our core example for this segment. Take a look at how we are able to get 18 different shots without a lot of change to our subject. I vary the subject’s hand placement and expression, as well as my camera angle and crop. For the most part, there are only subtle and minimal changes to my subject, but I’ve created a great deal of variety from a single pose.
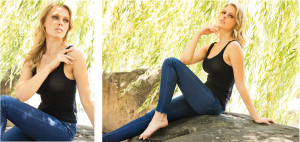

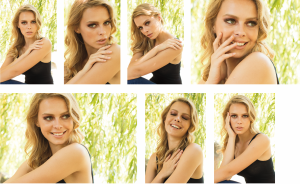
Every single shot is from the same base pose. The subject is seated with her front knee up. From there, I’ve varied her hand placement and expression, and then changed my crop and camera angle. The result is 15 different shots from a single pose.
STEP 9: Repeat!
Take everything you’ve learned and put it into action. get that base pose, make tweaks to flatter your subject, look out for posing pitfalls, make sure your subject connects with the camera, vary the digits, put the camera to work, and repeat. Pick a completely different base pose, and run through these steps again. From each base pose, you can build dozens of different shots by varying the digits, camera angle, depth of field, and crop.
STEP 10: Analyze Your Images and Learn from Your Successes and Mistakes!
This final step is not really a step in posing, but a step in becoming a better photographer. You’ll want to take a look at all the shots you’ve captured—not just the successes! What common problems and posing pitfalls did you encounter, and how can you avoid them in the future? What poses really worked, and should they be added to your go-to poses? Maybe they just worked great for the body type of that individual.
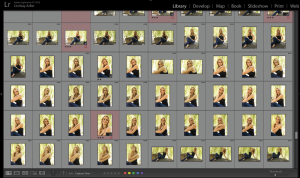
I often go through Adobe Lightroom to see which images succeeded and which images didn’t make the cut. Sometimes you’ll notice a repeated problem with a particular subject (like awkward hands) or become aware of repeated issues in your own posing.
Analyze your own work for issues that appear repeatedly, and try to fix them before you snap the shutter in your next shoot.
Take the time to look at your work. When you learn to see the mistakes you are making after the fact, you train your eye to recognize common problems during the shoot…giving you the opportunity to make changes. I think this step is something so many photographers forget. You become a better photographer through practice and by identifying mistakes and problems so you can improve in the future.
Please keep in mind that, eventually, these steps will become second nature. With practice, you will know exactly what you can change in order to flow from one pose to the next and create endless variation. You’ll have your own rhythm on a shoot, your favorite poses, and your own process that ensures success. For now, use this process to give you a great place to start your journey of mastering endless poses and maintaining your momentum in a portrait session.