The following is an excerpt from The Film Photography Handbook, 3rd Edition by Chris Marquardt and Monika Andrae.
Analog or Digital?
People are always quick to make comparisons. In particular, the question, “How many megapixels does that camera have?” comes up a lot.
This question is not so easy to answer in regard to film photography. There is no straightforward conversion from film to digital sensor in terms of megapixels. There are simply too many differences between the two worlds. Even if we use the smallest light-sensitive units to make a comparison—the digital pixel and the light-sensitive grain of film—we won’t get far. Should we perhaps talk about the individual silver halide particle, instead of a grain? Let’s take a closer look at individual aspects of the different processes. Comparisons are not prohibited.
Film Grain
Let’s first look at the shape of the film grain. It can be large or small, hard or soft, regular or irregular in its distribution. The grain structure of film can be completely different depending on the type of development used. Developing film (e.g,. in Rodinal) in a way that involves a lot of movement is going to highlight the film grain noticeably more than a 90-minute stand development where the film is left alone and still. Temperature, developing time, type of developer, and even the amount of movement when developing (the agitation) can turn the film into either a (crisp) grain beast or a silky-soft photo with a smooth finish.
The film sometimes shows a clear and rough grain; and other times, it shows hardly any grain at all. This is partly due to the structure of the film emulsion, which does not consist of one single layer of adjacent silver particles, as many people believe. Depending on the production process, it is usually a three-dimensional structure of several layers of differently sized and formed particles on top of one another. Kodak T-MAX is a good example. The original T-MAX had a layer of traditional pebble-shaped crystals with a layer of the new, flatter, T-shaped crystals on top (see the illustration below). The current version of the film uses exclusively T-shaped crystals.
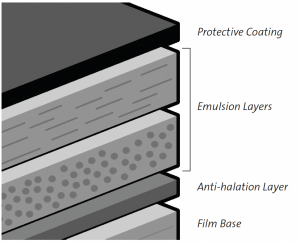
The multi-layered structure used in the original Kodak T-MAX film
If you look through this three-dimensional structure from above after developing, you’ll see that what we refer to as “grain” is almost always a visual cluster composed of several particle layers.
Arrangement
If you place a digital sensor and film side by side under a microscope, you’ll notice that the pixels are arranged regularly on the sensor. Each light-sensitive cell has its particular place in the grid. There are no irregularities. The grain of the analog film, on the other hand, is not regular at all. It is chaotically spread out over the entire surface of the film.

Grain or pixel?
The regular pattern of the sensor pixels results in lines on the image that run diagonally to the sensor structures, depicted as jagged little steps (aliasing). The more this angle approaches the arrangement on the sensor, the more prominent the aliasing. With the color sensor, this results in moiré patterns or local color distortions in the picture. Thanks to the organic grain distribution, film does not care at all about such regular patterns within the subject.
The manufacturers of digital cameras need to use tricks to ensure such structures are depicted cleanly: They add an anti-aliasing filter to their cameras, which makes the picture slightly unsharp during the shot. The formation of jagged steps is prevented at the expense of image sharpness. This explains why you should sharpen most digital pictures in the last step of post-processing. Film does not require this step.
Sharpness
The image sharpness can be measured in technical terms via the resolution capacity of pairs of lines. But for artistic work, the viewer’s perception of sharpness is much more important. This perception depends on several factors.
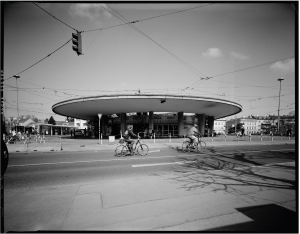
Vienna, large format, Kodak Tri-X 320. The high resolution of the large format manifests in a correspondingly high image sharpness.
The viewing distance and resolution of the picture play an important role in perceived image sharpness. The farther away you are from the picture, the less resolution is required to achieve an impression of sharpness.
The contrast in the picture also plays a role. The impression of sharpness is the same as the local contrast in the picture. If there are soft (low-contrast) transitions between adjacent areas, we interpret it as unsharpness. If the transitions are high in contrast, the viewer perceives it as sharp. To increase the perceived sharpness, you can use an unsharp mask, an old method from the darkroom days. This method involves increasing the contrast along the image edges. The dark sides of the contrast edges are darkened further, the bright sides are lightened. The viewer then perceives this increase in contrast as greater sharpness.
But the film grain also contributes to the perception of sharpness.
Area
In addition to the representation of fine structures, film and sensors also differ regarding how much of their area is light sensitive. With film, it’s easy: The entire area of the film is light sensitive. With a sensor, it’s a different story. The camera needs to get the exposure information from each individual pixel, so apart from the light-sensitive cells, there are also conductors on the surface of the sensor, which are not light sensitive. So, part of the sensor area is useless for light reception. Not so very long ago, the available utilization for light reception on the sensor area was well below 30% . Today, manufacturers are working on moving the wiring to the back of the sensor in order to increase this area, but we are still far from a 100% utilization of the theoretically available sensor area.
Contrast Range
Between the poles of deepest black and brightest white, every medium is able to represent only a certain differently sized area. This representable area is also referred to as contrast range or dynamic range. It is measured in f-stops. One f-stop corresponds to doubling or halving the amount of light represented.
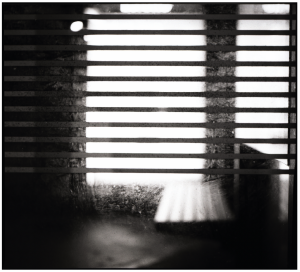
Bus stop, Fomapan 100 in Rodinal 1+100. The stand development helps tame the particularly high contrast range of the picture.
Whether we have a digital camera sensor or are using analog film, both options have one thing in common: They can best differentiate subtle nuances of brightness in the middle of their contrast range. If the exposure moves further away from this mid-range, fewer nuances (for example, fewer details in textures) will be represented.
One task of the camera’s light meter is to direct the amount of incidental light for different light situations in such a way that the exposure is as far within this contrast range as possible. Otherwise, you are risking over- or under-exposure. Camera manufacturers like to boast with big numbers when advertising their flagships—this certainly applies to the dynamic range of the camera.
But how does film fare by comparison?
Color negative film and slides are largely standardized; the processing is fully automatic. So their respective contrast range is also fairly clear-cut. Black-and-white film is the real all-purpose medium in this respect. Every black-and-white film can be processed in any one of the countless developers, and variations in the dilution of the developer, the processing time, and the temperature also do their part in changing the amount of contrast in the final image, sometimes significantly. In particular, push and pull, two different methods of treating and developing the film that we will discuss in more detail in chapter 6, have an enormous influence on the contrast range of the processed film.
Angle of Light
The role of the angle of incidental light is another variable. Film captures light almost independently of its entrance angle; many digital sensors are much more angle-dependent based on how they are built. Although light generally falls onto a sensor and film from the front, the angles are different depending on the focal length, so different amounts of light are captured. For example, telephoto lenses tend to send more bundled rays of light into the camera, which hit the sensor or film at an angle of almost 90 degrees. If the light does not hit at right angles, less light reaches the individual pixels in the digital camera. The light beams of wide-angle lenses tend to come in at a rather shallow angle, especially towards the edges. When using wide-angle lenses, this leads to a noticeable darkening, especially in the edge regions of the sensor. To increase the light-sensitive area, sensors often contain micro lenses. These are little loupes that bundle the incidental light towards the pixels.
What makes it even trickier is that mirrorless cameras have a shorter flange focal distance, i.e., the distance between the lens mount and the film plane is correspondingly shorter. As a result, the angles are flatter and vignetting becomes more pronounced. If you are now asking yourself why the wide-angle lens on your digital camera does not show vignetting, the answer is digital trickery. If the camera knows which lens it is looking through, it can simply factor out the darkening in the image corners. Almost all of the camera manufacturers now apply this technology to their digital cameras—even Leica and Hasselblad.
The Bayer Pattern
Another reason for a slight unsharpness of the digital image is that sensors use the Bayer pattern. Most sensors divide the light up into blocks of four in the three basic colors: red, green, and blue. In each case, two pixels are sensitive to green, one to red, and one to blue. This means only a quarter of the sensor area can sense blue or red light, and only half the area is sensitive to green light.
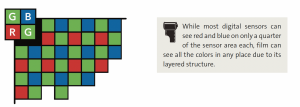
RGB sensor with Bayer pattern
These three color channels are then converted to 16 million colorful pixels inside the camera, and sharpness gets lost again during that process.
Instead of the widely-used Bayer pattern–type sensor, Fujifilm uses its own proprietary X-Trans sensors in many of its cameras. This design uses the same red, green, and blue micro filters, but they are arranged in a 6×6-pixel pattern that is reportedly less prone to moir. artifacts while delivering greater image resolution.
Sigma goes a different route with its Foveon X3 sensor. Instead of arranging the red-, green-, and blue-sensitive photosites adjacent to each other, Sigma places them on layers on top of one another. This design makes clever use of the way silicon absorbs different wavelengths of light. The layered design makes every pixel in a Foveon sensor sensitive to all three colors, thus making its behavior similar to that of color film, which “sees” all three colors over its entire surface.
Banding
Another area of the digital world that sometimes trips up people who switch over from film photography is the bit depth of digital pictures. The number of bits used to save the individual digital pixels determines the number of different grades of brightness this pixel can have. If we were to save with a bit depth of one, you could use this to represent exactly two states: black and white. Each additional bit doubles the number of possible gradations. With every additional bit, the potential number of represented shades of gray increases.
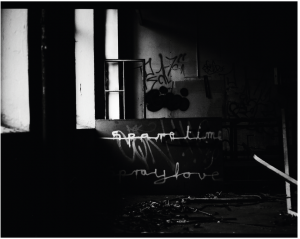
Factory, Hannover, Universal 200
In literature on digital image editing, you often read about bit depths of 8 or 16. Luckily, modern editing programs take the decision of what bit depth to use out of our hands and make the choice under the hood. They almost always work with very high bit depths. Only when switching between different programs does the question about the best setting come up from time to time. If you are not sure how many bits you should set for editing in another program, just remember that more can’t hurt. In our case, the value for black-and-white pictures is usually set to 16-bit; for color channels it’s set to 16 bits per color channel, i.e., 48-bit. You will come across this topic again in chapter 7.
If the bit depth is too low, it will be visible in the picture, particularly in areas with fine grading and color transitions. This includes sky areas where we like to see transitions from light blue to lighter blue over larger areas of the image. Without enough bits, these transitions disintegrate into discrete bands. Film only cares about all this for the transition to digital.
White Balance vs. Film Type
The term white balance originated with the appearance of the first (still analog) video cameras, in which the colored image was composed of the three different basic colors: red, green, and blue. Because this is still the case for most digital cameras, the term white balance is still used.
The human eye is amazingly flexible when it comes to perceiving different colors of light. We’ll almost always see white as white, even though a candle has a much warmer coloring than a cold-white fluorescent tube, and golden sunset light has a completely different color than the cool atmosphere of a cloudy winter afternoon. We are talking about the color temperature, measured in Kelvin (K). Somewhat counterintuitively, the light we perceive as warm has lower values (candle: 1200 K). The more blue content in the light, the higher the color temperature (cloudy sky in northern latitudes: 7000 K).
Unlike us, digital cameras cannot easily perceive the different light colors as neutral. Without white balance, a photo of a white sheet of paper taken by candlelight is going to look more yellow than white. Under a cloudy afternoon sky with its rather cool color components, everything in the photo will look blue.
To make these differences less severe, digital cameras try to control the mix of the three color channels (red, green, and blue) through automatic white balance. If the digital camera recognizes candlelight with its strong, warm (red) color components, it will ideally try to reduce the red channel and make the picture look more neutral.
With color film, we find something similar: The sensitivity of the different color layers is variably strong depending on the purpose of the film. The norm is usually daylight film, generally set to an average color temperature of about 5500 K. Under corresponding daylight, colors are represented as neutral as possible, i.e., neither too cool nor too warm. Depending on its type, artificial light can be quite cool (fluorescent lights) or warm (incandescent light bulbs), and to achieve neutral colors, the film type needs to be selected accordingly.
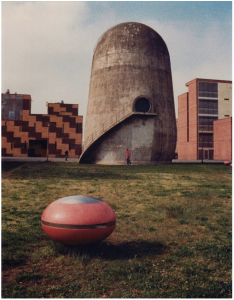
Zeiss Ikon Tenax, half-frame
But today, there are only very few films that are optimized for artificial light. One example is the CineStill Xpro C-41 800Tungsten, used for warm incandescent light bulbs. To be able to use daylight film in artificial light, you can use filters in front of the lens to adapt the color spectrum to the film.
A 100% adaptation for completely neutral colors is generally neither possible nor desirable for film. Every color film has its very special characteristics of colors and contrasts. Often it’s precisely these characteristics that make that film desirable, and they determine which type of film you choose for individual purposes.
Further Processing
To be really able to compare film photography and digital photography, we need to digitize the image after processing. There are two main methods for this: We can either scan the image or take a digital photo of it. The range begins at affordable flatbed scanners and camera-based scanning systems, and continues up the price scale to exorbitantly expensive drum scanners. The huge number of technologies and variable possibilities we have at our disposal in this area shows that a direct comparison between any absolute version of a film image and a digital image is virtually impossible.