
The following lesson is from Adobe Illustrator A Complete Course & Compendium by Jason Hoppe. To follow along, you’ll need to download this file.
Lesson A: Create a Hot Air Balloon
Hot Air Balloon
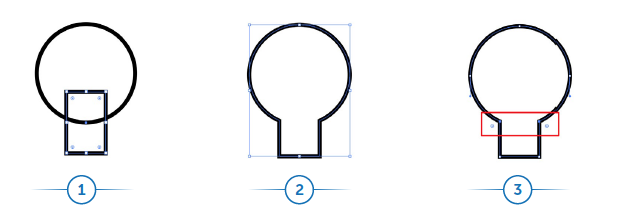
- Start with a circle. Add a tall rectangle to the bottom of the circle.
2. Select both shapes and use the Pathfinder Unite mode to make them into one shape.
3. Use the Direct Selection tool to choose the two corner widgets on the inside corners.
Pull the corner widgets out.
Copy and Flip
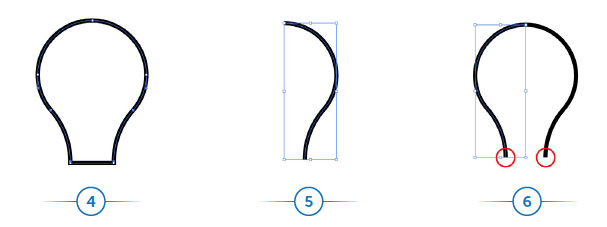
4. This is the result of the corner widget pull. This is also a great way to create a light bulb!
5. Use the Direct Selection tool to select the right half of the balloon. Copy and paste the shape.
6. Paste the shape again and flip it over to create two halves. Place them together so they touch at the top. Select the halves.
Blend Options
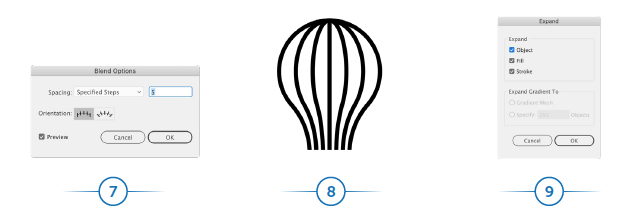
7. Choose Object > Blend > Blend Options. Set the Spacing to Specified Steps and enter in 5 steps. Click OK.
8. Choose Object > Blend > Make to create the curved lines in between the end lines.
9. The Blend Shape needs to be expanded to be able to be converted into a Live Paint Object. Choose Object > Expand. Click OK.
Live Paint Mode
10. With the shapes expanded (it will not look any different), add a rectangle to the bottom of the balloon.
11. Select all the shapes and choose Object > Live Paint > Make. Live Paint objects will have snowflake-looking pull handles.
12. Select the Live Paint Bucket tool (K). On the upper part of the Live Paint Bucket cursor there are three boxes; this is your color palette. Use the left or right arrows to scroll through the color palette indicator. The center color is your choice. Click in the area where you want to add that chosen color.
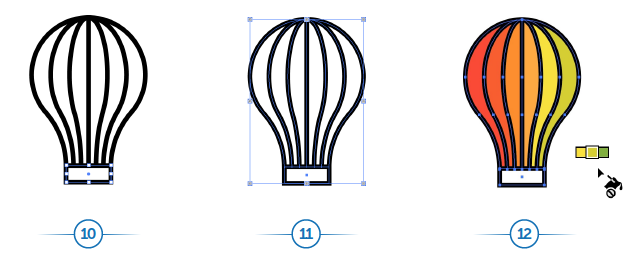
13. Add a rectangle underneath to create the basket.
14. Use the Direct Selection tool to select the lower two points and pull in the corner widgets slightly.
15. Add a top to the basket with a rounded-corner rectangle.
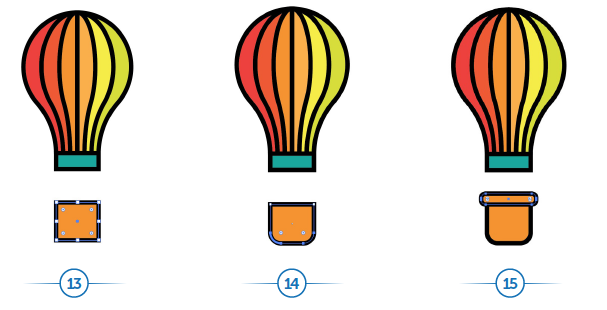
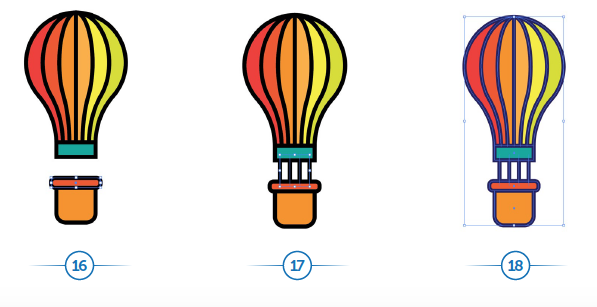
16. Change the color of the top of the basket to a darker color to add contrast.
17. Add attaching lines between the balloon and the basket with the Line tool (\). To change the color of all the strokes at one time, select one of the attaching lines, then choose Select > Same > Stroke Color.
18. With all the same stroke color selected, change the color of the strokes in the Swatches panel.
Duplicate and Repeat
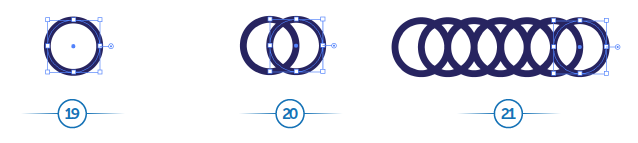
19. To create the cloud, start with a circle.
20. Duplicate the circle and place it halfway over the original.
21. Use Command + D (Mac) / Ctrl + D (PC) to duplicate the circle several times.
Pathfinder
22. Select a set of circles, copy it, and move it halfway up the group. Repeat the step again, with a smaller group, stacking sets on top of each other.
23. Select all the shapes and choose the Pathfinder Unite mode to make them all one cloud.
24. Use the Direct Selection tool to select and then delete the lower section of the cloud.
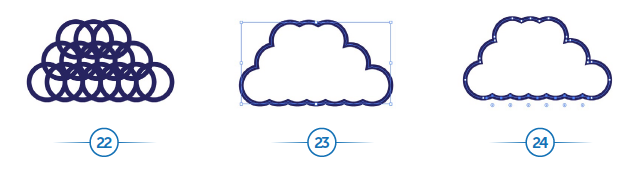
25. With the open cloud, choose Object > Path > Join to join the shapes together.
26. Add a fill to the cloud and place it in front of the balloon using Object > Arrange > Bring to Front. Duplicate the cloud, fill it with a darker shade of the same color, and choose Object > Arrange > Send to Back.
27. Add lines with rounded end caps in front of and behind the clouds and the balloon. Create shorter and longer lines to give the balloon the look of moving through the sky.

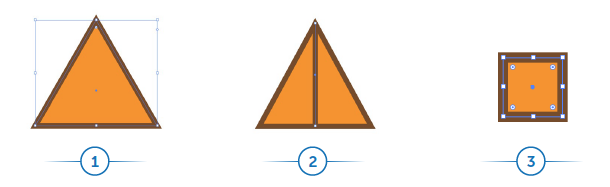
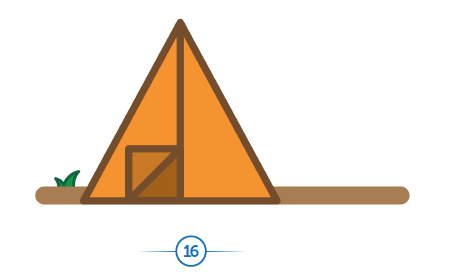
Lesson B: Create a Tent
Camping Tent
1. Start the tent off with the Polygon tool. While drawing the Polygon, use the down arrow to decrease the number of sides to three, creating a triangle. Add a fill color and an 8 pt stroke weight. Choose a darker color for the stroke.
2. Draw a line in the middle of the triangle.
3. Create a square with an 8 pt stroke weight.
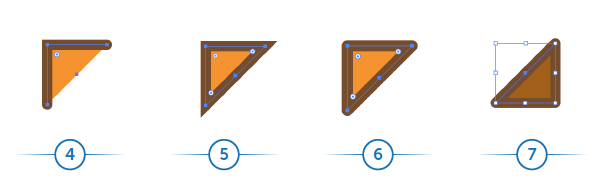
Join
4. With the Direct Selection tool (A), select the lower-right corner point and delete it.
5. Choose Object > Path > Join to close the shape.
6. In the Stroke panel, set the Stroke Corners to rounded.
7. Duplicate the triangle and rotate it 180 degrees. Fill the shape with a darker shade of the fill color.
8. Place the two triangles at the center of the tent to create the look of an open flap.
9. Draw a line, 16 pt weight, with rounded end caps. Choose Object > Arrange > Send to Back and move the line behind the tent to anchor it on the ground.
10. Create two circles with an 8 pt stroke weight and overlap them slightly.
11. Select both circle and use the Pathfinder Minus Front mode to leave a crescent shape.

Pathfinder
12. Create a rectangle over the crescent shape. Select both shapes and use the Pathfinder Minus Front mode to remove the lower portion of the shape.
13. This will create a blade of grass or green plant.
14. Duplicate the shape and use the flip horizontal feature in the Properties panel. Scale the duplicate shape larger and move it to the right.
15. Select both shapes and use the Pathfinder Unite mode to make them one shape.
16. Fill the grass with a darker shade of the stroke color. Move the foliage into position next to the tent.
Lesson C: Create a Campfire
Campfire
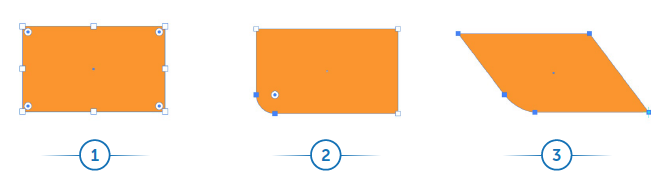
1. Create a rectangle with a fill color.
2. Use the Direct Selection tool (A) to select the lower-right corner and pull the corner widget in slightly.
3. Select the Skew tool and click on the lower-right corner of the rectangle. Hold Shift and pull the top of the rectangle to the right to skew the shape.
Pathfinder
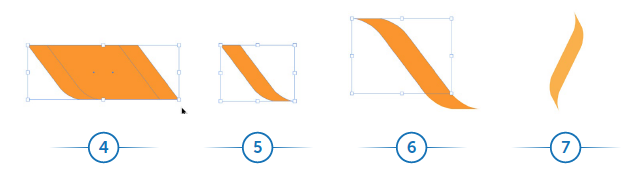
4. Duplicate the skewed shape and overlap the original shape.
5. Select both shapes and use the Pathfinder Minus Front mode to remove the front shape.
6. Duplicate the shape and rotate it 180 degrees and position it over the original shape. Use the Pathfinder Unite Front mode to make it into one shape.
7. Select the shape and make it narrower by dragging the pull handles closer together. Rotate the shape to make the tips point vertically, like a flame.
Duplicate and Draw Inside
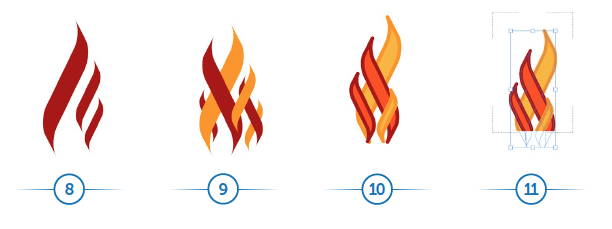
8. Duplicate the flame shape. Scale it smaller, and repeat the duplicate and scale.
9. Add a red fill to some flames to mix in with the orange flames. Use the Object > Bring to Front or Object > Send to Back to arrange the flames.
10. Add 8 pt strokes to the flames with a darker shade of the fill color. Select all the flames and group them. Cut the flames using Edit > Cut.
11. Draw a rectangle with no fill or stroke over the flames. Click on the Draw Inside mode at the bottom of the toolbar. Paste the cut flames into the rectangle and move them so their bottom tips are hidden by the rectangle. Click on the Draw Normal mode at the bottom of the toolbar when you’re done.
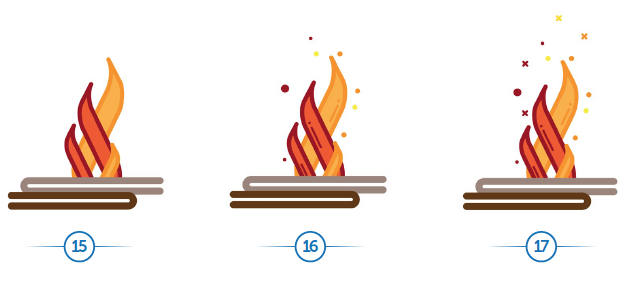
12. Add some wood to the fire by creating a rectangle, wide and short.
13. Use the Direct Selection tool to select the right end and corner widget the ends fully. Move the wood under the fire.
14. Use the Direct Selection tool to select and remove one end of the rectangle. In the Stroke panel, set the end caps to be rounded to indicate a log.

Snap, Crackle, and Pop
15. Duplicate the log and rotate it 180 degrees. Apply a lighter color stroke. Move the logs under the fire.
16. Add some snap and crackle to the fire by creating small circles with orange, red, and yellow fills. Add lines to the flames for texture.
17. Add some pop to the snap and crackle by creating lines to form an X and placing them above the fire.
Lesson D: Create Pine Trees
Blend Options
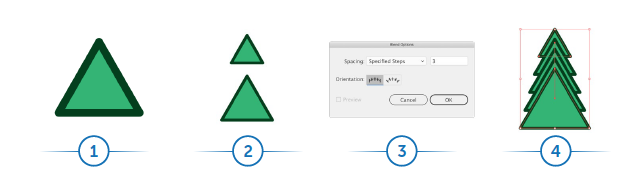
1. Create a triangle by using the Polygon tool. Draw the polygon and while drawing, hold the down arrow to reduce the number of sides. Fill it with a lighter green and add a heavy stroke of a darker green. Use the Stroke panel to round the corners of the stroke.
2. Duplicate the first triangle, then increase the size and place it below the first triangle. Do not scale the stroke and effects while sizing; open the Transform panel and make sure Scale Stroke and Effects is off before you scale.
3. Choose Object > Blend > Blend Options. Set the spacing to Specified Steps and choose 3 steps. Click OK.
4. Choose Object > Blend > Make to blend the shapes together.
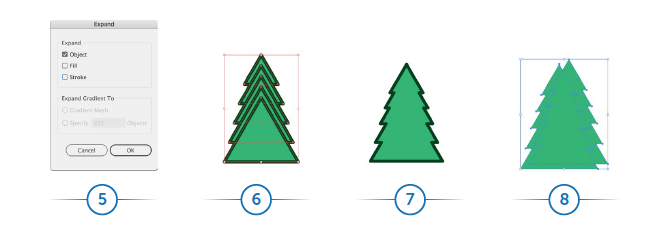
Expand
5. Select the blended shapes and choose Object > Expand.
6. This creates shapes for each step of the blend. Select all the shapes.
7. Choose the Pathfinder Unite mode to make all the shapes into one shape.
8. Duplicate the shape and set the stroke weight to zero. Duplicate the tree and position it up and to the right slightly.
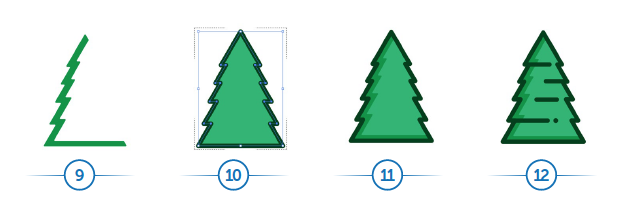
Draw Inside
9. Choose the Pathfinder Minus Front mode to leave a small section. Fill the small section with a darker shade of the fill color. Cut the shape using Edit > Cut.
10. Select the tree shape and choose the Draw Inside mode at the bottom of the toolbar.
11. Paste the darker section in and move it to the left, making a slip shadow. Click on the Draw Normal mode.
12. Add lines in the same color and weight as the stroke of the tree. Add a circle at the end of the rounded lines for visual texture. Select all the objects and group them.
Lesson E: Create a Backpack
Backpack
1. Create a rectangle to start the backpack.
2. Pull the corner widgets in toward the center of the rectangle to round the edges.
3. Add a stroke to the shape. Duplicate this shape twice for later use.
4. Create a rectangle for the lower section of the backpack. Add a fill color. Cut the rectangle with Edit > Cut.
Draw Inside
5. Select the main rectangle and click on Draw Inside mode at the bottom of the toolbar.
6. Paste the shape into the rectangle and move it to the bottom to create the lower section of the backpack. Click on the Draw Normal mode.
7. Create a rectangle for the front pouch. Choose a lighter fill color. Pull the corner widgets in toward the center of the shape to round the corners.
8. Copy the pouch, reduce the height, and with the Direct Selection tool (A), select the lower corners. Pull the corner widgets out so the corners are not rounded. Move the shape to the top of the pouch as the cover.
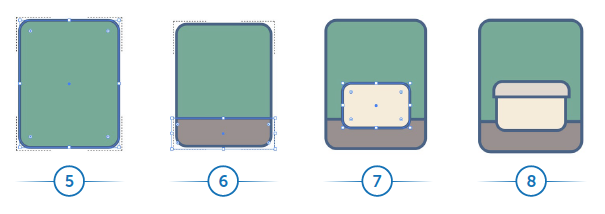
9. Take the duplicate of the main rounded rectangle in step 4, and reduce the height. With the Direct Selection tool (A), select the upper corners and pull the corner widgets out so the corners are not rounded. Move the shape to the top of the backpack as the cover and scale it to be larger than the backpack.
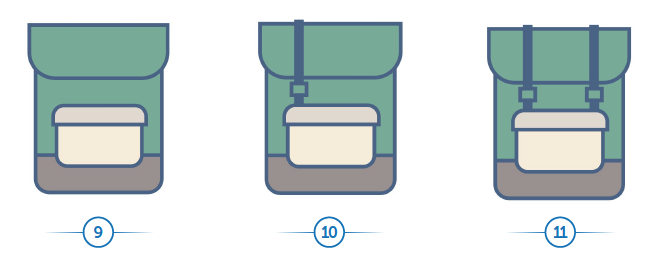
10. Create a strap with a buckle by creating a vertical rectangle with no stroke. Draw a rectangle over the strap for the buckle. Select the strap and the buckle and group them using Object > Group.
11. Duplicate the strap and buckle to the other side of the backpack.
Arrange Objects
12. Create a zipper on the pouch with two lines, one vertical and one horizontal. Round cap the ends in the Stroke panel.
13. Create an oval and move it behind the backpack with Object > Arrange > Send to Back.
14. Take the duplicate shape from step 4 and remove the fill. Make the stroke a darker color.

Opacity
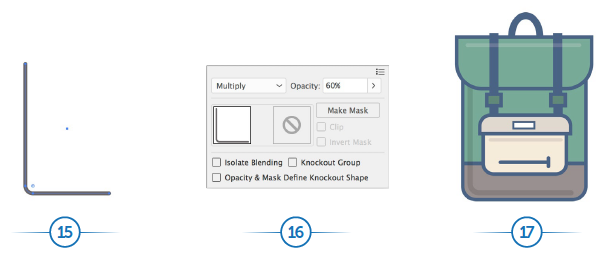
15. With the Direct Selection tool (A), click on the upper-right corner and delete it, leaving just the lower corner.
16. Set the Opacity of the line to 60% (or less, depending on the color) and set the Blend mode to Multiply.
17. Move the line over the lower-left area of the backpack to create a shadow line. Create a line near the top of the pouch. Set the Opacity and Blend modes as you did in step 16. Create a lighter line at the top of the backpack for a highlight and repeat the Opacity and Blend mode settings. You may want to adjust the opacity to make the lines look like they work well with the colors. Add a small rectangle for the logo on the backpack pouch flap.
Recolor Artwork
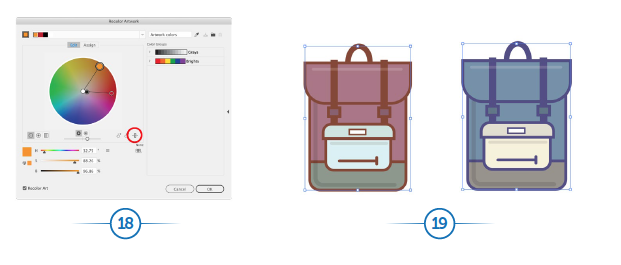
18. To create multiple backpacks of different colors, select the backpack, group it, and duplicate it. Choose Edit > Colors > Recolor Artwork. Click on the Edit tab at the top of the Recolor Artwork panel. Click on the link icon to the lower right of the color wheel, linking the colors together.
19. Move the color paddles around the wheel to change the color harmonies, or use the sliders under the color wheel to change the brightness or colors.
Lesson F: Assemble the Scene
Camping Day and Night
Let’s assemble the scene with all your creations from the lessons. Group each set of creations together and then copy and paste from one artboard into this artboard. Scale the objects to their appropriate sizes. Remember to open the Transform panel and choose the Scale Stroke & Effects button if you want the stroke to increase and decrease with the scale. Or uncheck it to have the stroke not scale with the size.
Useful Tip for Scaling Strokes: If an object has a stroke that is too large for the scene, uncheck the Scale Stroke & Effects, and scale the object larger. Click on the Scale Stroke & Effects box, then scale it smaller. The stroke will scale smaller along with it.
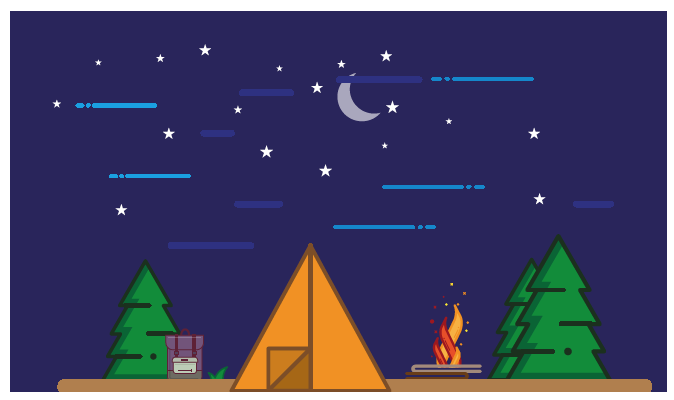
To create an evening camping scene, make a dark-colored background and add stars and a moon from the Weather icons creations. Clouds from the Hot Air Balloon project can be used, or just use the lines as wisps of clouds.