
This is an excerpt from Glenn Randall’s new title, Dusk to Dawn. Join us for a free Webinar with Glenn Randall on the Essential Skills for Night Photography. You can find more information on the webinar here.
The principles of good composition in daylight still hold true at night. The trick is implementing them when you can’t see through the lens. The best way to choose the ideal composition for your nocturnal landscape is to visit it in daylight first. Scouting during the day, when you can see a considerable distance in any direction, makes it much easier to locate great foregrounds. It also makes it easier to spot distracting elements you might overlook at night, such as distant powerlines or roads. Such flaws may be nearly impossible to see on your camera’s LCD display, but all too obvious when you view your image on a big monitor.
Daylight scouting lets you plan your shot in advance rather than trying to figure it out on the fly in the dark. What focal-length lens will you need? Will your widest lens be wide enough, or will you need to shoot a panorama? How important is detail in the land to the success of your image? If it’s important, you’ll probably need to shoot two frames, one exposed for land, one exposed for sky. What depth-of-field challenges will you face? All of these questions are easier to answer in daylight than at night.
If you can’t visit your location in advance during the daytime, you’ll be forced to rely on guess-and-check to get the composition right. When your eyes are dark-adapted, you’ll probably be able to distinguish land from sky as you look through the viewfinder—but not much else. Use the built-in level your camera may offer or a small bubble level inserted in your camera’s hot shoe to be sure the camera is level left to right. Estimate the right exposure and shoot a compositional study frame. If you plan to use a shutter speed that will extend into minutes for the final image, consider boosting the ISO to a very high value to speed up the process of refining your composition. It doesn’t matter if the test image is noisy since it’s only a compositional study frame. Dial the ISO back down for the final shot.
The process of composing an image begins when you have a gut reaction to a prospective subject—“That’s cool! I want to shoot that!” The first step is emotional, but the next two steps are analytical. What is it about the scene that makes you think it is worth photographing? What are the key elements that must be included to convey the emotion you are feeling? Include those elements, and no others. The novelist Antoine de Saint-Exupéry wrote, “Perfection is achieved, not when there is nothing more to add, but when there is nothing left to take away.”
The final step in good composition is arranging the key elements within the frame. Now you need to compose with your feet (and your knees and elbows). Examine the subject from all angles and all possible camera heights: ground level, knee level, waist level, eye level. Move left and right to decide how foreground elements should line up with background elements. The perspective of your photograph is determined by camera placement, not by focal length. By perspective I mean the size of your foreground elements relative to the background. Move forward to put more emphasis on the foreground. Move backward to give the background more visual weight. The final step is adjusting the focal length of your lens to once again include only those elements that will generate maximum emotional impact.
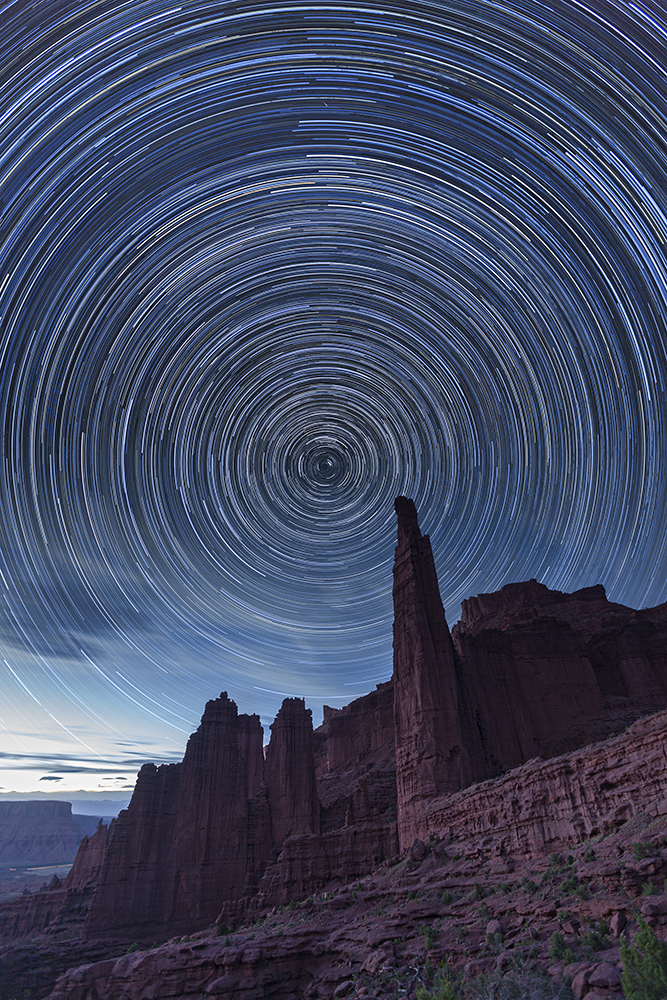
Figure 3-7: Star trails over the Titan, Fisher Towers, Utah. August 10-11, 2016, 9:44 p.m. to 3:28 a.m. Canon EOS 1Ds Mark III, Canon EF 16-35mm f/2.8L II USM. Land: 6 seconds, f/11, ISO 200 (shot at 8:33 p.m., 18 minutes after sunset). Sky: 339 frames, 59 seconds, f/2.8, ISO 200.
Exposure at Night
Achieving correct exposure at night is more challenging than during the day. For starters, you probably won’t be able to get a meter reading, even under the light of a full moon. In addition, your exposure choices are more limited at night than they are during the day. In daytime you can choose the aperture you need to achieve the depth of field you want and still keep shutter speeds within reason, all without resorting to high ISOs. At night you’ll be shooting with your lens wide open and begging for every photon you can get. Shutter speeds are limited by the motion of the stars, and ISOs are limited by the ability of your camera to control noise.
It’s helpful to remember a few rules of thumb to get you close to correct exposure. For example, the correct exposure for the Milky Way, one of the dimmest night photography subjects, is about 30 seconds, f/2.8, ISO 6400 on a moonless night far away from city lights. The correct exposure for a landscape lit by the full moon is about four stops down from that, or about 30 seconds, f/2.8, ISO 400. The correct exposure for the aurora varies widely. The variation in exposure in my own collection of aurora photos goes from 8 seconds, f/2.0, ISO 800, all the way to 30 seconds, f/2.8, ISO 6400—a difference of four stops. My starting-point exposure, however, is 10 seconds, f/2.8, ISO 3200. Finding exactly the right exposure within the ranges suggested here is a matter of making test exposures, then checking your histogram. See the sidebar if you need help reading a histogram.
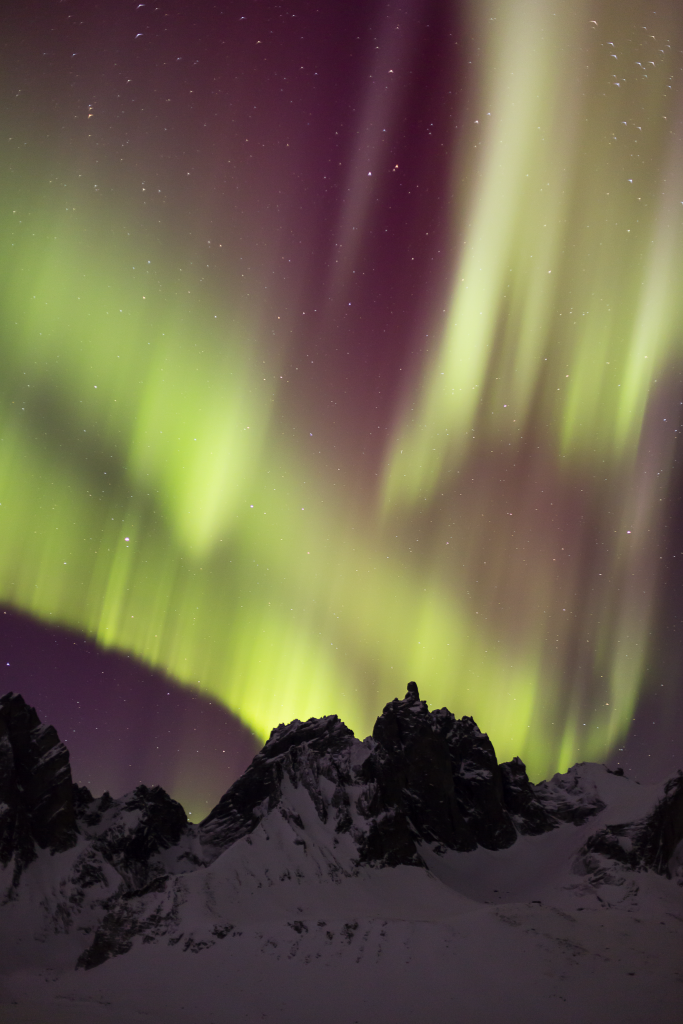
Figure 3-8: Aurora over Mt. Monolith, Tombstone Territorial Park, Yukon Territory, Canada. March 17, 2015, 10:49 p.m. Canon EOS 5D Mark III, Canon EF 50mm f/1.4 USM, 4 seconds, f/2.0, ISO 3200.
As in daylight, you should never use the image on the LCD to judge exposure. Instead, use the histogram. Once your eyes are dark-adapted, the image on your LCD, if displayed at a brightness level suitable for viewing in daylight, will be deceptively bright. It’s likely to mislead you into believing you have more shadow detail than you actually do. Dive into your menus, and turn down the brightness of your LCD. Then remember to turn it back up again when you’re done shooting for the night. If you forget, you may find that the LCD looks so dim in bright daylight that you can’t see it well enough to turn the brightness back up without taking the camera indoors or into deep shade.
Figure 3-9: Aurora over Tombstone Mountain,Tombstone Territorial Park, Yukon Territory,Canada. March 18, 2015, 1:07 a.m. Canon EOS5D Mark III, Canon EF 16-35mm f/2.8L II USM,3.2 seconds, f/2.8, ISO 3200.

Figure 3-10: Aurora over pond along the PreludeLake Nature Trail, Prelude Lake TerritorialPark, near Yellowknife, Northwest Territories,Canada. September 29, 2013, 11:30 p.m. CanonEOS 5D Mark III, Canon EF 16-35mm f/2.8L IIUSM, 13 seconds, f/2.8, ISO 6400.
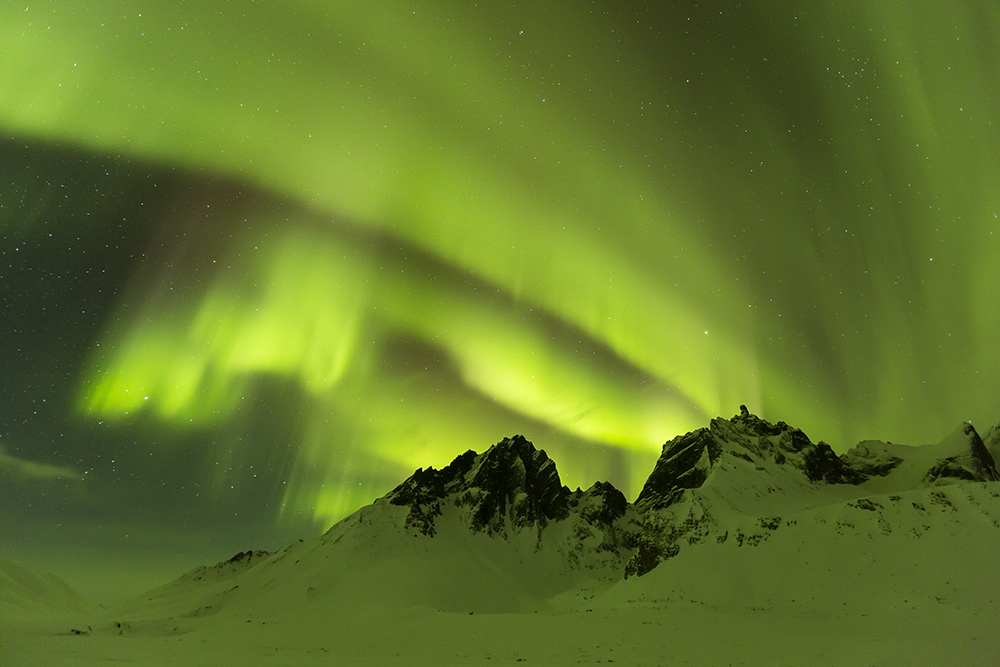
Figure 3-15: Aurora over Mt. Monolith, Tombstone Territorial Park, Yukon Territory, Canada. March 16, 2015, 12:36 a.m. Canon EOS 5D Mark III, Canon EF 16-35mm f/2.8L II USM, 8 seconds, f/2.8, ISO 3200.
As I mentioned in the previous chapter, the longest shutter speed you can use on a stationary camera (one not mounted on a star-tracker), is determined by the focal length of the lens. One handy rule of thumb for estimating the longest shutter speed you can use for a particular focal length is called the 500 rule. The basic idea is simple: the longest exposure, in seconds, that you can use before the stars make visible streaks in your image equals 500 divided by the focal length of the lens. For example, the longest exposure you can use with a 20mm lens is about 25 seconds (500 ÷ 20 = 25).
The chart on the next page assumes you are using a full-frame camera. If you are using a camera with a sub-full-frame or APS-C sensor, multiply the focal length printed on the lens by the appropriate crop factor, then use the result as the focal length for the purpose of this chart. For example, if you are using a 16mm lens on a camera with a 1.5 crop factor, multiply 16 by 1.5 to get 24. The longest exposure you can make with that lens without visible star motion is 21 seconds. Note that this chart assumes you are viewing a print made at normal resolution for high-quality output (file resolution of 240 to 300 ppi). If you zoom in to 100 percent on your monitor you will see very short star trails.