Enhancing or creating that glowing, just-after sunset blue sky
This is an excerpt from The Off-Camera Flash Handbook by Vanessa Joy, coming in April 2020.
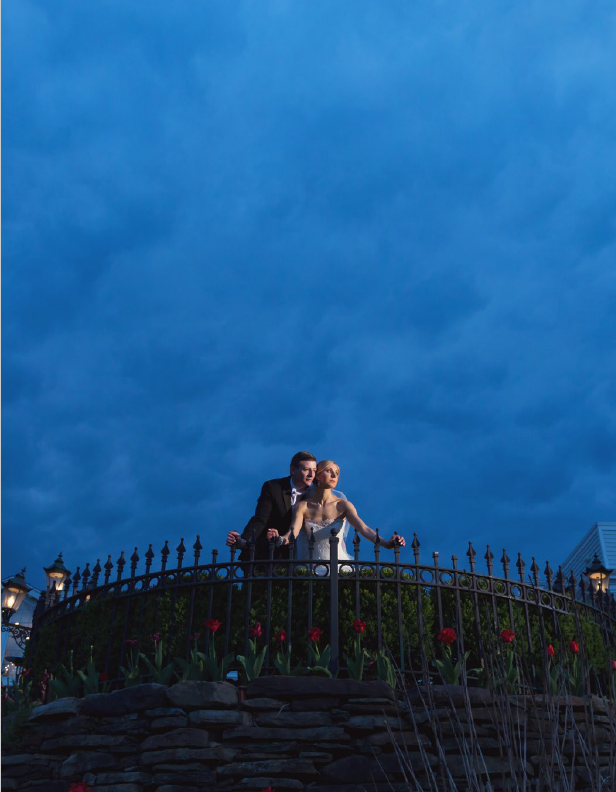
GOAL IMAGE I don’t know about you, but more often than not I miss the sunset photo. Not because I’m not prepared, but because I’m listening to a (potentially long and embarrassing) best man’s speech. There’s only a small window to capture sunset, but I love twilight even more (Figure 3.1).
No, I’m not referring to the epic love story with a vampire-werewolf-human love triangle (team Jacob, over here). I’m talking about the way that the sky glows that magically saturated blue just after the sunset colors have passed. It’s definitely my preferred “nighttime” shot (versus when the sky is pitch black).
I do advise that you take a look at Scenario 4, “Photographing a Sunset,” before reading this one. It is not completely necessary, but the photography principles are pretty much the same except for one neat little trick that turns the sky blue. Actually, you might want to read Scenario 5, “Making a Magenta Sunset,” as well. It all goes hand-in-hand.
Preferably, you’ll be trying this shot during actual twilight when the sky is blue so you don’t have to do too much to enhance it further. This will make it very easy to use a speedlight since you don’t have the sun to compete with. However, you can make this happen after twilight and even in the middle of the day if you want to. In fact, there’s a scenario on making it look like nighttime in the middle of the day in this book, so anything is possible.
To make this happen you have to play opposite day in the photo world. If you want a blue sky, then you actually need an orange gel to make it happen. It’s much easier to light your subject instead of the entire sky.
If you wanted to “blue” a photograph, you would turn down your white balance to a temperature lower than what the actual light in the situation would generally need to make the colors seem realistic. That’s all great until you put a person in the frame. They’re instantly turned into a very blue Smurf or Smurfette (#80sreference), or a member of the Kree race living on Hala (if you’re an Avenger’s Universe fan like I am). Sounds fun, but not so cool to your clients, especially if one is wearing a white dress that is now blue.
To balance out the color on your subject, you need to add the opposite color light. Think of a color wheel. Colors on the opposite side of the wheel, when put together, cancel out each other’s color and create a white light instead. The opposite of blue, for this purpose, is orange. Light your subjects with a Color Temperature Orange (CTO) gel to make them look like they have regular human skin tones.
The last thing you need to choose is the light modifier for your light. You absolutely can choose to not have one at all. Your light will be more direct and harsh looking. I prefer my twilight photos to have a more subtle light on my subject, so I use either a beauty dish or a softbox. However, I have used a grid if I need to position my light far away from my subject like I did in Figure 3.1. It’s all relative to what you’re trying to accomplish.
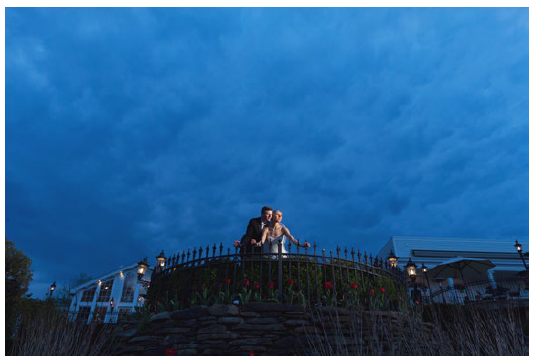
FIGURE 3.1 GOAL IMAGE. CANON 1D X, CANON 24MM 1.4, ISO 500, APERTURE 7.1, SHUTT ER 1/250
Step by Step
1. Position your subjects: Since we’re using one light in this example, I suggest placing your subjects so that their faces are both turned towards the light. Turn their bodies away from the light so that the front of their torsos go into shadow. It creates a slimming effect and more dramatic lighting.
2. Choose a lens: Lens choice is up to you and your creativity. Choose a lens that will enable you to show the most sky you can in the frame. There’s no point in turning the sky blue (or more blue) if it’s only taking up a very small portion of your picture.
3. Put modifiers on your light: Put on the Full CTO gel. I usually won’t go more orange than that because the light starts to look too unrealistic, but you are welcome use as much orange as you like. Also use the light modifier of your choice. This may suck up a lot of your light power, so keep that in mind.
4. Position your light: I typically shoot with my light to the right or left of my subjects at a 45-degree angle. Go even more to the side if you’re looking for something more dramatic.
5. Set your camera exposure: Set your camera exposure as if you’re taking a landscape photo of the nighttime sky. You may need to use a slow shutter speed. If that’s the case, consider using a tripod, placing your camera on the ground, or holding your breath and stopping your heartbeat to avoid transferring any movement to the camera.
6. Set the white balance: Because the flash is your main source of light and you’ve covered it with a Full CTO gel, you’ll set your WB to tungsten, or about 3200 Kelvin depending on the original color temperature of your light.
7. Set your flash power: I suggest setting your flash power to TTL +1 because of how many modifiers your light is passing through. With how TTL works, it theoretically shouldn’t be a problem, but I find that the image can turn out too dark so I compensate for that upfront. If you’re using a manual flash, start in the medium-high power range or use a light meter, and adjust up or down to your liking. Take a test shot and adjust your light to be more or less powerful according to your taste.
8. Look at your colors and histogram: Nighttime shots can be very deceiving when you’re solely reviewing them on the back of the camera. I’ve fairly often loved a twilight shot on the back of my camera only to find that the backlight was making it look much brighter than it actually was. Take a look at your histogram to make sure that it’s not too dark and that nothing is blown out. Adjust for more or less blue and light power as needed.
OPTIONAL: Add a rim light to the back of your subjects to further separate them from the background. I don’t typically gel this light because I like the blue backlight it gives.
Shot By Shot
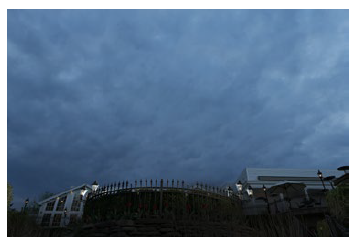
FIGURE 3.2 NATURAL LIGHT TWILIGHT SHOT. CANON 1D X, CANON 24MM 1.4, ISO 500, APERTURE 7.1, SHUTTER 1/250
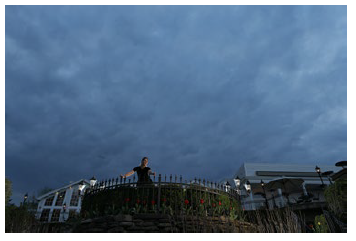
FIGURE 3.3 ADDING FRONT AND BACK FLASHES.
CANON 1D X, CANON 24MM 1.4, ISO 500, APERTURE 7.1, SHUTTER 1/250
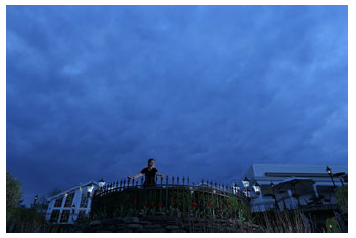
FIGURE 3.4 LOWERED WHITE BALANCE.
CANON 1D X, CANON 24MM 1.4, ISO 500, APERTURE 7.1, SHUTTER 1/250
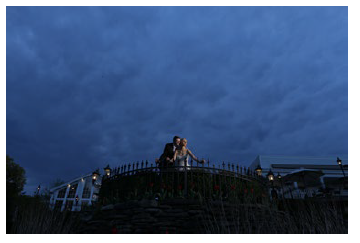
FIGURE 3.5 STRAIGHT OUT OF CAMERA IMAGE.
CANON 1D X, CANON 24MM 1.4, ISO 500, APERTURE 7.1, SHUTTER 1/250
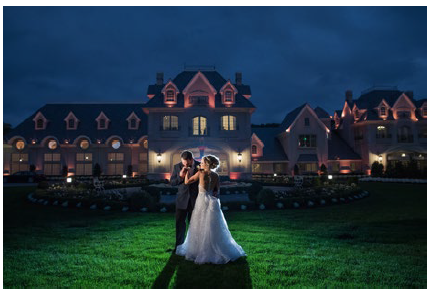
FIGURE 3.6 YOU CAN ADD AN OPTIONAL RIM LIGHT.
CANON 1D X II, CANON 24MM 1.4, ISO 1600, APERTURE 3.5, SHUTTER 1/100
Potential Problems
There some potential issues that you can run into with twilight images. Here are the a few that I have come across:
• Anything else in the photo that’s not lit by your CTO light will turn blue (note the blue building in the background of the first image in this chapter. That building is actually white). Avoid other objects in your shot by crouching low and shooting up toward the sky.
• You’re lighting the subject, but some of the other landscape elements won’t be lit and therefore will turn into silhouettes. Shoot at a lower angle to clean up your sky, or add CTO-gelled lights to your setup to light up other parts of the landscape.
• Check your histogram! I can’t emphasize this enough. Do not trust the back of your camera!
• Watch for motion blur if you’re using a slow shutter speed. Even if you’re locked down on a tripod, your subjects can move to create a bit of a ghosting effect. Or, do that on purpose and have fun with it!
Practical Uses
This is a great technique for enhancing the blue night sky that’s already there, or creating one if it’s not there. Getting a handle on color shifting techniques like this will do wonders for your photographic knowledge to make you feel more in control of situations. Give it a try with one light first and build up from there. The two-light method (adding the optional rim light) is my go-to lighting setup for nighttime shots. It’s a safety net that I have for any job that gives me confidence and creates an image that my clients look forward to having (and printing at a large size).