The following is an excerpt from Megan Meketa’s The Maker’s Guide to Cricut
Reads as cry-cut, sounds like cricket. Cricut brand electronic cutting machines can be life-changing, let me tell you! What might start out as a fun pastime of cutting vinyl decals, creating cards, customizing shirts, and making custom labels around your home can quickly become a passionate hobby or can turn into a small business. My point being, a Cricut machine and its possibilities can be whatever you want it to be. Get creative, explore your machine and the software, and let’s get making!

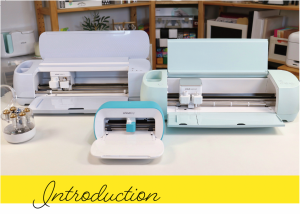
There are several Cricut models to choose from. The No. 1 question I am asked is, “Which machine should I buy?” My answer is, “If you could dream up what you would like to create in the next several months to a year, what would you include?” Check out the machines listed below to help narrow down your choice.
CRICUT JOY The smallest of the Cricut cutting machines. This little cutie is a whiz when it comes to making custom cards, but the Joy can do so much more. This machine can cut a wide variety of materials including cardstock, vinyl, iron-on, sticker paper, cardboard, and faux leather; and it can even cut lengths up to 20 feet long (of a repeated cut/pattern) when using Cricut Smart Materials. The Joy can also electronically write, which is a great option for making labels, cards, envelopes, and more. However, there are limits to Joy’s capabilities. The compatible materials list for the Cricut Joy is shorter than the other machines and there is no option for Print Then Cut, which is important to know if you plan on making stickers. Cricut Joy Smart Vinyl is 5.5˝ wide and the maximum cut width is 4.5˝ if using a Cricut Joy Mat.
CRICUT EXPLORE (AIR) SERIES These machines are full size and can cut more than 100 different types of materials. The Explore Air machines are a great option if you want to mainly work with cardstock, stickers, leather, vinyl, and iron-on materials. There is a blade for bonded fabric as well as a Deep-Point Blade that is compatible with this machine. The Explore machines have a dual tool holder, which means your machine can hold a Fine-Point Blade and a Scoring Tool or a pen at the same time. This machine can cut material up to 2mm thick. The dial on the Air and Air 2 machines only mentions some of the materials you can cut with these machines, but you can select the Custom option from the dial and it opens up a list with many more options when it comes time to Make It. The Air 3 model does not have a dial, but you will select your material from a list within Cricut Design Space. Unlike the first two versions of the Explore machines, the Air 3 is capable of cutting Smart Vinyl without a mat for cuts/designs larger than 11.5˝ × 23.5˝, which is the maximum size of the previous Explore machines.
CRICUT MAKER This machine is the cream of the crop! It has all the features of the other machines and more. My favorite things about this machine that the others don’t have are the blades and specialty tools for cutting more than 300 types of materials. Many of these tools are used for the projects within this book, like the Rotary Blade for cutting felt and the Knife Blade for cutting craft foam. While the Explore Air 2 has blades that will work for felt and foam, I’ve found the Maker delivers the smoothest results (more on that when we get to those projects). Other than the blades and tools that are exclusive to the Maker, you can even cut wood with this machine. Balsa wood and basswood are two of the most common types of wood you can use in your Maker, up to 3/32˝ thick. Like the Explore machines, the Maker machines have a dual tool holder, which means your machine can hold a blade and a pen at the same time. The Maker 3 is capable of cutting Smart Vinyl without a mat for cuts/ designs larger than 11.5˝ × 23.5˝, which is the maximum cut size of the original Maker machine.

Let’s chat about heat presses. A heat press is a machine that uses heat and pressure to bond materials. Heat presses are commonly used with iron-on material and garment customization, but can be used for so much more. You can even use a heat press on canvas, socks, shoes, wood, and the list goes on. I use two different presses in the projects that follow: a handheld EasyPress Mini and a 9˝ × 9˝ EasyPress 2. These aren’t the only options for presses though. We’ll start small.
HANDHELD PRESSES The EasyPress Mini or mini-iron is exactly what you need for those tiny personalized projects. The small size of these presses helps to monitor and manage the amount of heat you are applying to delicate projects.
SPECIALTY PRESSES Hats, mugs, and tumblers, oh my! Some full-size heat presses come with attachments that can be used to create a variety of projects. If you have a particular passion, it may be a wise investment to focus on one specific type of press. Cricut has a mug and a hat press, both of which are fun and user friendly.
EASYPRESS COLLECTION These come in a variety of sizes and colors. These handheld presses are a great option if you prefer a more portable heat press. They are available in 9˝ × 9˝ and 12˝ × 10˝ sizes. (Note that the 6˝ × 7˝ EasyPress is no longer available.) The 9˝ × 9˝ EasyPress is great for tote bags and other medium-sized projects, while the 12˝ × 10˝ is perfect for larger designs on shirts or canvases.
FULL-SIZE HEAT PRESS This is the way to go when you need more pressure or a larger heat plate. There are many options available across the Internet and in craft stores. Cricut also offers the Autopress machine, which is aimed toward professionals who produce batches of shirts or other goods. Full-size heat presses provide a great amount of space to make adult shirts and other items that need to be mass produced.
The above covers some essential points about each of the Cricut machines and tools. For more detailed information, check out help.cricut.com.

Creating custom bookmarks with your Cricut is a breeze! Grab some faux or genuine leather and find your favorite witty book-related pun and you’re all set. For this bookmark we’ll be using Cricut’s Foil Transfer tool to create a sophisticated keepsake.
Materials Needed
Faux or genuine leather
Foil Transfer tool
Foil Transfer sheets
Washi or painter’s tape
Craft knife (optional)
Ruler (optional)
Self-healing mat (optional)
Glue gun or leather adhesive
Machine Compatibility
Any Cricut machine
Images Used
Stack of Books #M231CE56F
Rectangle #M7F037EA
Oval #M2AAB3D97

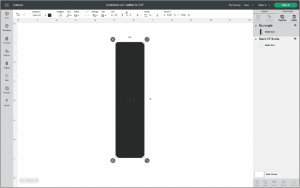
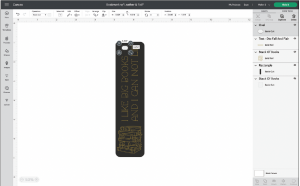
Start with your overall desired shape. If you choose a rectangle, decide whether you want rounded or square corners. Add the shape to your Design Space canvas and size it to your liking. I went with a rectangle with rounded corners and sized it 1.5″ x 6″.
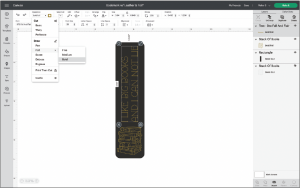
Now comes the fun part of adding your text and any images you like by using the Text tab on the left side of your canvas. Adjust the sizes and alignment of your design elements at this time. In the image here, you can see in the Layers panel that the Basic Cut layer of the book image is hidden. You can hide layers by tapping the eye/hide icon. In the Operation dropdown menu, change the text and image by selecting Foil, then Bold.
PRO TIP
Use a font that is labeled as a Writing font. This will give the best results for creating your foil text.
What’s a bookmark without a tassel? Okay, it can still be a bookmark, just a little less fun. If you’d like your bookmark to have a tassel, add a shape to serve as the hole to attach your tassel. I chose an oval because I’ll make my tassel out of leather scraps and need a little more width. More on that in a minute.
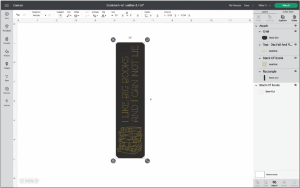
When your design is the way you want it, in the Layers panel, click on all the layers and then click on Attach, as shown here. (You can delete the Basic Cut layer that will be hidden, but you don’t have to.)

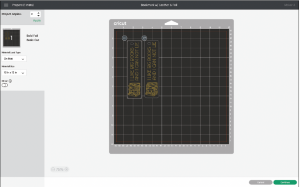
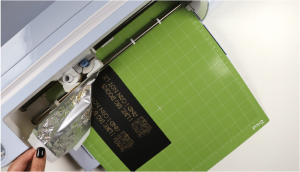
Now you’re ready to click on the green Make It button. Once on the Make It screen, move your project down into the grid a bit. I brought mine down just a bit more than 1˝ from the top and 1˝ from the left side. Keep this positioning in mind as you place your leather onto your mat. The reason for doing this is to give some clearance around your material so it doesn’t hit the star wheels (small white wheels) on the bar of your machine or leave imprints on your material.
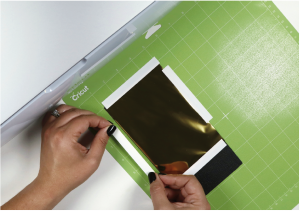
The Foil Transfer tool process is a bit different than just cutting your material straightaway. You’ll need to start by laying the foil over your leather material, keeping in mind where your leather and the designs are on the Make It screen. Using the tape that comes with the foil transfer sheets, or washi or painter’s tape, make sure you tape all four edges of the foil down. Try to make the foil as smooth and secure as you can—if it’s not taped well, your foil will shift.
Before you start your machine, swap out your Fine-Point Blade for the Bold Foil Transfer tip (the one with three lines), then follow the prompts on your screen. When this first process is complete, remove the foil but do not unload your mat. Just slide the foil out from underneath the carriage. Next, swap out the Foil Transfer tool for your Fine-Point Blade and then cut the material.
When the cutting process is complete, you can begin to assemble your bookmark. All it needs now is a tassel. You can make a tassel out of yarn, ribbon, or even the leather scraps from this project. If you’d like to create your tassel out of leather scraps, read on for a few suggestions.

Faux leather is perfect for a bookmark because it is thin enough that it won’t cause your book to warp or bulge, but it is sturdy enough to use book after book. Have fun with the types of leathers, designs, and text to customize bookmarks for all the book-loving people in your life!
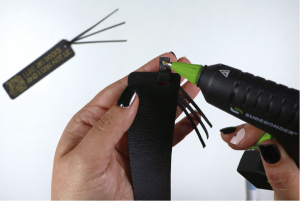
Using the leather scraps as the tassel also makes this bookmark a bit extra. You’ll need a ruler, craft blade, and a self-healing mat. You can use scissors for the next step, but it might become a bit tedious. Using the excess leather (scraps from your project), create a small, thin rectangle to use as your tassel. See the image above for an example of what your leather scraps may look like and what section may be useful to use as your tassel.
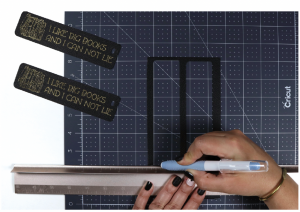
From there you can make a small slit about 1/3˝ in from one end. This will be used to create a lark’s head knot. I took this a step further and split the rest of the leather in thirds lengthwise to create a bit of a fringe. Just be sure to leave some room between the initial slice and your new fringe. Then loop it through the hole in the bookmark.
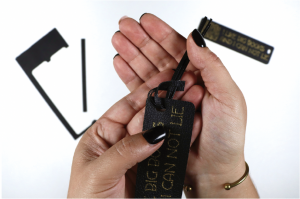
Secure the end of the leather to the back of the bookmark as shown here. You’re all set with a unique and personalized bookmark!