The following is an excerpt from Adam Pratt’s Declutter Your Photo Life
What Is Curation?
We usually hear the word curation in relation to museums and art galleries, but art curators aren’t focused on throwing away the mediocre pieces. A curator selects the best material to put on display. There are thousands of pieces of art and history in warehouses, basements, and private collections, but in a museum we see the best items only.
This is instructive for us as photographers because most people use the word culling, which is more about deleting your bad photos. Honestly, most of us are taking so many photos that we can’t afford to just cull out the bad ones. Instead, you should keep the best and delete the rest. Turning the curation process upside down is a big shift in thinking, but it will be a more delightful experience for you, and you will create a better photo archive for posterity.
If you start with clear criteria, then the process is simpler, even pleasant. For personal photo collections, these are the kinds of photos you want to keep:
• Telling stories: People are using their phones to take a lot of photos of random things, such as their lunch or shoes they might buy, but you want photos and sequences that tell stories.

FIGURE 11.1 Delete the random reminder shots, and focus on the photos that tell stories.
• Connecting with people: Focus on photos that reveal relationships, show personal interaction, and capture human reactions.
• Capturing emotion: A photo of a child posing with a gift is fine, but I’d rather have the photo of them showing genuine surprise.

FIGURE 11.2 There’s nothing wrong with a posed photo, but everybody enjoys a photo that highlights human interaction.

FIGURE 11.3 A great photograph captures emotion, not just the scene and subject.
• Preserving memories: Not every photo has to be technically excellent. It’s okay to keep a photo even if it’s not a great photo, but is still a great memory. A mediocre photo is better than no photo.

FIGURE 11.4 There are many things I wish I could change about this photo, but it’s the only image I have of this person.
• Not just smiles: Sad photos are allowed. Sometimes life is hard, and it’s okay to take photos of those days and keep them. One of my favorite photos is when our son Josh wasn’t feeling well and my wife was comforting him tenderly. It’s not a happy photo, and nobody is smiling or saying cheese, but it’s a beautiful photo that captures a mother’s love for her son.

FIGURE 11.5 You don’t always have to say cheese!
• Good composition: Make sure there’s a clear subject that is well positioned within the frame, and that nothing’s sticking out of the heads of your subjects. Taking a moment to compose your shots can result in dramatically better photos.

FIGURE 11.6 An alarming number of photos I organize for clients don’t have a clear subject, so I encourage folks to slow down, compose their shots, and make better photographs.
• Good exposure: Common mistakes to avoid are photographs that are too dark, too bright from harsh flash, or backlit against a window. In Adobe Lightroom Classic you can use the Histogram panel to evaluate if a photo is underexposed, overexposed, or just right.
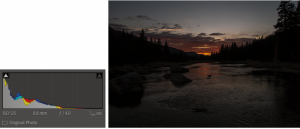
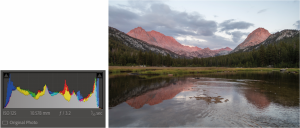
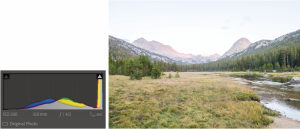
FIGURE 11.7 Most photos with good exposure will have a histogram that looks like a mountain range spread from left to right, with no spikes on the left (shadows) or right (highlights).
• Multiple angles: It can be helpful to capture the same scene from multiple angles. Sometimes the best shot is from an unexpected perspective.

FIGURE 11.8 After I finished running the Oklahoma City Marathon, I spent some time taking photos of the memorial of the 1995 bombing. I adjusted my camera and moved my feet to find new angles on this special place.
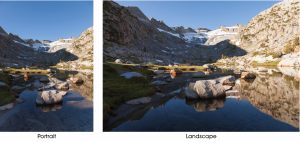
• Multiple orientations: If you plan to use your photos for creative projects, capturing a portrait and a landscape version of the same shot gives you more creative freedom. For example, the portrait version of the shot below might look great on a canvas gallery wrap, but the landscape would work better in a slideshow because you won’t have those unsightly black bars on the edges.


FIGURE 11.9 Shoot and edit with multiple
orientations, and you’ll give yourself more
creative options.
• Different crops: I tend to shoot pretty tight, but I’ve learned to step back or zoom out. Capturing both the intimate details and the wider scene helps you tell a better story.

FIGURE 11.10 This portrait sequence shows how different crops can reveal the scene and details of a moment.
The best photos make you feel something, and these are the criteria I have in mind as I curate photos. Depending on your interest and skill in photography, you might have other goals that are important to you. If you’re a portrait photographer shooting families, a commercial photographer shooting assignments, or a wedding photographer shooting the big day, then your curation criteria might be different. Decide if you like my criteria or you’re going to set your own, and then write them down so they guide your curation process.
When to Curate
As usual, I believe that when you curate your photos matters, and it’s different depending on whether you’re working with physical or digital photos. My curation strategy is the same, but the timing is different:
• Physical photos should be curated before you scan them, because you don’t want to waste time and money scanning photos you don’t care about.
• Digital photos should be curated after you’ve deduplicated your collection (see chapter 5), but before you organize photos with metadata and consistent filenames (see chapter 12). You don’t want to waste time adding keywords to digital photos that you’re just going to delete, right?
Delete the Duds
I’m obsessed with efficient workflows, so my goal is to accomplish the most amount of work in the least amount of time. A great way to achieve efficiency in the curating phase of photo organization is to delete entire categories of images when possible. For example, can you delete:
• All the PNG files from your collection? PNG files are usually screenshots and internet memes that can be deleted. Use the Library filter in Lightroom to isolate these in an instant.
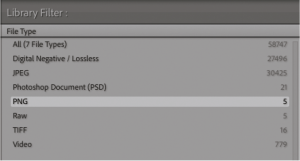
FIGURE 11.11 Use the Library Filter (Command/Ctrl+L) to isolate photos you might want to delete based on file type, camera model, or date.
• All the files taken with a specific camera or lens? Again, the Library filter is your friend.
• Photos of food, shopping lists, shipping labels, and other reminders? Are there other categories of photos that you shot for convenience but don’t need to keep?
• Bad photos? After these broad categories, there still might be lots of photos to delete that are out of focus or suffer from bad exposure, flash failures, poor composition, blinking eyes, unclear subjects, or objects blocking the lens. These distract from your good photos, so delete them ruthlessly.
I use Adobe Lightroom Classic to preview lots of images and delete the duds quickly with these shortcuts:
1. Select images you plan to delete and press the X key to flag them as Rejected. Notice that rejected images aren’t deleted immediately, but display a small black flag and are grayed out in the Grid view of the Lightroom Library module.
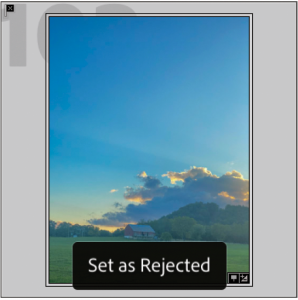
FIGURE 11.12 Select photos you want to delete and press the X key to mark them as rejects.
2. If you change your mind and want to keep one of the photos you marked as a reject, select the image and press the U key to unflag it.
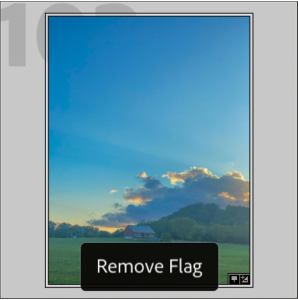
FIGURE 11.13 Press the U key to change your mind about any rejected photos.
3. Enable Auto advance by pressing the Caps Lock key, and Lightroom will automatically advance to the next image after you’ve marked it. This might not seem like a big deal, but when you’re reviewing large photo collections, it reduces your keystrokes by fifty percent.
4. When you’re ready to delete the rejected images, choose the Photo > Delete Rejected Photos command and click “Delete from Disk.” This will remove your rejected photos from your Lightroom catalog and put them in the Trash (macOS) or Recycle Bin (Windows) on your computer.
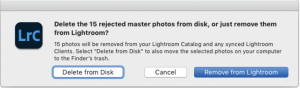
FIGURE 11.14 When you’ve made your final decisions, delete the rejected photos from disk.
If this process makes you nervous, don’t forget that you have a backup of all your gathered files. But there’s no need to worry. Based on the projects we see at Chaos to Memories, most people don’t cull aggressively enough. Right now you’re just sorting through the “junk” pile, so it’s a great time to practice ruthless culling!
Save the Best
Now that the duds are gone, it’s easier to focus on saving your best and most memorable photos. To select your best photos, use the criteria I listed earlier in this chapter and follow these steps:
1. Select your best photos and press the P key to flag them as a Pick. Notice that picked images display a small white flag icon. This doesn’t move or change your files, but it marks them with your intentions to keep them as your best photos, and you can still do a second review and change your mind.
2. When you’re selecting your best images, consider working from the last photos to the first in each batch, which is opposite from how most people do it. When you’re taking photos, you typically start with a test shot, then shoot a couple more, and finally stop shooting when you’ve captured your best shot. So if you’re looking for your best photos, it makes more sense to work from the last photo to the first.
3. If you change your mind and don’t want to keep a Pick image, select it in the Library module and press the U key to unflag it.
4. Now run the Library > Refine Photos command, and all of your unmarked images will be marked as Rejected and all your Pick images will become unmarked.
Delete the Rest
If you’ve followed my workflow to this point, then your dud photos have been deleted, all your best photos are unmarked, and all your unremarkable photos have been flagged as Rejects. If you’re feeling good about your decisions, then choose the Photo > Delete Rejected Photos command and click “Delete from Disk.”
If you’re feeling trepidation about deleting too much, follow these steps to double-check your work:
1. In the Library module of Lightroom Classic, make sure View > Show Filter Bar is enabled.
2. Click on Attribute in the Library Filter, and then click the black flag attribute to reveal only the photos that are marked as Rejected from the previous step in the workflow.
FIGURE 11.16 Use the Library Filter to review all rejected photos before making a final decision.
3. Review your rejects as needed, and if you decide you want to keep any of the rejected images, select them and press the U key to unflag them.
4. After reviewing your photos, click None in the Library Filter at the top of the Grid view.
5. To delete all your unremarkable and rejected photos, run the Photo > Delete Rejected Photos command and click “Delete from Disk.”
6. At this point, you should have just your best photos left, leaving you with a huge sense of relief that you’ve kept the photos you care about, and all the duplicates and duds are gone. The next step is to empty the Trash (macOS) or the Recycle Bin (Windows) to permanently purge your deleted files. The last step in this phase is to celebrate the joy of decluttering your photos. Well done!
Curation Process
The curation process is literally thousands of comparisons and decisions. Doing this for a living, I’ve become very efficient at it, but it’s still exhausting and complicated. It can raise questions about the quality of your photography, your identity as an artist, and even the complexity of relationships. Here’s what I’ve learned about the curation process that will help you do this better and faster:
• Set a goal: If you have ten photos of the same scene, do you want to keep one, five, or nine? How aggressively do you want to curate your photos? Decide how you want to approach this phase and set boundaries and expectations for your curation process.
• Work in small batches: Our average Chaos to Memories client has more than 100,000 digital photos in their collection. If you’re anywhere close to this (or over), then curation feels like a daunting task. The reality is that you can’t evaluate 100,000 images at a time, so breaking it into smaller batches is essential to tracking your progress, experiencing success, and not feeling overwhelmed. I organize photos chronologically, so I usually curate photos one day at a time, one year at a time. With practice, you’ll find a pace and process that works for you.
If you’re catching up on years or decades of photos, it’s especially important to tackle them in bite-sized chunks. For example, most people started using digital cameras in the early 2000s, so that can be a great place to start. You probably took fewer photos in the early 2000s than you do today, you’re more removed from them, and you can feel a sense of progress as you work through your photos year by year. By the time you’re working on recent years, when you might take thousands or tens of thousands of photos a year, your curation habits and decision-making skills will be fine-tuned.
• Multiple passes: It can be hard to make all these decisions, so remember that your initial edits are not carved into stone. You can make multiple passes on one batch and change your mind. Making many passes is probably evidence of too much indecision, but with practice you’ll get better.
• Take breaks: If you’re experiencing decision fatigue, take a break and come back later. Often, decisions that are hard on Monday become easier on Tuesday. Just give it a day or a week, whatever it takes, and return to the project with fresh eyes.
• Leave options: It can help to have multiple images of the same scene, such as portrait and landscape orientation, wide and tight zoom, serious and silly. If you use your photos for creative projects such as photo books, these options are especially helpful. I’m all about curation, but I don’t want you to be so aggressive that you regret it later because you’ve limited your ability to complete creative projects and tell stories.
• Pretend you’re selecting a magazine cover: Imagine you’re a world-famous photographer submitting images for a magazine cover. You’re curating your best work and submitting two to three images, not everything you shot of a given subject.
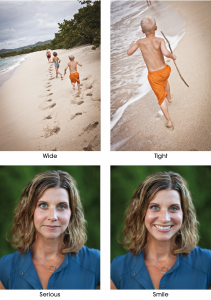
FIGURE 11.18 I encourage you to keep just your best photos,
but don’t curate so aggressively that you limit your options for creative projects.
• Toss the trash: When you’re done curating, make sure you actually delete the files and move on. Keeping your rejected files is the digital equivalent of hoarding. If you’re afraid to delete your digital trash, take a note from home organizers who set stuff aside for a week to see if it’s missed. Try this with your digital photos, then revisit your photo archive after a week. I expect you’ll feel more joy and freedom about preserving your best photos, and you’ll be convinced it’s time to empty the trash!
Curating Physical Photos
When you curate digital photos, you just delete them and—poof!—they disappear from your hard drive. With physical photos, there are other considerations because you’re dealing with physical objects. You have four options when curating physical photos:
• Discard: If they’re duds or photos you don’t care about, you can discard or destroy them. Unfortunately, most photo prints, slides, and negatives cannot be recycled. You can just toss them out with the trash, or if you’re concerned about privacy, you can shred them. But don’t mingle shredded photos with recyclable paper.
• Distribute: If you have double prints or photos that aren’t meaningful to you, consider distributing them to family or friends who might appreciate a blast from the past.
• Keep and scan: For the photos you want to keep, I suggest you get them scanned so they’re easier to enjoy, share, backup, and use in creative projects. Keep matching prints and negatives together, and keep any envelopes, binders, or boxes for the clues they might contain. There is a lot more information about scanning in chapter 10.
• Keep and don’t scan: Sometimes you’ll have physical photos you want to keep, but you don’t want to spend the time or money to scan them. In this situation, I suggest you keep them with the rest of the photos from that roll or batch, but turn them backward in the stack. This keeps everything together and organized, but it makes it clear which ones you want to scan and which ones to skip.
TIP Scan your photos and check them for clues before you discard any double prints.
Figure 11.29 shows four identical prints of my wife’s grandfather serving in World War II, each with different flaws and notes. From these four prints, I was able to gather names, dates, and other details, along with the best possible scan before deciding what to do with the originals.

FIGURE 11.29 Get the best possible scan and all available clues from double prints before you decide what to do with the originals.
Curate with Purpose
The deduplication process deletes lots of photos quickly, but the curation process takes more time and demands your brain and your heart. Making these decisions means you must look at your photos with a critical eye, but a thoughtfully curated photo archive is a joy for you and a blessing to others.
Ansel Adams, one of the greatest photographers of all time, wrote, “Twelve significant photographs in any one year is a good crop.” I’m not suggesting you should keep only your best twelve photos from each year, but I think we can all learn from Ansel to slow down our photography, compose more carefully, and curate more purposefully.