The following is an excerpt from Colin Smith’s The Photographer’s Guide to Drones, 2nd Edition
Panoramas
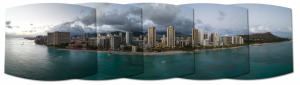
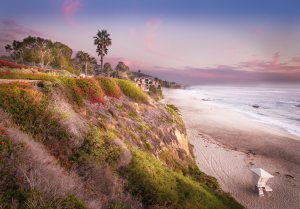
One of the most stunning landscape shots you can get from a drone is a panorama. A panorama is a series of photographs that are assembled, or “stitched” together, to create a larger photo. The main reason most people shoot panoramas is to capture an entire vista that won’t fit in the lens in a single shot. An additional benefit to panoramas is a larger image with more details, which can be printed at large sizes. Some drones have the ability to shoot panoramas automatically and quite often that works just fine. At other times you may want more control over the composition of your panorama, or you wish to shoot bracketed panoramas, which isn’t a common option currently for an automatic shot.
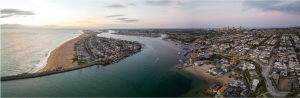
4.30 Panorama
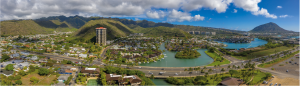
4.31 Panorama
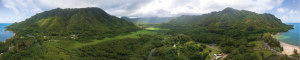
4.32 Panorama
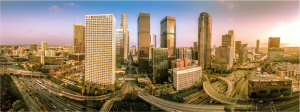
4.33 Panorama
Traditionally, the rule for shooting panoramas is to rotate the camera on the point of no parallax, which is called the nodal point. Try holding an object or your finger close to your face and close one eye. Now switch eyes and see how far the background moves in comparison to the object. This is known as parallax and is a key element in our depth perception. Now try holding the object farther away from your face and repeat the eye exercise. Notice that the shift is less marked. Parallax is reduced with distance and almost disappears at about 30 feet. Because you are generally shooting panoramas from a greater distance than a traditional tripod on the ground, parallax is no longer the main issue.
Another traditional rule of panoramas is a 30 percent overlap. For several reasons—wider lenses, more of a fisheye effect on some lenses, drifting position while rotating the drone, and so on—I shoot for more of an overlap. I personally shoot a 50 percent overlap with smaller cameras such as the Phantoms. Overkill? Maybe, but at least I have options, and I find I get a lot less doubling and weird stitches with this method. I also have less stretching of objects in the image. The Phantom 4 has a 94-degree field of view (84 on the Mavic 3), which changes the angle of view between images very quickly while rotating.
When shooting with a longer lens, such as the Zenmuse X5 on the Inspire 1 Pro or the Mavic zoom, the excessive overlap isn’t needed.
To capture this kind of shot, I figure out what I call my “shooting rectangle.” Corner to corner, how wide an area do I want to capture and how tall? A key part is the distance I choose to shoot from. At 2,000 feet from my subject, I might get the shot in three images; at a lesser distance, it might take six shots to achieve the same width. These images are not the same. The closer shot will have more distortion and bending, whereas the shot from farther away will appear more natural, but with less detail. This is something you will learn with practice.
It’s very important when shooting a panorama to make sure that your camera is level with the horizon. If the camera is tilted, you can get a wavy horizon or weird stair-stepping in the panoramic merge, or it could fail altogether. If you are having issues with leveling the camera, try putting your drone on a perfectly level surface that’s free from magnetic interference, and run a gimbal calibration. You can also offset the camera tilt in the DJI Fly app or whatever software you are using. If the tilting is caused by a camera balance issue, taping a coin to one side of the camera is a hack that can work.
4.34 Overlay Diagram
Bracketing:
HDR, Capturing the Full Range
How often have you looked at a beautiful scene and photographed it, but then been disappointed later when you saw the photograph? Instead of the beautiful sunset, there is a solid white blob, and the light dancing off the sand is just a dark expanse. This is because of a limitation called dynamic range. The human eye can see a wide dynamic range and is able to adjust very quickly. This is why we see an astonishing amount of detail even in very bright light while also seeing a lot of detail in the shadows.
The sensor on a camera isn’t capable of capturing the same amount of information. In a high-contrast situation, such as sunset or nighttime, when you expose for the highlights all the darker areas turn solid black. If you expose for those shadows, all the highlights turn pure white with no detail. This situation shows the limits of the dynamic range of the camera. Because it’s so early in aerial camera development, many cameras have less dynamic range than their larger siblings, but it’s getting better very quickly. Camera quality has increased substantially in the time since the first edition of this book was written. Shooting in RAW definitely helps capture more dynamic range—certainly enough for an overcast day. However, when it comes to capturing a bright sky and dark ground, even the most sophisticated cameras struggle to have enough dynamic range.
The solution is HDR, or high dynamic range. This is accomplished by shooting multiple photographs at different exposures to capture the entire visible spectrum of light. These photos are then combined into an HDR image that contains all the details in both shadow and highlight. Some cameras do auto HDR, but I avoid these because I prefer to have more control. This doesn’t mean you can’t use these modes, and I’m sure they will improve after the time of this writing; I may use them myself in the future.
My preferred method is to shoot multiple photos at different exposures and then use Lightroom or Photoshop to make the HDR images later, in post. The steps for merging them are included in chapter 7. For now, I’m going to tell you how to shoot these images.
In a perfect world, I would shoot from three to five images that are +/- 2 stops apart (Figure 4.35). Let me explain. In photographic terms, an f-stop is how we measure exposure, or more correctly EV (exposure value). Say you shoot an image and want to overexpose it by one stop, or one EV. This means that you double the amount of light that hits the sensor. If you want to underexpose by one stop, or one EV, you halve the amount of light that hits the sensor. You can control how much light hits the sensor in four ways:
• Change the ISO. This is the sensor sensitivity.
• Change the shutter speed. This is how long the light strikes the sensor to make an image.
• Change the aperture. This is how much light can enter the camera at once (the size of the opening of the lens). Many aerial cameras don’t have an adjustable aperture.
• Add an ND (neutral density) filter, which uses tinted glass to reduce the amount of light that comes into the lens.
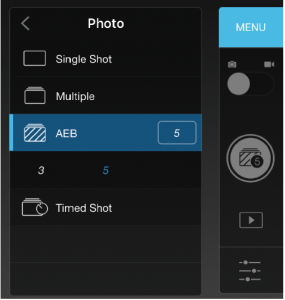
Generally speaking, for HDR the best way to vary exposure is by changing the shutter speed. Most cameras have AEB (auto exposure bracketing) so that you don’t have to physically change the shutter speed between photographs. At the time of this writing, all the DJI cameras, through the DJI Go app, are capable of shooting AEB. It’s under the camera settings (Figure 4.36).
The DJI Go app doesn’t allow you to change the amount of the bracket; it’s set to approximately .7 stops (I have seen it vary from .66 to .7). Because of the small amount of variance, it’s best to shoot five images. This will capture a wider dynamic range. In the future, if they allow you to change the bracket amount, set it to two stops +/- and just shoot three exposures.
When AEB is selected, shoot your images like you normally would. You’ll hear the camera shoot multiple images. You don’t need to do this for all photos, just when there is a lot of contrast, such as a bright sky against a shaded landscape.
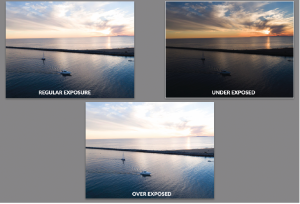
4.35 Bracketed exposures
4.36
4.37A Example of an HDR image
4.37B Example of an HDR image
Panoramic HDR
One of the things I’m asked about daily on social media is how I make my HDR panoramas. One image I posted recently was comprised of 115 images. Why 115 images? And how do I shoot that? Because of my background in visual effects, HDR panoramas aren’t new to me. I was shooting these kinds of images years ago on a panoramic head with my DSLR and building 360-degree HDR spherical environments that could be mapped to the inside of spheres in Maya. The technical side is much easier with drones, but the execution is more difficult because the precision isn’t the same—it’s the difference between a nodal-calibrated tripod on the ground with rotation clicks and a satellite-stabilized drone in the sky.
As I have already described, I shoot bracketed photographs so that I can capture more detail simultaneously in the highlights and shadows. This is particularly true with sunsets and sunrises, as visual contrast is much higher at these times. Because of the current limitation on the DJI bracketing options, I often shoot five images for each frame to capture more detail in the sky and ground. If we divide 115 by 5, it comes to 23 frames to make the panorama. I actually attempted to do three levels of eight photographs in this case, but one of them didn’t come out right. In many cases it doesn’t matter if one or two don’t work if you have enough overlap. The goal is to completely cover the area that you want to capture. This really isn’t new. When Photoshop came out with auto align, we used to “spray” photos and stitch them together to see what would happen. The truth is that you don’t have to have an even number of photos in each stack in order for Photoshop to stitch them together. An even number will get you a better crop though, without losing so much of the image.
TO CAPTURE THIS KIND OF SHOT
1. Set your camera to AEB (five exposures on the current DJI Fly app).
2. Determine your shooting rectangle, corner to corner.
3. Rotate your copter to determine your shooting radius.
4. Tilt the camera to an upward position and rotate to make sure everything is in frame.
5. Tilt the camera to the lowest point and rotate to make sure everything is in frame.
6. Starting with the top row, shoot your brackets right to left (for sunsets on the West Coast; for sunrises, I go the opposite way). I shoot this way because the sun is much brighter and throws off the exposure settings. So I shoot the sun as the last image and sometimes use Exposure Lock for this frame (not always; only if it’s radically different than the rest of the shots).
7. Tilt the camera down and shoot the middle row.
8. Tilt the camera down and shoot the bottom row.
TIPS
• Wait a few seconds for the drone to stabilize between shots, or you could get blurring due to motion caused by rotating the aircraft.
• Shoot in an S-shaped pattern, like mowing the lawn.
• Use the grid overlay on the app to align the shots and plan your camera tilts.
• Use the fastest SD card you can get to minimize waiting time between shots.
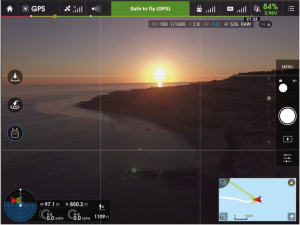
4.38 Grid overlay
Don’t be disappointed if your first few attempts don’t work. It takes a lot of practice to nail these HDR panoramas, and you will get better over time. I also like to use Lightroom to at least visualize the shots. Lightroom can quickly assemble a preview so that you can tell if the image is going to work or not. Most of the time, I use Lightroom to assemble my HDR panoramas, because it’s quick. Camera Raw in Photoshop works the exact same way. You can also do this in Photoshop or a dedicated program such as PT GUI for more control.
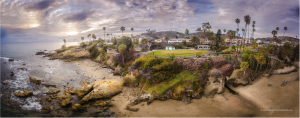
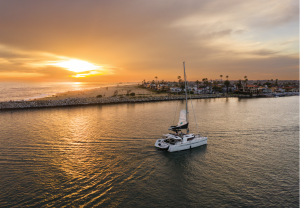
4.39 Final HDR panorama