The following is an excerpt from Scott Kelby’s The Flash Book. Enjoy these flash tips to improve your images!
Why We Need to Shoot in Manual Mode
For my everyday photography (travel, sports, portraits in natural light, etc.), I generally shoot in aperture priority mode (A or Av mode on most cameras), where I pick the f-stop and my camera automatically picks the proper shutter speed for me. But, when it comes to using flash, this is when I switch to manual mode because, believe it or not, it’s easier.
That’s right, it makes using flash a breeze, and what we do in manual mode is so easy, even if you’ve never shot in manual mode before, you’ll totally “get” this. One big reason it’s easier is that, with the flash system I’m teaching you, you’ll have a starting place (a specific shutter speed setting and a starting f-stop) each time you use your flash (in fact, if you’re shooting indoors, you might not even change these settings at all—you just dial ‘em in and those are your settings for the shoot. They’ll stay the same the whole time.
The only thing you’ll do is take a test shot, and if you think the flash looks too bright, you’ll turn down the brightness setting of the flash. If you think it’s too dark, you’ll turn it up. How simple is that?). So, even if you’ve never shot in manual before, you will have absolutely no problem doing the simple stuff we need to do using the flash system this book is based upon. Okay, let’s start with what controls what. There are three controls on your camera that affect your flash photography, and we’ll start with shutter speed on the next page.
Shutter Speed Controls the Light in the Room
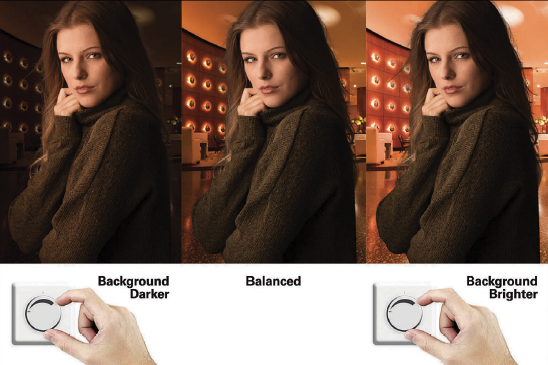
Take a look at the image above, in the center. The flash on her is pretty balanced with the light in the room behind her, but if I decided I wanted that light in the room darker, in real life, I’d walk over to the dimmer switch on the wall and turn down the lights, right?
That wouldn’t affect the flash, it would just affect the lighting in the room, right? Well, that’s exactly how shutter speed works. If I wanted the background behind her darker, I would raise the shutter speed, maybe up to 1/200 of a second or even 1/250 (if my flash allows me to go that high and still stay in sync). Doing that darkens the room light behind her, just like turning down the dimmer switch on the wall. The problem with this awesome metaphor is there’s no dimmer switch when you’re shooting outside, but that is precisely why this technique is so awesome: because it works outdoors, too, making the background behind your subject darker, even outside. (I know. Mind blown!) Now, just so you totally get this, take a look at all three photos above. Notice that even when I change my shutter speed, and the background gets darker (by raising the shutter speed to a faster amount), or brighter (by lowering my shutter speed to maybe 1/60 of a second, or 1/30 of a second, or even less), the amount of light from my flash hitting my subject doesn’t change. It’s the same amount of light on her in all three shots. That’s why you can think of shutter speed as the dimmer switch for the existing light whether you’re inside or outside.
F-Stop Controls the Brightness of the Flash

You already know there’s a power control on the back of your flash, and you can turn the brightness (power) up or down using that control. But, what if you’re just an incredibly lazy person, and you don’t want to change the power of your flash using the up/down control? Well, then you’re going to love the fact that you can change your f-stop to brighten and darken the flash without affecting the existing room light much at all (or the natural light outdoors). Take a look at the three shots above. The one in the middle is pretty balanced between the room light, and the amount of flash I’m using, but if I raise my f-stop (let’s say my current f-stop is f/5.6, and I raise it numerically to f/8 or f/11), the flash goes down in brightness but the background pretty much stays the same. Why? Because only my flash is lighting my subject (the background is lit with the room lighting indoors or the sun outdoors). Look at the shot on the right. That’s what happens if I lower my f-stop (let’s say it’s still at f/5.6) down numerically to f/4 or f/2.8. My flash gets brighter on my subject, but notice that the room light, in all three shots, never changes. (Pop-quiz: What changes the light in the room? That’s right, the general manager of the hotel. Or, if he’s not available, you can use your shutter speed.) “So, Scott, I just want to make sure I have this correct, are you saying that I can change the brightness of my flash by either: (a) changing the power setting on the flash, or (b) by changing my f-stop?” Yes, that’s what I’m saying. Boom! (Drops mic.) “That is incredibly helpful to know.” Sorry, I can’t comment any further, I already dropped the mic.
ISO Makes Everything Brighter or Darker

What if you want everything brighter—the room light (or the light outside) and your flash? Then, you’d increase your ISO (let’s say, for example, we’re at 100 ISO, so maybe you’d move it up to 400 ISO, or even 800 ISO), and you’ll see everything get brighter, because (nerd alert) your camera is more sensitive to light. So, see that little formula above? That’s telling you that ISO equals turning up the dimmer switch, and the brightness of your flash—you’re turning up everything at once. Needless to say (but, I’ll say it anyway because I heard a rumor once that authors get paid by the word, but apparently that was a long time ago, and then it only applied to newspaper and magazine articles, and one can’t be too careful when it comes to 3¢ a word), if you’re already at 400 or 800 ISO, turning down your ISO would make everything darker (those 17 words just brought in a cool 51¢. Cha-ching!).
Where to Set Your Shutter Speed and Why

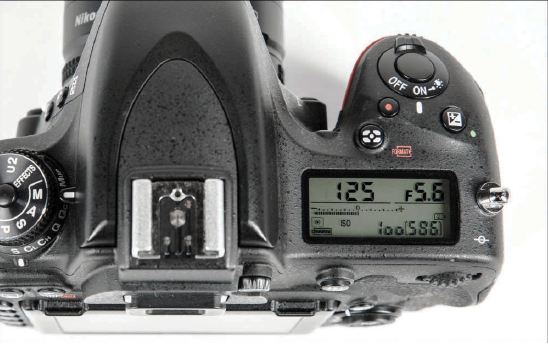
Set your shutter speed at 1/125 of a second. Okay, why 1/125? Because that’s a good, safe shutter speed to use on almost any camera to make certain that your flash and the shutter on your camera stay in sync—you press the shutter button and it fires at exactly the right time. What happens if they get out of sync? Well, that’s what you see above.
If your shutter speed gets too high (above 1/200 of a second for Canon, 1/250 for Nikon, or depending on which Sony camera you have, it could be 1/160, 1/200, or 1/250, which is why 1/125 is so perfect), you start to get a dark gradient that appears over the bottom of your image, like you see above. The higher you go over that “maximum flash sync speed,” the higher that gradient gets. But, of course, you can avoid that entirely by just doing what I do and use 1/125 as your shutter speed. There will be a time (as you’ll learn shortly) where you might want to change it, but usually it will be to lower the shutter speed, and that’s perfectly fine. It’s when you go above 1/200 of a second that things get dicey, so that’s why I recommend 1/125 of a second. I’m doing my best to not nerd out here and go into how the “curtains” work in your shutter, and their relation to the focal plane, and all that stuff, so instead just know that (a) you want your camera and flash to stay in perfect sync, (b) if you set your shutter speed at 1/125 of a second, you’ll never have to worry about them being out of sync, and (c) if you see a gradient appear on your photo, check to see if you accidentally increased your shutter speed, ‘cause ya probably did (I’ve done it dozens of times myself). So, set the shutter speed back to 1/125.
Here’s Your Camera Setting Checklist
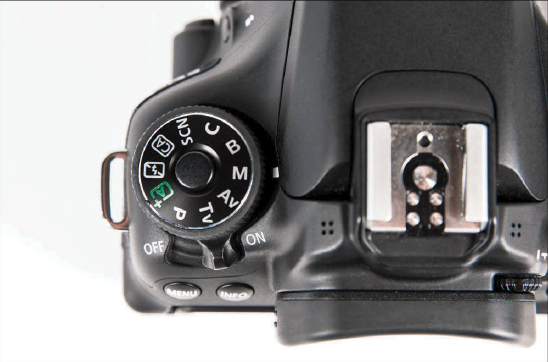
1. Switch your camera to manual mode.
2. Set your ISO at 100 (or the lowest native ISO for your particular camera).
3. Set your shutter speed at 1/125 of a second.
4. Set your f-stop to f/5.6.
5. Set the power on the back of your flash to 1/4 power.
Now, take a test shot. If the flash is too bright, turn down the power of your flash a bit and take another test shot. If it’s still too bright, turn it down a little more, and take another test shot. After a couple of test shots, you’ll have the brightness of your flash dialed in. If the flash isn’t bright enough, turn it up a bit and take another test shot.
Repeat until it looks bright enough.
That’s it. Seriously, that’s it. Avoid the tremendous urge to overthink this. This is the joy of shooting in manual mode on your camera, and using Manual mode on your flash— everything is just so simple. Don’t try to find ways to make it complicated, because this works like a charm. This is a set of settings you can use as your starting place every single time, and a lot of the time, once you start shooting, you might not even touch the camera settings (depending on where you’re shooting), just the power of your flash.