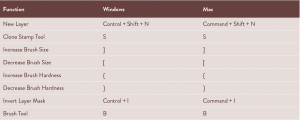
The following is an excerpt from Lauren Caris Short’s The Complete Guide to Food Photography

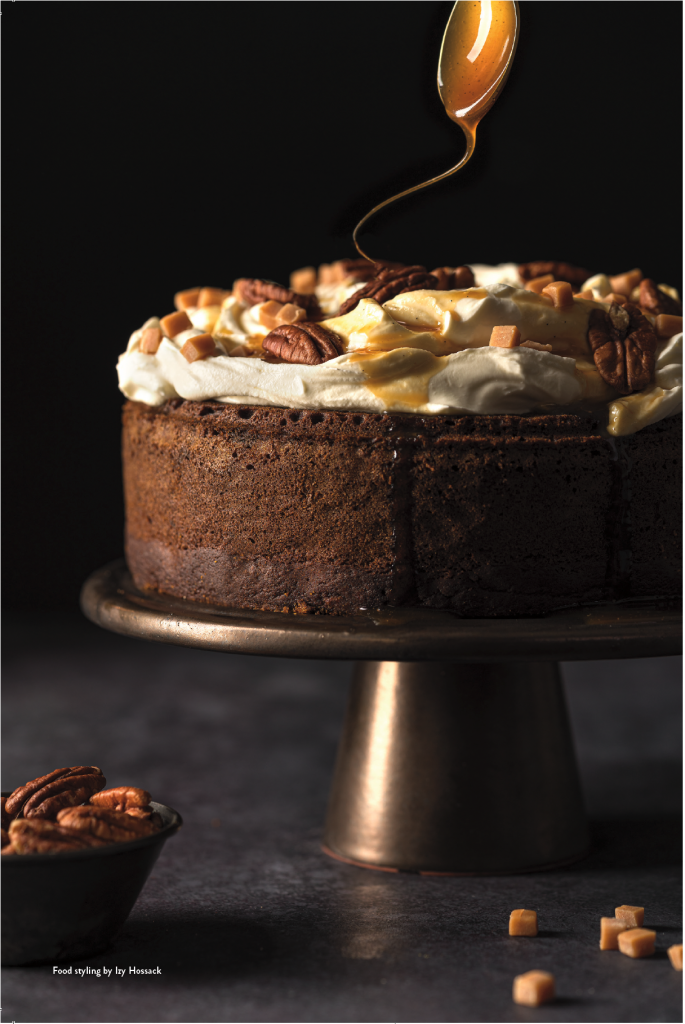
Food Styling by Izy Hossack
Watch a preview of the behind-the-scenes video for this shoot! vimeo.com/715138039/601860d10c
STORY AND IMAGE OBJECTIVE
In this image, I wanted to create a dark and moody action shot of this heroic, salted caramel pumpkin spice cake with a creamy Greek yoghurt frosting. As well as capturing the scale of the side of the cake with all the different textures of the toppings, I really wanted a signature swirl of the caramel sauce being dripped onto the cake. Not only does it add an element of interest and interaction to the image, but it also helps the viewer to imagine what the texture of the caramel sauce is like, connecting them more to the food they see.
LIGHTING
Lighting Gear List
• 1 PIKA 200TTL flash
• 1 x 4 foot strip box soft box
• Black foam card flag
I chose side light for this shot, using a 1 x 4 foot strip soft box to concentrate the light on the subject, keeping the scene around it dark. I added an additional piece of black foam card as a flag at the back of the strip box, to create a soft gradient in the light toward the back of the scene and avoid any light spill farther back.
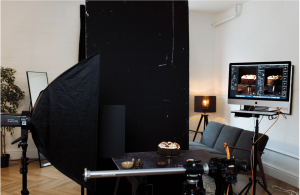
Figure 1: An overview of the setup for this cake shot.
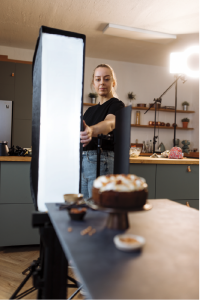
Figure 2 (Photo credit Tommy Reynolds)
The rectangular shape of the soft box also helps with definition of reflections on the spoon where we have a direct reflection (specular reflection). The long, thin, rectangular shape follows the contours of the spoon, looking natural and enhancing the shine.
I played around with the distance of the soft box from the cake and ended up pulling it a bit farther away in order to create less dramatic falloff, allowing enough light to spill onto the right-hand side of the cake to illuminate the frosting and toppings.
I used a relatively low flash power to capture the action of the caramel as a sharp, frozen motion. The lower the flash power, the faster the exposure (see page 125 for a full explanation on this), so you want to go as low as you can to achieve a good exposure and also capture a nice sharp motion.
CAMERA AND LENS SETUP
I kept the aperture quite wide at f/4.5 to create a nice softness and depth across the top of the cake. Because of this, I shot the portrait of the cake and the caramel drizzle in two separate shots that I then composited together during the edit. This allowed me to ensure that the most important parts of the image were sharp by using manual focus in each one.
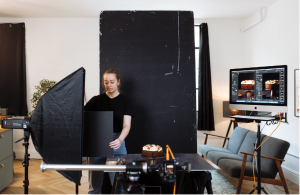
Figure 3 (Photo credit Tommy Reynolds)
This is another reason why shooting with artificial light was very important for this image. It’s essential that the lighting and colour are completely consistent between the two shots, so that they are seamless when I composite them together. I set a shutter speed of 1/250 to cut out all the ambient light in the room, and my ISO to 100 to avoid any noise.
I’m shooting with my 90mm macro lens to create a tight, compressed look and an impactful portrait, angled just a little above straight on, so that the top of the cake is slightly visible. Being mostly straight on allowed the action and the height of the cake to be the focus.
To capture the caramel drizzle, I put my camera into continuous burst mode and took several shots in a row to give me lots of options to choose from.
COMPOSITION AND STYLING
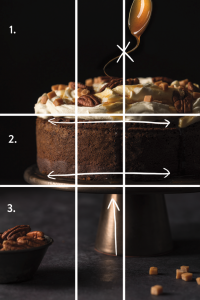
Figure 4
Because I knew the caramel drizzle would be the focus of the image, I kept the rest of the frame quite minimal, without too many other props or elements distracting from it. I used the phi grid composition technique to help me keep the frame balanced, with plenty of negative space above the cake to allow the drizzle to sit in its own space undisturbed.
I also used the phi grid to place the horizon of the backdrop and the base of the cake stand (Figure 4), which brings a visually pleasing balance to the image, creating three layers between the baseboard and stand, the cake itself, the frosting, and the caramel drizzle. There is also an overall sweeping diagonal created from the top right to the bottom left of the frame leading from the spoon to the cake, and then to the bowl. This keeps the eye moving through the image.
I used the right-hand line of the grid to place the base of the cake stand, to create a decentralized composition, adding interest. I also used this line to place the spoon for the caramel drizzle. I was working with a food stylist for this shot so I did have a hand model to do the caramel drizzle, allowing me to focus on the photography.
To style a cake like this it’s all about working slowly in layers whilst always checking how the final product is looking through the camera. The frosting was applied in layers, taking time to smooth out each one with a small offset spatula to create the desired texture before adding more frosting and repeating to build height. As we went along, I also kept rotating the cake to make sure that the camera was seeing the hero side.
We also added the toppings gradually, making sure there was variation in the direction and angle of the pecans to fully appreciate their texture from all sides. We did the same thing with the bowl of pecans, carefully flipping and moving around a couple to get a good angle and lighting.
The best side of the cake had a small chunk out of the bottom from moving it out of the tin and onto the stand, so I’ll retouch this in Photoshop during the editing.
BACKGROUND AND PROPS
For the background: I used a large black piece of foam board to keep the background dark, and a dark grey painted wooden board as the baseboard. This board has a nice amount of texture from the paint, and a slightly blue hue, which gives a nice cool feel to the image.
The cake stand I chose is a muted brass colour, and matte in texture. I wanted to keep the whole palette of this image brown and warm toned, so this cake stand with the gold spoon for the drizzle were the perfect match.
The bowl is a small, matte black bowl with a stone texture. I didn’t want the bowl at the front to steal any focus away—I wanted it to almost blend with the foreground, just creating a little texture and interest, so the black colour worked perfectly.
A few little caramel squares on the bottom right finished off the frame and added more context to the ingredients seen on top of the cake.
EDITING
Part 1—Lightroom
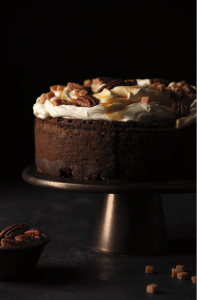
Figure 5
I’m going to begin processing this image in Lightroom before moving into Photoshop to composite the two layers together. Here’s the image straight out of camera (Figure 5).
Beginning with the image in Lightroom that’s going to become my base layer, I firstly increased the exposure just a little by + 0.35 to remove most of the clipped areas. I then decreased the highlights and increased the shadows to bring back areas of detail in these tones, before adding back in some whites and blacks for contrast and colour (Figure 6).
I added both texture and clarity to this image, as there’s a lot of small points of definition on the front of the cake, and I wanted the texture of the crumb on the cake to be very visible and sharp.
Next, I worked on the HSL/Color panel, mainly in the saturation section, focusing on increasing the yellow and orange colours, and pulling some blue out of the backdrop by decreasing the blue slider. I wanted an overall cool feel from the backdrop, but it was a little overwhelming, so reducing the saturation of the blue slightly helped a lot. I also increased the luminance of the orange and yellow slightly, to further help the cake stand out in the scene.
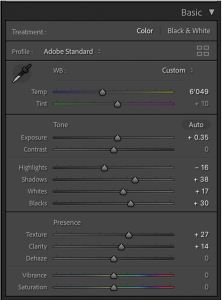
Figure 6
I applied sharpening to the image, using the masking sliders to ensure I was only applying sharpening to the edges of the subject.
Next, I straightened the image a little (Figure 7). Within the crop tool, I held down the command key to activate the spirit level tool. I then drew a line across the image where it should be horizontal, and Lightroom corrected it. I then adjusted the crop a little until I was happy with the composition.
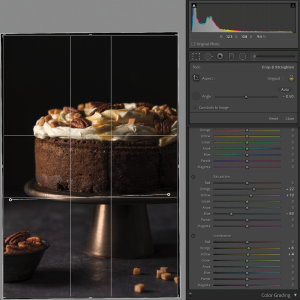
Figure 7
The last thing I did in Lightroom was copy over all the edits I made to the cake image to the caramel drizzle image so that I can blend them seamlessly in Photoshop. To do this I selected the image I already edited in the develop module timeline, then held down shift and selected the image I want to copy the edits to. Then I hit the “sync” button at the bottom of the column on the right and “check all.” Once I hit synchronize, Lightroom will apply every change I made to the cake layer to the caramel drizzle layer as well.
Part 2—Photoshop
Next, I’ll move over to Photoshop to combine the caramel drizzle and cake layers, and do a little retouching.
First, I’m going to composite together the two images, by masking in the caramel spoon and drizzle. For a full walkthrough on how to do this, check out the tutorial on page 151. Here are the two images I’ll be combining (Figure 8).
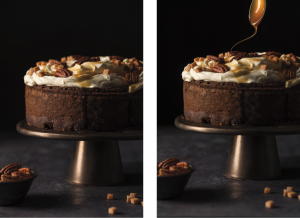
Figure 8
Once these were combined, I retouched the side of the cake with the clone stamp tool. For my brush settings I used a brush size of 100px, with a hardness of 20%, a flow of 20%, and an opacity of 100%. I made sure that the sample selection was set to “current & below” so that the clone stamp would sample my original layer to make the adjustments. I didn’t correct every single crumb on the cake, as I still want it to look real and approachable—I just wanted to remove the large distractions. Here’s how the cake looked before and after retouching (Figure 9).
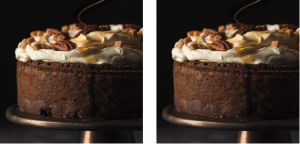
Figure 9
Challenge
Try creating your own action shot image by combining two images. This will allow you to get that perfect base shot, then focus on shooting the action, taking the best bits from both! It could be a caramel drizzle like this cake, a pour shot, or any other action you find inspiring.