The following is an excerpt from Scott Kelby’s The Landscape Photography Book.
Ummm, It’s How to Make HDRs and Panos
I hope, by now, you’ve learned that in the world of photography, things are not always as they seem—capital letters that seem like they should by acronyms are often words, and words that begin with “P” and end with a lowercase “s” seem like words, when in fact, they are acronyms. It’s learning this stuff, how to talk like a pro at parties, that really matters. All that camera gear and settings and stuff—it’s fluff. Icing on the cake. It’s learning how to talk the talk that impresses. It makes the front door swing and the cash register ring. Yeah, baby! Now you’re talkin’ like a pro! So, let’s unpack a few “word things.” First, HDR. Not an acronym. Never has been. Somebody tagged it as “high dynamic range,” but that’s because they didn’t know it’s a word, and when people don’t know the answers, they make stuff up, like folks who floated the idea that the term HDR was invented by seagoing pirates of the 1800s. That’s why it’s pronounced “H-dee-Arrrrrrr!” I can’t believe how many professionals fell for that one. It’s actually pronounced “Hodor,”’ which is short for “hold the door,” but you’re supposed to say it multiple times in a row, like “Hodor, Hodor, Hodor!” As for panos, on the other hand, it actually is an acronym, which stands for “Photo Apps Now On Sale.” I know that sounds weird at first, but here’s the good news: photo apps are now on sale! Whoo hoo! Anyway, that real name has to be true because I read it on the Internet and they can’t put things on the Internet that are not true (at least that’s what I read on the Internet).
The Advantage of Panos Versus Wide-Angle
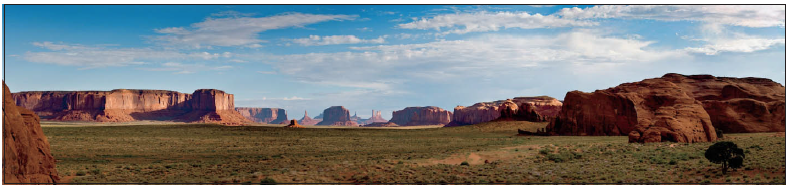
I’ve had people ask me why we even do panos, and wouldn’t it be easier to just shoot a wide-angle lens and crop it like a pano? Well, there are three big advantages to shooting a pano over a wide-angle, but to me, the first is the most important:
(1) panos make big things look big and help maintain their scale, while wide-angle lenses push the scene farther way, making big mountains look smaller, huge arches look regular, and tall waterfalls look small. Panos keep that sense of scale and big-ness. Plus, there’s (2): panos have really high resolution, and you can print them at huge sizes because you’re combining a bunch of high-resolution photos into one image. Lastly, (3) shooting a pano can capture more of a scene than a wide-angle lens. You can make your panos as long, tall, or wide as you want. You can do multi-row panos (see page 94), and even panos where you combine multiple wide-angle lens shots, so you have more options on how to capture the scene you’re standing in front of. There’s also a bonus reason: (4) people love panos. The viewing public loves to see a printed pano in person, because that’s something you just don’t see every day (for a tip on printing, see page 98).
Camera Settings for Shooting Panos
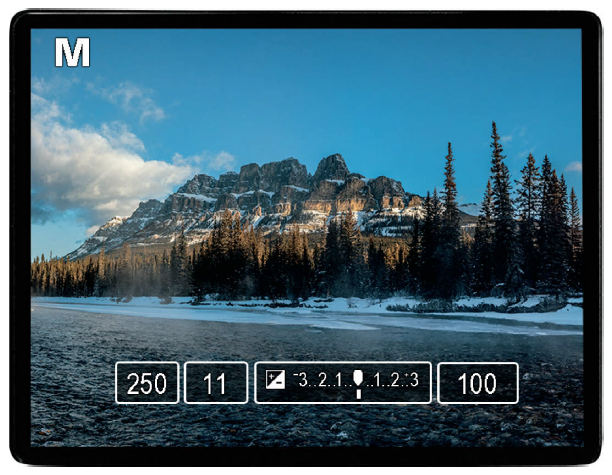
We use specific settings for shooting panos because each frame of the pano has to have the exact same exposure and focus. If you shoot 11 frames, they all have to look the same. If you let the camera determine the exposure and auto focus point of each different frame while you’re shooting your pano, you’ll wind up with a pano where some areas are darker, some parts are focused at one depth, and others look soft at the same depth, and basically you wind up with a mess. So, let’s set our camera for panoramic success. First, if you’re on a tripod, set your ISO to your cleanest setting (probably 100 ISO). If you’re hand-holding, you might have to go higher (see page 26). Then, switch your camera to aperture priority mode and choose f/11 for your f-stop, so everything will be in focus. Now, aim your camera at a key part of the scene, hold the shutter button down halfway, and look through the viewfinder to see what shutter speed it chose to properly expose the scene. Remember that number (let’s say it showed 1/250 of a second). Switch your camera to manual mode, leave your f-stop at f/11, and set your shutter speed to that number you remembered (1/250 of a second). Okay, your exposure is set. What about your white balance? Don’t use Auto white balance because it could change from frame to frame. Choose an actual white balance preset (I generally choose Cloudy white balance. See page 36). Hold the shutter button halfway down, so your Auto focus locks on the scene, then switch your lens focus to Manual, so your focus doesn’t change. Take a test shot or two to see how it looks (and, yes, zoom in to check sharpness, just in case), and now you’re all set to shoot without having any surprises later on.
Picking a Lens for Panos That Limits Edge Distortion
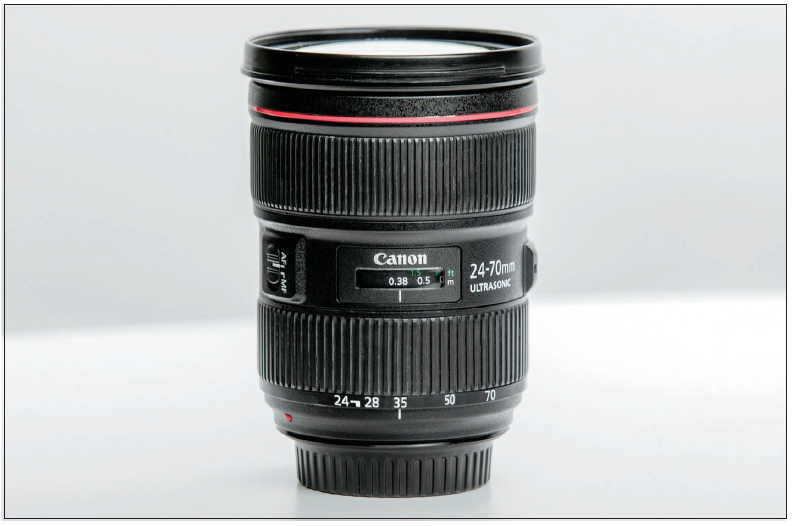
While you can use a wide-angle lens to shoot panoramas, to limit any edge distortion, you should ideally try to use a lens that is a minimum of 35mm (on a full-frame camera), but shoot for 50mm or more. This distortion, which you might not notice all that much on a single image, gets magnified in a panorama. So, instead of trying to “fix it in Photoshop,” pick a lens that works best for panos, like something 50mm or longer (I often use the 70mm on my 24–70mm lens that I have with me for landscape shoots).
Make Certain Your Camera Is Level
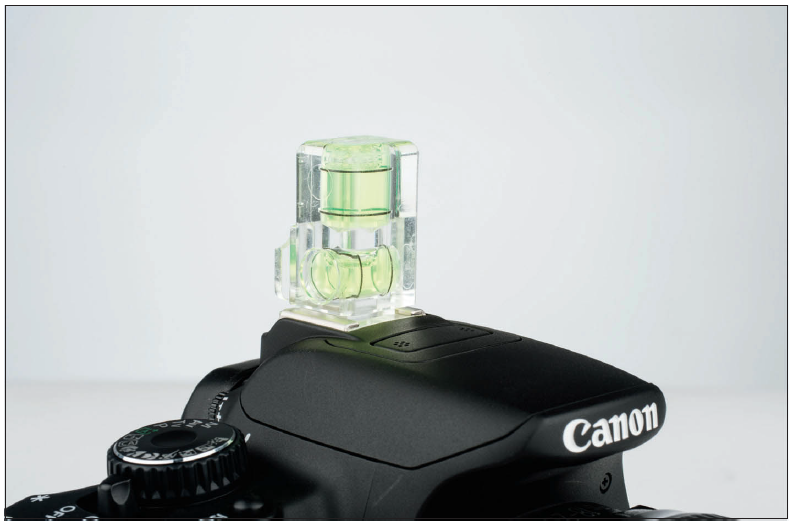
One of the things we always try to do when shooting panos is to keep as much of what was shot of the scene without having to crop a bunch away. One big thing that will help is to make sure that when you’re shooting on a tripod, your camera is perfectly level. If it’s even a little crooked, as you take each pano segment, your pano will start to tilt more and more, causing you to have to crop off quite a lot because you’ll have big gaps around your tilted, skewed pano image. This is why keeping your camera straight and level is really important. A lot of newer cameras have built-in leveling features (see page 11), so if yours does, make sure you level your camera right on the money before you start shooting. If yours doesn’t have a built-in feature, you can buy a bubble level that slips right into the hot shoe mount on the top of your camera and you can level it that way (the Vello 3-axis hot shoe bubble level is around $22). A lot of ballheads these days have bubble levels built-in, too, so check for that. Also, another thing that will help keep things level while you’re shooting is a ballhead that has a panning adjustment at the bottom of the unit that lets you smoothly swivel your camera around the vertical axis of your rig to take your pano images. It’s usually a small extra knob at the bottom that you loosen to let it swivel (look near the bottom of your ballhead for a set of vertical lines—if you see that, yours has this swivel/pan feature).
Keeping Your Camera Centered
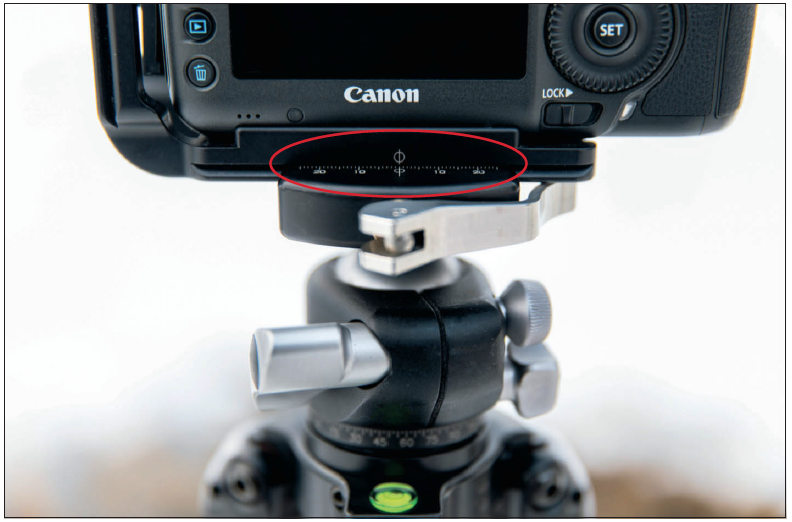
To get the best results from your panos (and to limit the amount you have to crop away once the pano is stitched together), one thing that will help is to make sure your camera is perfectly centered on your tripod. Depending on your tripod’s make and model, this might be a no-brainer, but if you’re using one of the popular L-brackets or quick release plates, it’s easy for them to get just a little out of line, and then you pay for that later when you’re having to crop away more than necessary. That’s why most L-brackets and quick release plates have a scale on them with the center marked—both on the bracket and the top of the ballhead (as seen here)—so you can easily line those two points up and know that your camera is right at that center point. It’s a little thing, but they’re pretty much all little things—they just start to add up quickly.
Three Advantages to Shooting Them Tall
There are three advantages to shooting your panos in tall orientation (portrait orientation) rather than shooting them wide: (1) You get less edge distortion when you shoot tall. (2) If you have to crop your pano (and, by the way, you almost always have to crop your pano after it’s stitched together), shooting tall usually gives you more breathing room at the top (more sky) and bottom (more foreground), so you’re not cropping away something important in the image (like a mountain top or the foreground of a lake). Can you get away with shooting your panos in wide (landscape) orientation? Absolutely. Do I sometimes shoot in wide orientation when I take my panos (and I shoot a lot of panos)? I do. Has anything bad happened to me when I’ve done that? I’ve lost a couple of mountain tops I wish I hadn’t. And, (3) you wind up with a higher resolution final image when you shoot tall. For example, let’s say it took five frames shooting wide to cover the scene in front of you, and you’re shooting a 24-megapixel camera. Stitched together (before cropping) that would yield around a 120-megapixel image (but take off 20% or 30% for the overlap). If it took eight frames shooting tall to capture that same scene, your result would be around a 192-megapixel image, and you’d have enough resolution where you could print that bad boy on the side of a bus, and it would look awesome (well, depending on the bus, of course). So, those are three fairly compelling reasons to shoot tall. The only downsides are: (1) it takes more segments shooting tall to cover the same ground as shooting wide, and (2) your final file sizes will be larger. Not too bad a trade-off.
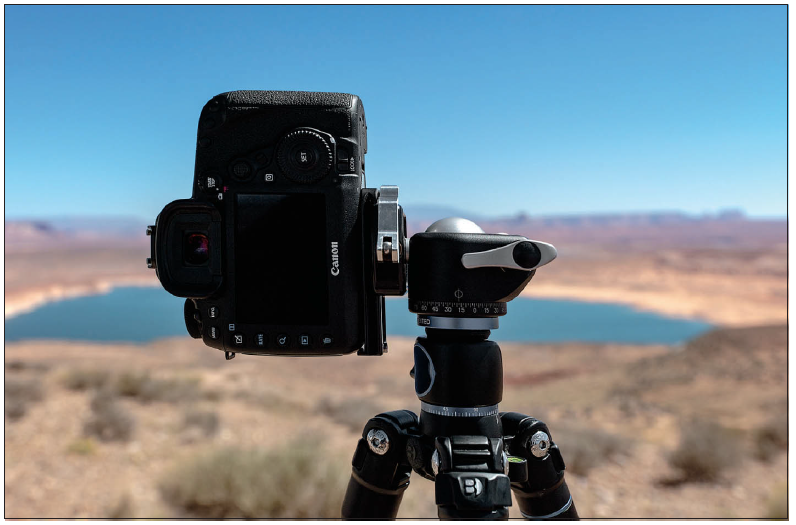
Put Your Ballhead’s Notch on the Left for Tall Panos
Most ballheads come with a notch cut out of the side of their base, so you can fully tilt your camera on its side for things like vertical panos (well, not just for those, but it sure comes in handy). This is just a quick tip that will help you make shooting vertically more comfortable, and that is to rotate the base of your ballhead so the notch is always on the left side from your shooting position. That way, when you use the notch to shoot vertically, your shutter button is near the top of your camera and easy to reach. If the notch is on the right side, your shutter button winds up near the bottom of the camera and getting to it is more of a pain when it’s on that side.
The Key to Panoramas That Stitch Together Perfectly
Lightroom (and Photoshop’s Camera Raw) does an amazing job of taking multiple frames and combining them into one seamless panoramic image, as long as you follow this one simple rule when shooting your pano shots: you need to overlap each image by around 30%. Notice I said “around”—you don’t have to calculate this precisely, just keep in mind that around 1/3 needs to overlap. Easy enough. The reason you need to do this is that both programs use the same technology, which needs to see some overlap, so it knows those two frames go together. It sees part of the same image at the edge of both frames and that’s its cue that they go together. If you do more than 30%, no problem—it’ll still work fine. If you do less than 30%, then it might not join all the segments together (you’ll get a warning that says, “[some number] of the images were unable to be merged”). So, just keep the 30% minimum overlap thing in mind and you’ll be good to go.
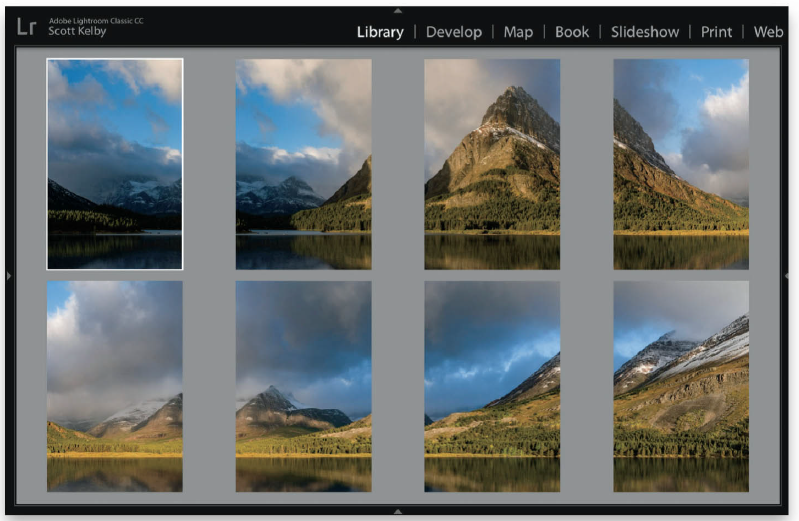
The Two-Finger Trick Pano Helper
This is a trick I’ve been using for years, and it’s way more handy than it’s going to sound (I get emails from people I’ve taught this trick to thanking me for it, so you have to at least give it a try). Before you shoot your pano, hold one finger up in front of your lens and take a shot, so your finger is clearly visible in the shot. Then shoot your pano segments, and when you’re done, take one more shot, but hold up two fingers in front of your lens, so they’re clearly visible in the shot. Where this pays off is later, when you’re looking at your image thumbnails in Lightroom or Adobe Bridge. When you see a shot with one finger held up, you’ll instantly think, “Oh, that’s right, I shot a pano there,” and you’ll know exactly where the segments for that pano end because you’ll see that shot of two fingers. When you’re scrolling through hundreds of thumbnails from a shoot, you’ll be so glad you did this.
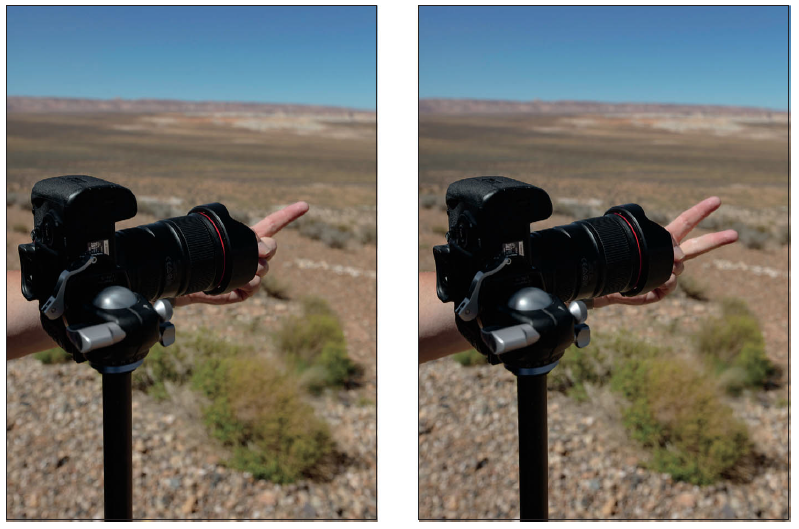
Pano Trick for Keeping More with Less Cropping
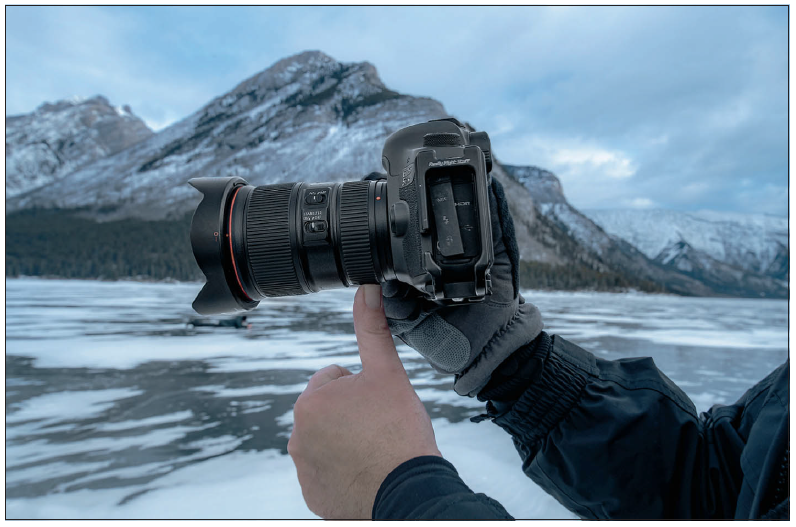
I learned this trick from my dear friend, French photographer Serge Ramelli, and what it lets you do is keep more of your pano by not having to crop as much. Now, you can buy specialized panoramic heads that are designed to help with this, but for some reason they are among the most-expensive camera accessories out there. For a good one (not a killer one, just a good one), you’re talking $600+ and for a really good one, well over $1,000 (don’t shoot the messenger), which is why Serge’s trick is so awesome because it works so well, and it’s free. (Note: To do this, you have to handhold your pano—it doesn’t really work if you’re on a tripod.) Here’s what you do: You hold up your thumb like you’re giving a “thumbs-up” and you place it directly below the center of the lens, touching the bottom of it (like your thumb is acting like a tripod), and then you take your pano segments by simply rotating the top of your camera with your other hand. Take a shot, rotate it a bit, take another shot, rotate it, and so on. The result is a pano where you have to crop away very little. It works like a charm (thanks, Serge!).
Be Quick About It
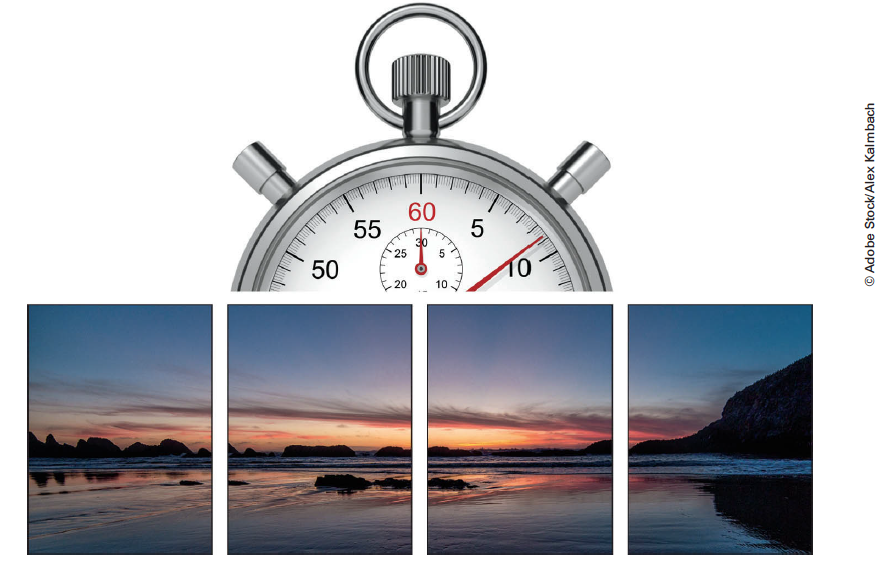
When you start to take your panorama, be quick about it. If there are things moving in your image (like clouds, or water, or trees swaying in the breeze), you need to take your pano segments fairly quickly, so you don’t wind up with a blurry mess in those areas. Again, this is only if things are moving in your image. If you’re shooting, say, a six-segment pano, it should take 10 seconds or less to shoot all six segments, not 30 seconds. If something does move a bit, you can often “fix it in Photoshop,” but sometimes not. So, just shoot it fairly quickly, and you won’t have to worry about it.
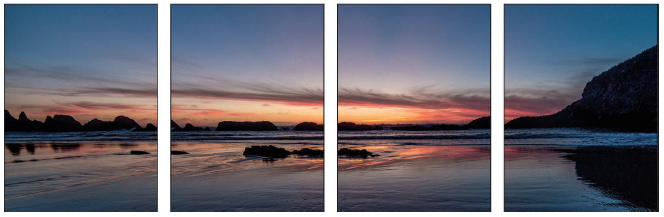
Shooting Vertical Panos
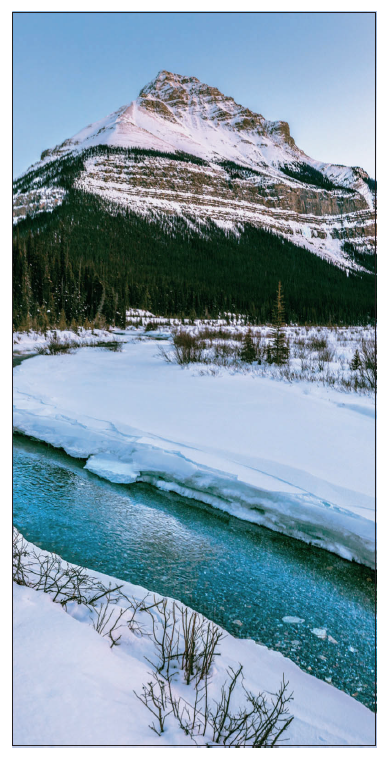
Vertical panoramas (where instead of creating a wide, horizontal panorama, you create a tall, vertical one) have become so popular that they have their own name: vertorama. You shoot and stitch a vertical panorama, errr…vertorama, the same way you would a panorama (with at least a 30% overlap between frames). But, instead of shooting from left to right, you start at the bottom of the scene and shoot moving upward, one frame at a time (don’t forget the overlap), until you reach the top. Once you’re done, you’ll stitch it together in Lightroom or Camera Raw just like you would with a regular horizontal panorama (see page 95).
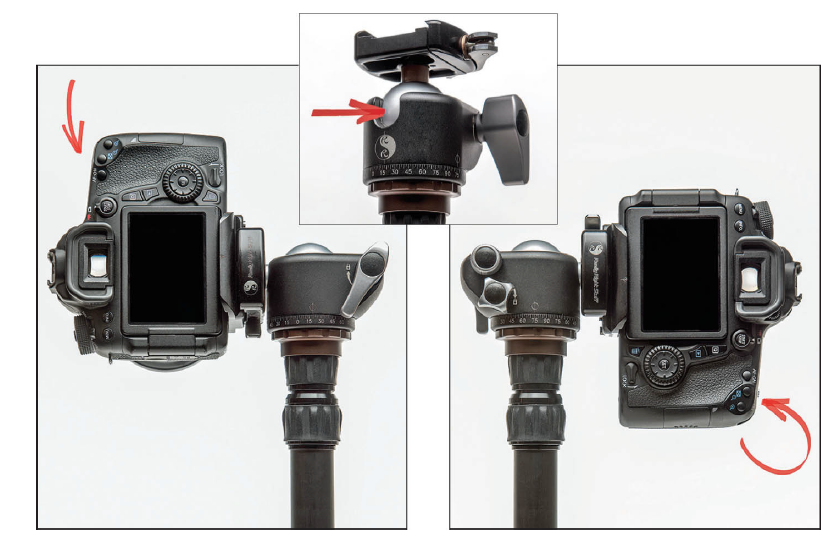
Shooting Multi-Row Panos
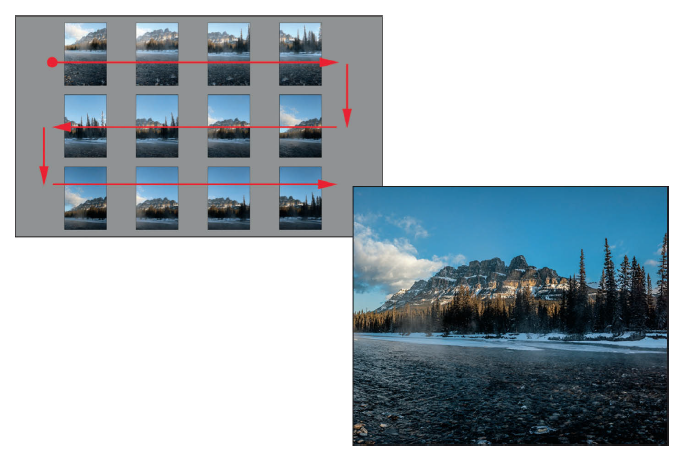
Imagine stacking two or three panos, one on top of another, to create a giant, seamless über-pano (I think I just coined a new name). You don’t have to imagine it because multi-row panos are easy, and they let you cover so much of the scene you’re capturing. You can have the top pano be the foreground, the middle pano be the subject, and the bottom pano be the sky. All it takes is a little bit of planning. First, let’s start with the foreground: angling the camera downward, going from left to right, take your pano frames and stop when you get to the last frame. Now, tip the camera up to get the center of the scene (make sure you’re overlapping the top and bottom at least 30%), but this time, you’re going to shoot from right to left (the opposite direction), taking your frames, but once again stopping when you get to the end. Lastly, tilt your camera up again for the final pass—we’re back to just going from left to right for this one. So, you’re kind of making an “S” pattern with this technique (as seen above on the left). Now, when you open all of these images in Lightroom or Camera Raw and process them as a regular pano, it will put all three rows into one giant über-pano.
How to Stitch Your Shots Into a Pano
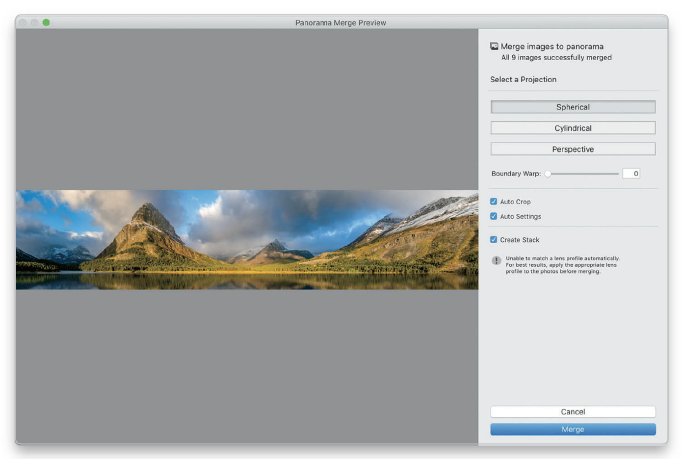
You can combine your individual frames into a single panoramic image (we call this “stitching”) in either Lightroom or Adobe Camera Raw, and it’s pretty much the same except for how you start the process, so I’ll cover both. In Lightroom: Press-and-hold the Shift key, click on the first thumbnail in the pano (not the one with your finger in it—the frame after that), then click on the last frame in the series (the one before your two-finger shot) to select them. Now, go under the Photo menu, under Photo Merge, and choose Panorama. If you’re using Camera Raw, press-and-hold the Command (PC: Ctrl) key, click on your pano images in the filmstrip along the left side of the window, and then press Command-M (PC: Ctrl-M). No matter which program you’re in, this opens the Panorama Merge Preview dialog, which shows you a preview of how your final stitched image will look. You have a choice of three different types of pano processing, and usually, it will choose Spherical, as that one is often the best for most panos. The middle choice, Cylindrical, is really more for architectural panos, so I don’t generally use that one, but there’s no harm in clicking it to see if you like the results better. You can also try clicking on Perspective, which tries to keep your lines straighter. (Note: It won’t always be able to render this choice, so if it doesn’t work for you, don’t sweat it—our first choice will almost always be Spherical anyway.) If you turn on the Auto Settings (or Apply Auto Tone and Color Adjustments) checkbox, it applies the Basic panel’s Auto adjustment when the pano is complete (I usually leave it on as a starting place, but lower the Shadows and raise the Contrast back up immediately).
Which Is Best: Auto Crop or Boundary Warp?
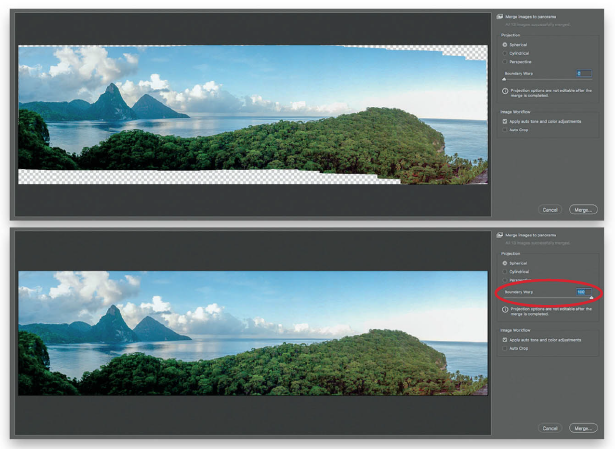
When Lightroom/Camera Raw stitches a pano together, it will have to massage (for lack of a better term, or my just wanting to use a term that sounds somehow naughty) the images quite a bit to combine them into a single, seamless image. This usually leaves white gaps along the outside edges of your images that range from little gaps to really big ones, depending on the image. This is normal pano stuff, and that’s why you get two options for dealing with these gaps. One is called “Auto Crop,” and if you turn this one on, it just crops your image down on all sides, so you don’t see any white gaps. Unfortunately, this can sometimes crop off important stuff in your image (like the top of an arch, or the tip of a mountain, etc.), plus it usually makes your pano very skinny because of the tight crop. That’s why I prefer to use the miracle that is Boundary Warp instead. When they talk about “Photoshop magic” this is the type of stuff they’re talking about. Simply drag this slider to the right (I normally drag it all the way to the right, as seen here at the bottom) and watch how the pano repositions itself to somehow fill in all those gaps without you having to crop the image down at all. It truly is amazing, and it’s my preferred way of dealing with those gaps. Of course, this is just a preview window, so you can try both to see which one you like and go with the one that looks best for that particular image. But, my money is on you trying Boundary Warp, picking your jaw up off the floor, and then going with it.
Stacking Your Panos to Keep Things Tidy
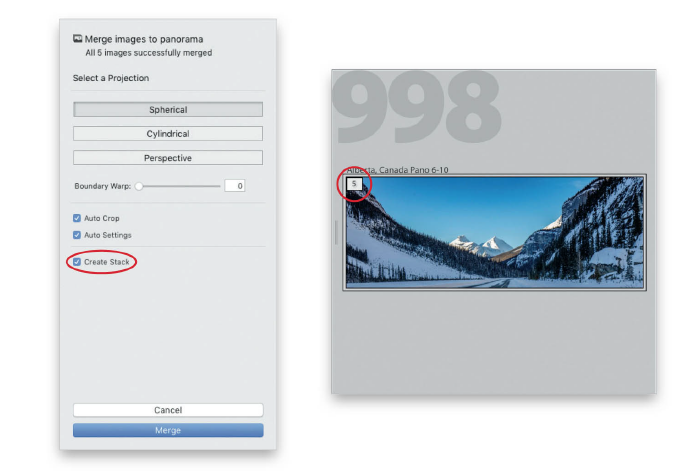
In Lightroom’s Panorama Merge Preview dialog, you’ll see a checkbox for Create Stack, and I highly recommend you turn that checkbox on because it will help you stay visually organized. What this does is it tidies things up by stacking all those frames you used to create your pano behind the final pano thumbnail. So, for example, let’s say you used four photos to create your pano. Instead of seeing all four thumbnails and your pano, you just see your pano with the number “5” appearing in the top-left corner of its thumbnail. That lets you know that there are four more images stacked beneath that one thumbnail. This is so handy because once you’ve stitched that pano together, what do you need those four thumbnails for? Nuthin’, right? Well, we’re not going to delete them (after all, they are our originals), but we don’t need to see them either—they’re just cluttering up our view. So, by tucking them out of sight like this, it tidies up your thumbnail grid. If you want to see those four frames again, just click right on the number 5 and it expands the stack to display all five like usual. To collapse them back into a stack, click where that number was (it will now say “1 of 5”). There’s a keyboard shortcut if you’d prefer that: just click on the thumbnail and press the letter S on your keyboard to toggle back and forth between seeing your pano frames or just the final pano image with the others stacked behind it. Great for helping you stay organized.
Printing Panoramas
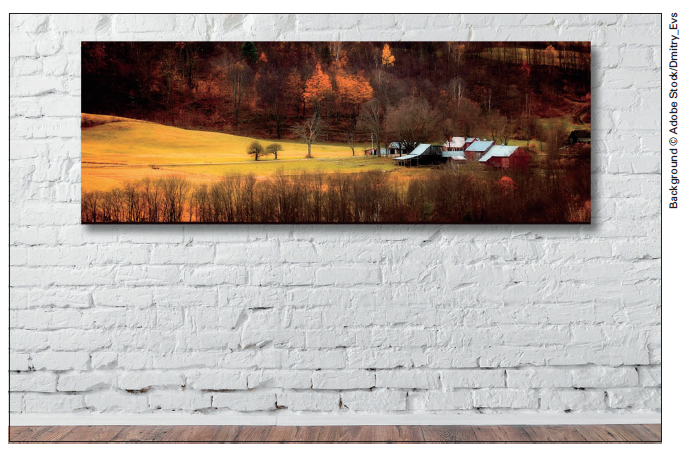
There are some online printing labs that will print panoramic sizes, but my go-to for printing panos is to have them printed on canvas. One advantage of canvas is that it’s the most forgiving printing surface known to man. If you don’t quite have enough resolution to print something really big, print it on canvas and they’ll never know. Plus, I love giving a pano as a gift—the people receiving it literally lose their minds. I have two sources (here in the US) that I use for printing panos. If you want the most awesome canvas you’ve ever seen, like gallery-quality stuff, try ArtisticPhotoCanvas.com (I’m not affiliated with them in any way, besides just being one of their customers). Their customer service is top notch, and all you have to do is upload the file to their site, and they’ll prep it for you. The canvas is wrapped around a wooden mounting frame, and you can have them wrap the image around the edges, or choose to have it mounted in a white or black frame. They are the best I’ve ever used. Great folks, too. The other one I use when I want the best possible price for a canvas pano, and the quality isn’t critical. The site is CanvasDiscount.com and their deals are pretty insane (I’m not affiliated with them either, just a customer). If you sign up for their newsletter, you’ll get deals that will blow your mind (not just on pano sizes). The last deal I got from them was for a 30×40″ wrapped canvas on a wood frame for $30 (I am not making this up—I just looked it up in my email). It’s crazy! The quality is good. It’s not amazing. It’s “good.” But to send as a gift to a non-photographer (we’re so picky), it’s ideal. Anyway, just wanted to share how I print my panos.
How to Shoot HDR Images
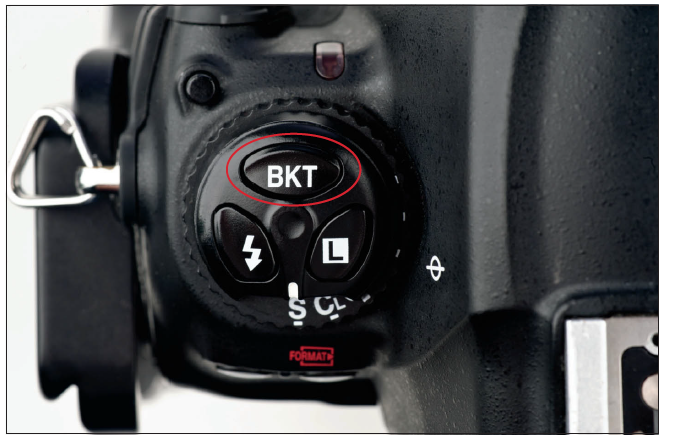
You’ll be merging multiple shots of the same image into a single image, so while you could shoot HDR bracketed images hand-held, for the best results, shoot on a tripod. Set your camera to its lowest, cleanest ISO, switch to aperture priority mode, and choose an f-stop that keeps everything in focus, like f/11. The key to this technique is setting your camera to shoot bracketed exposures. When you turn on this feature, called “Auto Exposure Bracketing” or “AEB,” you take one photo, and then your cam-era automatically takes at least two more of the same photo, but darker and lighter. On my camera, I set it to take a 2-stop bracket, so it takes the normal exposure, and then it takes another shot that is 2 stops darker, and another that is 2 stops brighter. These are the three images needed to make an HDR. Now, my particular make and model of camera allows me to do a 2-stop bracket, but some cameras will only do a 1-stop bracket. No problem. Instead of shooting just three photos (that are 2 stops apart), you’ll need to shoot five 1-stop shots, so when you’re done, you’ll have a 2 stops darker shot, a 2 stops brighter shot, and the regular exposure. The two others left over (the one that’s 1 stop darker, and one that’s 1 stop brighter), you can ignore. If you want to just press the shutter button once and have it take all the photos for you, there are two things you’ll need to do: (1) Turn on continuous shooting mode. That way you keep holding down the shutter until it takes all the bracketed shots. However, I prefer to also add one more thing: (2) turn on your camera’s self-timer, too. That way, with continuous shooting mode turned on, it will take the first picture, and then take the rest of the bracketed frames for you (without you having to hold anything down).
How to Merge Those Into a Single HDR Image
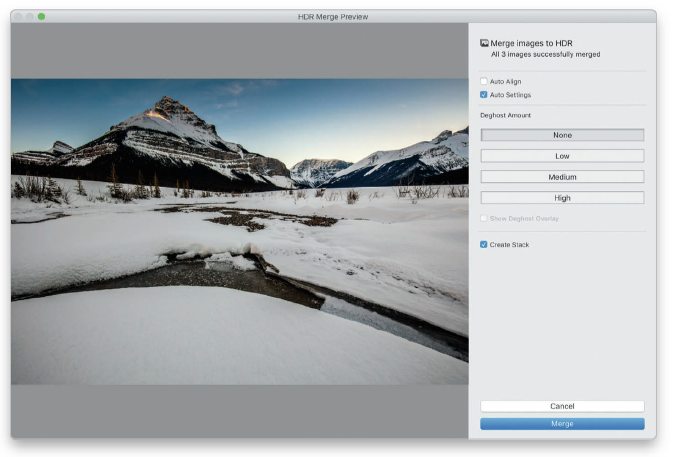
If you’re using Photoshop or Lightroom to make your HDR image, you actually only need the 2 stops darker and 2 stops brighter photos to make the image—just those two images—you don’t even need to use the normal exposure. (Note:Most other HDR applications will need that normal exposure image though.) Anyway, in Lightroom select your two bracketed images, then go under the Photo menu, under Photo Merge, and choose HDR to bring up the HDR Merge Preview dialog. If you’re using Photoshop’s Camera Raw, instead, select the two images in the filmstrip on the left and then press Option-M (PC: Alt-M) to bring up the HDR Merge Preview dialog. If you hand-held your HDR (it works much better if you shoot on a tripod, so I hope you didn’t), turn on the Auto Align (Align Images) checkbox, or just click the Merge button and it’ll take the best parts of both of those two images and combine them into a single image with a greatly expanded tonal range (and—bonus—you can open the shadow areas way up without introducing a bunch of noise. A hidden advantage of Lightroom’s and Camera Raw’s built-in HDR feature). One more thing (and this is really cool): the resulting HDR image that Lightroom or Camera Raw creates is a DNG image (well, provided that you started with RAW images), so it retains the properties of a RAW photo. Mind. Blown.
Creating HDR Panos
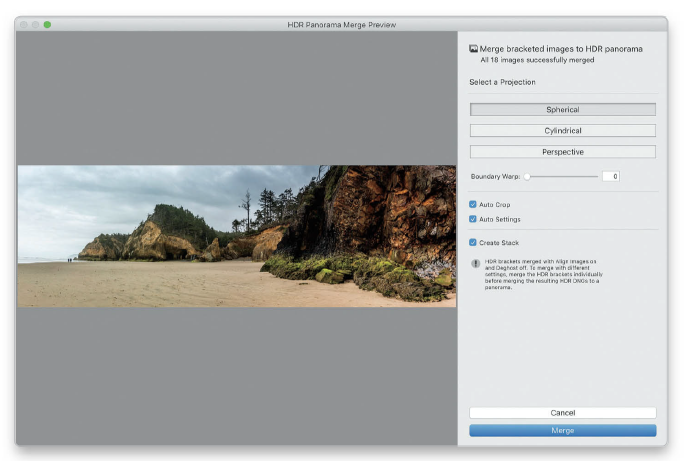
Now yer takin’ things up a notch. Not just an HDR image. Not just a pano. It’s both, in one image, and it’s surprisingly easy to do (especially since Lightroom and Photo shop have built-in features for processing and stitching HDR panos). Here’s what you’re going to do: You’re going to shoot a pano like you normally would (going from left to right across a scene), but instead of just taking one shot for each frame of your pano, you’re going to turn your camera’s exposure bracketing on, and let it take three bracketed shots. Now, you’ll swivel your camera to the next frame over, let it shoot another three bracketed shots, and so on, until you reach the end of your scene. Then, import all of those bracketed pano images into Lightroom or open them in Photoshop’s Camera Raw. In Lightroom, select them all, then go under the Photo menu, under Photo Merge, and choose HDR Panorama. In Camera Raw, select all the images in the filmstrip on the left, then click the four lines icon at the top right of the filmstrip and choose Merge to HDR Panorama. It opens what looks like the same Panorama Merge Preview dialog as always, but if you look in the top-right corner, you’ll see, sure enough, it’s for HDR panoramas. No special tricks here—just pretend it’s a regular pano—but when you click Merge, behind the scenes it merges the HDRs first, and then stitches the pano for it. It definitely takes longer than just stitching a pano, so this is a great opportunity to brew a fresh cup of coffee (or drive to a Dunkin’ Donuts in the next town over).