By Marie Read (Excerpted from her book Mastering Bird Photography)
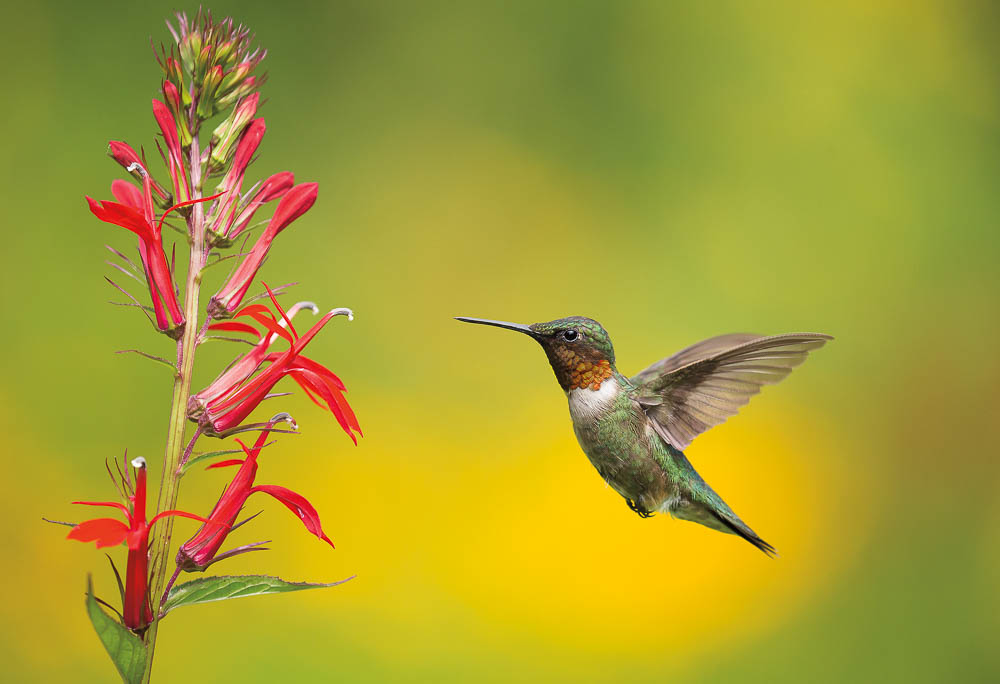
Figure 9.32: Ruby-throated Hummingbird hovers while feeding at the setup described previously. The background is the author’s flower garden. Canon EOS 5D Mark III with 100–400mm IS II lens at 300mm, Gitzo tripod, manual focus, natural light. Camera triggered remotely using a PocketWizard Plus II Transceiver kit, 1/2500 sec., f/5.6, ISO 1250.
Few creatures are as fascinating as hummingbirds, darting around on whirring wings, flashing their jewel-like colors. Flying hummers can be photographed in flight using natural light, but to truly do justice to their iridescent plumage and to freeze wing motion, you need flash. Hummingbird specialists employ elaborate sets involving artificial backgrounds and multiple flash units in which wing motion is stopped by the flash duration rather than shutter speed. This highly technical method is beyond the scope of this article.
The natural light method I use requires a remote triggering device as shown in figure 9.30. Mine is a PocketWizard Plus II transceiver kit, but several types are available.
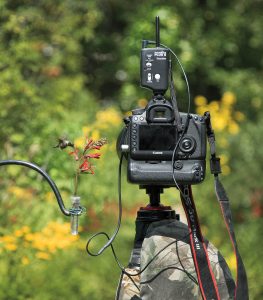
Figure 9.30: Backyard setup for hummingbirds. A cardinal flower in a floral tube of water is tied to a bird feeder pole. The camera, equipped with a short telephoto lens, is prefocused on the flower and triggered remotely using a PocketWizard Plus II transceiver kit.
First, attract hummingbirds by means of a hummingbird feeder filled with sugar water. When you are ready to photograph, replace the feeder with a flower in a tube of water. To be true to nature, select a flower that hummingbirds prefer naturally. Locate the setup where it receives good light against either a distant natural background or an artificial backdrop. Use a short- to mid-range telephoto lens on a tripod-mounted camera placed a few feet away from the flower. Using a medical syringe with a fine needle, inject a small amount of sugar water into the flower (figure 9.31). Manually prefocus on the flower, framing it off to one side to allow space for the hummingbird. When the hummingbird arrives, fire a burst of shots.
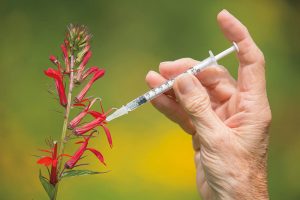
Figure 9.31: A medical syringe is used to inject a few drops of sugar water into the flower. Replenish the food after each time the hummingbird feeds.
Here are a few tips that may be helpful:
• A very fast shutter speed is vital to stop the motion of a flying hummer with natural light, so shoot at the time of day when the light is strongest. This means a compromise between light quality and intensity. I’ve found a shutter speed of at least 1/2000 second can work, but I much prefer 1/3200 second or faster. Even so, there may be some wing blurring.
• A hummingbird’s typical strategy is to insert its bill into the flower, drink, then back out and briefly hover in place before repeating the process, sometimes multiple times if the flower has been generously spiked with sugar water. To show the bill unobscured, press the shutter release when the hummer backs out of the flower as I did for figure 9.32. Otherwise, fire when it’s actually feeding.
• You can use the set-up flower technique either by shooting remotely using a short telephoto lens or by shooting conventionally using a longer lens at a distance (for which you would want to use autofocus rather than manual focus). I’ve used the latter method to capture hummers feeding at live plants in gardens and in the wild, as well as at set ups.