The following is an excerpt from How Do I Do That in Photoshop, 2nd Edition by Scott Kelby.
Photographers are obsessed with sharpness. It’s more of a driving force in our photo graphic lives than you might think. It’s why we spend so much on lenses, and why buying a tack sharp lens is so important to us. We’ll pay double, triple as much for a similar lens if we think that this expensive lens is even a tiny bit sharper than the other lens. What’s really interesting to me is that we’ll spend all this money to get a really nice camera body, a super-sharp lens, but then we’ll go and apply noise reduction to our image, which blurs our nice sharp images to hide the noise. So, while we feel like sharpness is our ultimate goal in everything we do, apparently, if we see any noise in our images, that all goes out the window. Why is this? It’s simple. Photographers, by nature, are crazy. I don’t mean like, “Oh man, that guy is crazy!” type of crazy. I mean the “Uh-oh. That guy is crazy” kind of crazy, which is an entirely different type of crazy, and which 96.3% of all photographers qualify as. The other 3.7% are just nuts. So, this begs the question: “Are any photographers not crazy?” Well, of course, for the sake of drama and general interest, I was exaggerating when I said 96.3% of all photographers are crazy. In reality, it’s really more like just 94.6%, according to the latest statistics from the American Statistics Society (or the ASS, for short). In all honesty, I hadn’t heard that much about the ASS in the past, so I did a little digging around and I found there’s so much for psychiatrists and therapists to do in the ASS. There’s loads of stuff I found there that could keep them busy for weeks. Months even. The ASS has a lot more depth than I was expecting, so I was happy to see someone beside myself really diving in. I applaud the ASS. I like what I’m seeing, and while the ASS might be behind, I think what’s in front of the ASS is even better. Okay, even I have to speak up at this point. How does my publisher let me get away with this stuff? I’ll tell you—they don’t read anything I write. Ever. If they did, surely, they would report me to the ASS, but you don’t want to go down that rabbit hole. See? Not reading. Not a word.
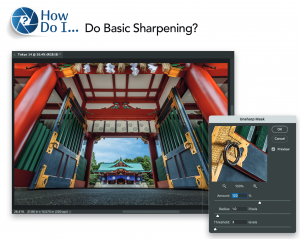
For your average, everyday sharpening, you can use the Unsharp Mask filter. There are actually more advanced ways to sharpen your image, but for some reason this is still the go-to method for many professionals. Go under the Filter menu, under Sharpen, and choose Unsharp Mask. When its dialog appears, you’ll see three sliders: The Amount slider controls the amount of sharpening applied to your image (I’m sorry I even had to explain that one, but if I didn’t, I would get emails asking, “What does the Amount slider do in the Unsharp Mask filter?” I am not making this up). The Radius slider determines how many pixels out from the edge the sharpening will affect, and the Threshold slider determines how different a pixel must be from the surrounding area before it’s considered an edge pixel. (Note: When it comes to adjusting the Threshold amount, the lower the number, the more intense the sharpening effect.) Okay, now that I’ve said all that, what settings do I actually use myself for my own work? My go-to sharpening settings for my average, everyday image are Amount: 120%, Radius: 1, Threshold: 3. Hope that helps.
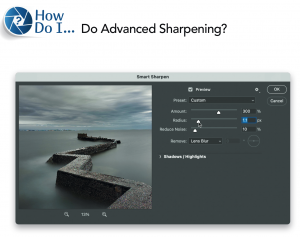
Go under the Filter menu, under Sharpen, and choose Smart Sharpen. As the name implies, this is a smarter way to sharpen your image (with new math that’s much more advanced than the Unsharp Mask filter, which believe it or not, was in Photoshop version 1.0). The Smart Sharpen filter lets you apply more sharpening with less of the “bad stuff” associated with sharpening (like increased noise, halos that appear around the edges of objects, or little specks or artifacts in the sharpened image). Here’s how Adobe recommends you use this filter: First, make sure the Remove pop-up menu is set to Lens Blur (so it uses the latest math), then increase the Amount slider to at least 300%, and slowly drag the Radius slider to the right until you start to see halos appear around the edges. When they appear, back the slider off by just a bit (until the halos go away), and you’re all set.
Get the Sharpen tool from the Toolbar (it’s nested with the Blur tool), then up in the Options Bar, make sure the Protect Detail checkbox is turned on (so it’s using the new math, and by the way, the mathematical algorithm behind this tool is the best sharpening in all of Photoshop). Then, simply paint over the areas you want sharpened. I use this on the irises in portraits and it works wonders. Now, this part is optional, but you might want to duplicate the Background layer first (press Command-J [PC: Ctrl-J]), so you’re applying this sharpening on a separate layer (like I did here). There are three advantages to doing this: (1) If, afterward, you feel that you’ve applied too much sharpening, you can simply lower the Opacity of this layer to back off the amount of sharpening. (2) If you change your mind and don’t want the sharpening at all, you can delete this layer. And, (3) it’s an easy way to see a before/after of just your sharpening during your editing process, so you can compare it to the unsharpened original (just turn the layer on/off by clicking on the Eye icon to its left). Totally optional, but it might just come in really handy.
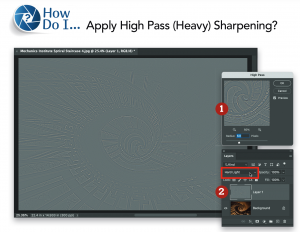
When you want “mega-sharpening,” this is the route to go because it accentuates all the edges in the photo, and making those edges stand out can really give the impression of mega-sharpening. Start by duplicating the Background layer (press Command-J [PC: Ctrl-J]), then go under the Filter menu, under Other, and choose High Pass to bring up its dialog (seen here, in #1). Drag the Radius slider all the way to the left (this turns the layer solid gray), then drag it slowly over to the right until you see the edges of objects in the image appear (as seen here). The farther you drag, the more intense the sharpening will be. But, if you drag too far, you’ll start to get large, white glows appearing around the edges of stuff, so don’t drag too far. Just drag until you see the edges clearly appear, then stop. Now, go near the top left of the Layers panel, and change the blend mode of this gray layer from Normal to Hard Light (as shown here, in #2) for maximum strength (or try Overlay for a less intense effect, or Soft Light for an even lighter effect). This removes the gray from the layer, but leaves the edges accentuated, making the entire photo appear much sharper. If the sharpening seems too intense, you can control the amount of it by lowering the layer’s Opacity near the top right of the Layers panel.
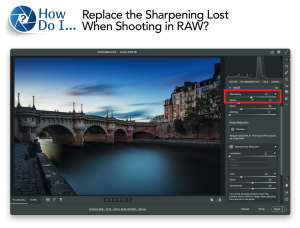
When you shoot in JPEG, your camera automatically applies sharpening to your photo right in-camera (we refer to this in-camera sharpening as “capture sharpening”). When you switch your camera to shoot in RAW, it turns off sharpening in your camera. That’s why, when you open a RAW image in Camera Raw, if you go to the Detail panel, you’ll see that Adobe has applied a bit of sharpening to your image to make up for the fact that your camera didn’t sharpen it at all. (Note: It only does this to RAW images—Camera Raw doesn’t automatically apply any sharpening to JPEG images, by default, because they already had capture sharpening applied in-camera.) However, the amount of capture sharpening Camera Raw applies to your RAW image is pretty modest (to say the least). That’s why I alway increase the amount to bring back more of the sharpness lost by shooting in RAW. To do that, scroll down to the Detail panel, and you’ll see that the Sharpening amount is already set at 40—hey, for 10+ years it was set at just 25, so 40 is better, it’s just not enough. If you agree, go ahead and crank that Sharpening slider up to at least 60, if not 70 (as seen here), while the image is still in RAW format (before you open it in Photoshop), and now you’re starting your editing from a sharper place. (Note: Of course, as with any adjustment [say it with me…], it all depends on the photo. Photos with lots of detail, like landscapes and cityscapes and cars and buildings, can take a lot of capture sharpening. Photos of babies probably don’t need 70 for the Sharpening amount. So, just remember, it all depends on the subject matter.)
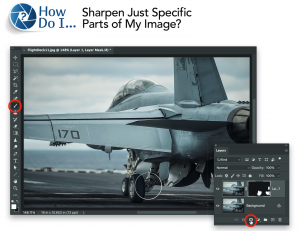
There are three ways to do this, and I covered one way already on page 248 (using the Sharpen tool). But, this is probably the way I do it most often: Start by pressing Command-J (PC: Ctrl-J) to duplicate the Background layer, then apply your sharpening using whichever filter or method you like best (here, I used the Unsharp Mask filter). Now, press-and-hold the Option (PC: Alt) key, and click on the Add Layer Mask icon at the bottom of the Layers panel (it’s shown circled here in red). This adds a black layer mask over your sharpened duplicate layer. Get the Brush tool (B) from the Toolbar, choose a soft-edged brush from the Brush Picker up in the Options Bar, make sure your Foreground color is set to white, and then paint over any areas in your image you want to appear sharpened (in this example, I wanted to add more sharpening to the tires, landing gear assembly, and the engine nozzle). As you paint, you’re painting sharpness. Another way do this is to go under the Filter menu and choose Camera Raw Filter. When its window appears, press the K key to get the Brush tool and create a mask, then scroll down to the Detail panel and drag the Sharpness slider way over to the right to apply a lot sharpening (the farther you drag, the more sharpness you get). Now, just paint over the areas you want to appear sharpened. Once you’ve done that, you can increase or decrease the amount of sharpening you applied using the Sharpness slider.
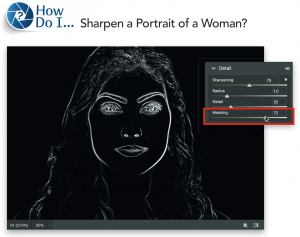
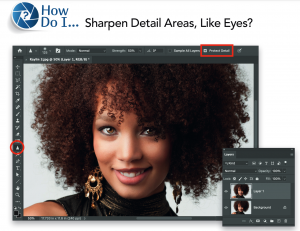
For portraits of women (where sharpening needs to be applied carefully, so you don’t overemphasize their pores or make their skin look craggy), you can use the method I showed on the previous page, where you duplicate the Background layer, apply sharpening, hide that layer behind a black layer mask, and then paint over just the detail areas on your subject’s face (eyes, eyebrows, eyelashes, lips, hair, etc.) with the Brush tool. But, that takes longer than the method I prefer, which is to do it in Camera Raw where there is a feature that works amazingly well for portraits. (I covered this on page 73 in the Camera Raw chapter, but I’ll share it again here, because you came to a chapter on sharpening, so I imagine you want to sharpen a portrait right now.) Scroll down to the Detail panel and choose the Sharpening amount you want. I usually leave the Radius set at 1.0 (1.1 for portraits that need more sharpening, or if you’re using a very-high-megapixel camera, like 50 or more megapixels). Leave the Detail slider set at 25. It’s the next slider we need for portraits—the Masking slider. We want to sharpen detail areas (eyes, eyebrows, teeth, lips, etc.), but avoid sharpening her skin because it brings out texture we don’t want to enhance (we want to keep her skin smooth). By raising the Masking slider, it narrows the sharpening to just those detail areas and avoids sharpening the skin. To make sure you apply the right amount, Option-click (PC: Alt-click) on the Masking slider and the entire image turns solid white. As you drag this slider to the right, areas that turn black (as seen here) are no longer being sharpened. Only the areas that appear in white are now getting sharpened—just the detail areas. That’s a pretty amazing little slider.
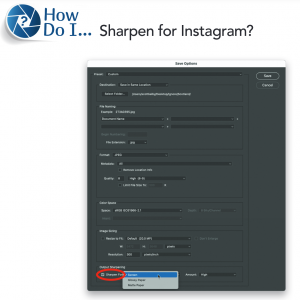
My favorite way is to let Photoshop do it for me by using Camera Raw, but this method only works if you’re just editing in Camera Raw (and not opening the image in Photoshop for more tweaking) because the feature you need only appears when you’re still working on the RAW image. So, if you’re still reading this, I’m assuming that you are, in fact, tweaking your RAW image in Camera Raw and you’re ready to save it outside of Photoshop. What’s nice about this method is that there’s no guesswork because Camera Raw does all the math for you—you just have to tell it where you’re going to share the image, and what level of sharpening you want, and it calculates everything for you. When you’re ready to save your file outside of Photoshop, click the Save Options icon (the square with a downward-facing arrow) at the top right of Camera Raw to bring up the Save Options dialog (seen here). At the bottom, in the Output Sharpening section, turn on the Sharpen For checkbox. To its right is a pop up menu where you’ll choose where this image is going. In this case, it’s being shared on Instagram, so choose Screen (since it will be viewed on a computer or phone screen). To the right is another pop-up menu where you choose the Amount (Low, Standard, or High), but these are fairly conservative settings, so I generally choose High—Low is just about imperceptible and Standard just seems too low. The tough part about this is that there is no preview—you just have to trust in the math. Once you’ve saved the image, open it to see how it did. Luckily, it does a nice job (the quality of the sharpening it applies is top notch), so you just kind of have to “trust the process” (as my favorite football coach would say).