The following is an excerpt from Light It, Shoot It, Retouch It, 2nd Edition by Scott Kelby.
10 THINGS I WISH SOMEBODY HAD TOLD ME WHEN I FIRST STARTED USING FLASH
If you’ve been shooting with flash for a while now, you already know this stuff, but I wish somebody had told me a few of these things when I first started—it would have saved me a lot of time and trouble, and would’ve gotten me better-looking shots a lot sooner. If you’re an old pro at this stuff, skip these 10 things and go check out a chapter that interests you. Of course, I know how human nature is—if you tell someone “this isn’t for you,” then they want it 10 times more than if you had said “everyone needs to read this.” So, I kept this pretty short for that very reason. 🙂
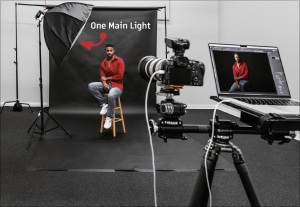 01 Start with just one flash.
A lot of people are tempted to throw up a bunch of flashes right off the bat, but honestly, this is usually an area where less is more. Start by setting up just one main flash. Once you’re happy with the quality and position, if you think you need to add a second flash (maybe a hair kicker light, or a background light), turn off the first flash, and get the second flash looking just like you want it before you turn the main flash back on. Also, never lose sight of what you can create using just one flash (remember, beautiful window light usually comes from just one window). So, build your look one flash at a time, and you’ll have better results.
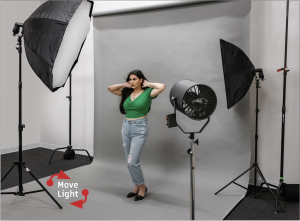 02 If something doesn’t look right, you’re probably only off by a few inches.
If you’ve got your flash in position, and it just looks either blah or bad, don’t get frustrated, or think it’s all messed up—you’re probably just off by a tiny bit. Literally inches. Move the light around your subject in an arc, as if your subject was the center of your wristwatch, and your light circles around them like the hands on your watch. Try moving the flash around that arc just two or three inches in either direction, and see what a difference that makes. Chances are, you’re only a few inches from fantastic light.
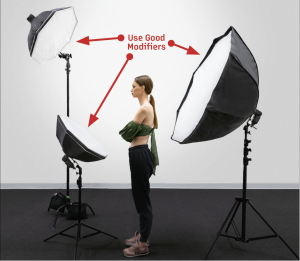 03 Spend more on your modifiers than on your flashes. You probably won’t use all the fancy features anyway.
You know the old saying: “Spend more on your lenses than you do on your camera body?” A similar thing also applies to flash. I’ve found that all flashes emit a bright flash of light when you fire them. Really expensive ones, really cheap ones, studio strobes, hot shoe flashes—they all do basically the same thing: they create a bright flash of light. So, spend more on your modifiers—the softboxes and accessories that shape and craft your light—than you do on the “bright flash of light” makers.
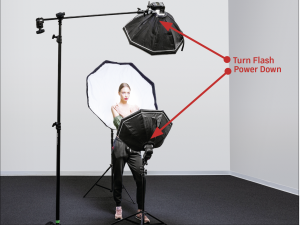 04 If the lighting doesn’t look good, this is probably why.
It’s one of the biggest mistakes new flash users make, and it’s simply this: your flash is too bright. Yup, you have the power of the flash up too high, so instead of looking natural, your light looks, what we call, “flashy.” It’s not supposed to look obvious that you used flash. Your subject is supposed to look like they were shot with window light—soft and natural—and not flashy and overly bright. If you’re going to make a mistake with flash, this is probably it. So, when you’re shooting, if things aren’t looking good, try turning your flash power down, take another test shot, and see if that fixes the problem.
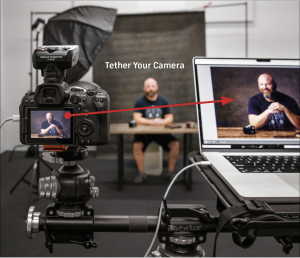 05 Shoot tethered to your computer.
It’s really hard to judge the quality of your light on that tiny 3″ display on the back of your camera. So, anytime I can, indoors or even on location, I try to shoot tethered to my computer using Lightroom’s built-in tethering feature (which has massively improved over the past couple of years—like night-and-day improvement). That way, as I’m shooting, I can see the images appear large on my laptop’s screen, and it makes such a big difference (try it once, and you’ll wonder how you ever lived without tethering). You just need a USB tethering cable—one end plugs into your camera; one end plugs in into your computer, and well, that’s pretty much it. Note: If you shoot Sony, Lightroom’s tethering currently doesn’t work. You’ll need to get the Smart Shooter 4 plug-in (from tethertools.com—the same folks that sell tons of tethering accessories, including the USB cable you need).
06 When it comes to softboxes, bigger is better.
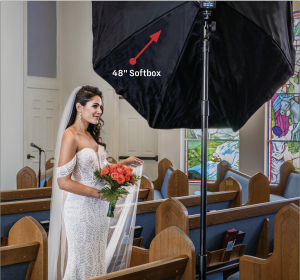
The bigger the softbox, the more beautiful and wrapping the light. If you get one that’s 48″ or even larger, it’s like cheating. It’s nearly impossible to make someone look bad with one of these huge softboxes, plus it makes lighting more than one subject a whole lot easier.
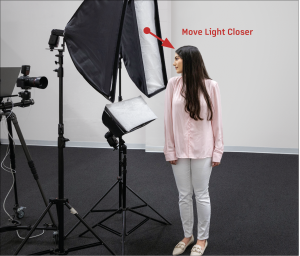 07 Closer is better.
If you want really, really soft, beautiful light, get your softbox really, really close to your subject. The closer you get your softbox to your subject, the larger the light source is in relation to your subject, and the softer, more beautiful, and more wrapping the light will be. Granted, it will also be brighter as you move it closer to them, so you might have to turn the power (brightness) down a smidgen or two as you get it in really close. Get it to where it’s literally just outside your frame in the viewfinder. You’ll love what getting it that close does.
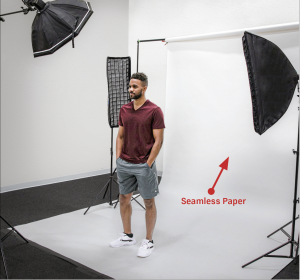
08 Get a few rolls of seamless paper. Start with white.
Pick up almost any magazine and if the cover shot isn’t shot on location, it’s almost a lock it’s shot on a roll of seamless paper. One big reason is the simplicity and clean look of seamless. They’re inexpensive, you can take them on location, and if you buy a white one, you’re actually buying four backgrounds in one. If you light the white background with a flash aiming at it, it turns solid white. If you don’t, that white background looks light gray. If you move your subject a few more feet forward, it turns dark gray. Go five or six feet or more forward with your subject, and that white background turns black because no light is reaching it. Seamless comes in lots of different colors (I get my mine from B&H Photo), and you can get a 53″ wide version or around a 9′ wide one. Get the 9′. You’ll thank me later.
09 You’re not going to change your ISO or shutter speed very often, if at all.
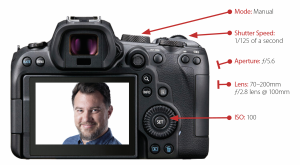 You’ll notice throughout the book, that my ISO usually stays on 100 (which is the lowest native ISO for most mirrorless or DSLR cameras these days) because that ISO creates the cleanest, noise-free images (though there are some cameras that go down to 64 or even 50 ISO, and if yours does, go there because that’s your camera’s lowest native ISO). Also, you’ll notice that in one of the chapters (I think it was Chapter 13) I had my ISO set to 125. Why was that? I think I accidentally hit the dial. It happens. Did that mess up my photo? Nope. It’s not noticeable, which is good because that’s not the first time I’ve hit the ISO setting or shutter speed dial by accident. For shutter speed, with flash, the fastest standard speed you can use (and still have your flash sync up to your camera) is either 1/200 or 1/250 of a second, depending on which make and model of flash you own. If you change to a faster shutter speed than 1/250 of a second, you’ll start to see a dark gradient appear across the bottom of your photo (a good warning sign to let you know your shutter speed is set above 1/250). There are some flashes that have a high-speed sync feature, which lets you use a higher shutter speed, so you can use really low-numbered f-stops, but we’re not going to be doing that here in the book, so you’ll usually see my shutter speed set at a nice safe 1/125 of a second. So, what are slower shutter speeds for? If you want to increase the amount of light already in the room (from lamps or lights), you can lower the shutter speed, like I did in Chapter 4 in the church, for example, where I lowered it to 1/60 of a second to let in more of the existing light. The lower the speed, the more ambient (existing) light it lets in. Don’t worry, your flash will still freeze your subject.
 10 Picking an f-stop for portraits.
My go-to starting place for shooting portraits with flash is f/5.6. This makes life easy, because since you already know your shutter speed will be 1/125 of a second, and your ISO is 100 (or lower if your camera will let you use a lower number), then all you have to do is adjust the power (the brightness) of your flash until the amount of light looks right to you. If you want to shoot at a higher f-stop, like f/11, you can, but you’ll just need to either: (a) turn the power of your flash way up, or (b) increase your ISO, so your camera is more sensitive to light. Now, you might notice that several times in the book I use different f-stops than f/5.6. That’s because I hit the f-stop dial with my thumb and didn’t notice it. It’s not a big deal—I just turned the flash up a little brighter, so don’t sweat this stuff. My starting settings, shooting indoors with flash, are aperture: f/5.6; ISO: 100; shutter speed: 1/125 of a second. I set my flash’s power setting at 1/4 power and take a test shot. If it looks too bright, I turn the flash down. If it looks too dark, I turn it up. That’s it. Don’t overthink it. Because you’ll be dialing in these settings, you need to set your camera to Manual mode, so you can just dial in your shutter speed, ISO, and f-stop, and then you really don’t have to be messing with your camera settings at all. Instead, you can work on what really makes a great photo (besides the light), which is connecting with your subject.