The following is an excerpt from Scott Kelby’s How Do I Do That in Lightroom, 3rd Edition

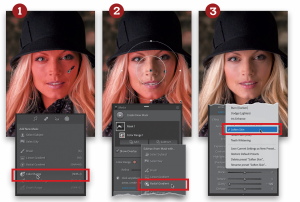
We’re going to use a slick little trick to get the skin on our subject’s face selected, without selecting her eyes or lips (we don’t want to soften those). Start by clicking on the Masking tool (the gray circle with the white dashes around it) in the toolbox beneath the histogram in Lightroom Classic’s Develop module (Lightroom cloud: in the toolbox on the right [on a PC, click-and-hold on the tool]), and then click on Color Range (as shown in the inset in #1). Click the Color Range eyedropper on an area of facial skin (I clicked on her cheek in #1). This selects her flesh tone, but it went a little too far here and selected her hair, as well. We’ll fix that in a moment, but notice her eyes and lips aren’t selected, which is what we want. Next, click on Mask 1 in the Masks panel, then click Subtract, and then click on Radial Gradient (as shown in the inset in #2). Now, click-and-drag an oval out over the subject’s face (as seen in #2). This subtracts her face from the mask, but that’s the opposite of what we want (we want a selection of just her face), so turn on the Invert checkbox (Lightroom cloud: click on the Invert icon) at the top of the Radial Gradient’s panel to invert the oval and now just her face is selected. Finally, at the top of the adjustments panel, to the right of the word “Effect,” click on Custom (Lightroom cloud: Preset) and a pop-up menu appears with a host of presets put there by Adobe with ideal settings for particular tasks. Choose Soften Skin (as shown in the inset in #3; Lightroom cloud: Smooth Skin), and it applies the skin smoothing for you. If you think the softening is too intense, try Soften Skin (Lite), or you can reduce the amount of softening by using the tip on page 144.

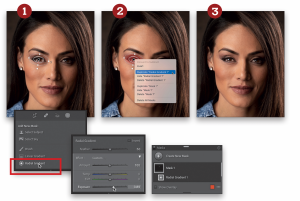
This is a great little trick I learned from pro retoucher (and KelbyOne instructor) Kristina Sherk (from Shark Pixel). Click on the Masking tool (the gray circle with the white dashes around it) in the toolbox beneath the histogram in Lightroom Classic’s Develop module (Lightroom cloud: in the toolbox on the right [on a PC, click-and-hold on the tool]), and then in the panel of Masking tools, click on Radial Gradient (as shown in the inset above left). Now, increase the Exposure amount to around 0.90 (just a starting point), and then click-and-drag out an oval over one of your subject’s eyes (or even the whole eye socket) to brighten it. You can reshape the oval by clicking-and-dragging any of the four adjustment handles around it, and rotate it by moving your cursor outside the oval and clicking-and-dragging (as shown in #1). When it looks good, adjust the Exposure amount so the brightening over the eye looks good (0.89 is probably way too bright for most images). Once you get the oval at the shape and brightness you want over the first eye, Right-click directly on its Edit Pin and choose Duplicate Radial Gradient 1 (as shown in #2) to make another identical oval with the same settings. This duplicate appears right near the original oval, so click-and-drag this duplicate pin, positioning it over the other eye and rotate it to match that eye.

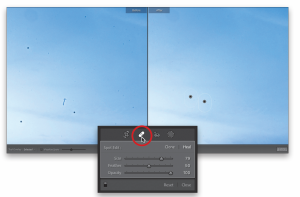
In Lightroom Classic’s Develop module, click on the Spot Removal tool (Q) in the toolbox beneath the histogram near the top of the right side panels (Lightroom cloud: the Healing Brush tool [H] in the toolbox on the right). Resize your brush, so it’s a little bit larger than the speck or spot you want to remove, then just click once and the tool will sample a nearby area to use as a source for the removal. (See the second thicker circle in the After image above? That’s where it’s sampling from.) If for any reason the fix looks odd (it picked a bad spot to sample from, which definitely happens from time to time), you can just click-and-drag that second circle—the one it’s sampling from—to a different location to get better results. Also, you can click-and-drag on the edge of the circle to resize it, and you can click-and-drag the first circle (the one where you clicked—it has a thinner border) if you were a little off when you first clicked over the spot you wanted to fix. If you don’t like the way the repair looks, you can have Lightroom automatically choose a different area to sample from, so you get a different result from the repair, by simply pressing the / (Forward Slash) key on your keyboard and it picks a new spot. Just keep hitting that key until your repair looks good.

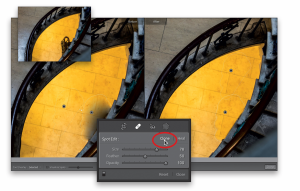
The Spot Removal tool (Q; found in the toolbox beneath the histogram; Lightroom cloud: the Healing Brush tool [H]—its icon looks like a Band-Aid in both) works best when the thing you want to remove is all by itself, like a dust spot or sensor dust. Where it really messes up is when you want to remove part of something because once you remove part of it, the area that’s left smears (as seen above, in the Before image on the left, where I removed part of a handrail on the floor below the steps). If you see that smearing, that’s when you want to switch the tool from Heal (which we leave on almost always) to Clone. It makes a huge difference (as seen above, in the After image on the right) because it uses a totally different technique, where it literally copies part of your photo and puts it over the area you’re trying to remove. You choose this setting from the top of the tool’s panel (as shown in the inset above). Just click on Clone (Lightroom cloud: choose it from the Mode pop-up menu) and it redoes your edit. Also, you might need to drag the tool’s Feather slider to the left and right to see which setting looks best for the current area you’re working on—just a simple drag to the left and back to the right, and you’ll find the sweet spot where it looks best. In the example above, to get the lines on the tile floor to line up, once I switched to Clone I had to click inside the sample area and drag it to an area on the floor where the tones and lines all matched up.

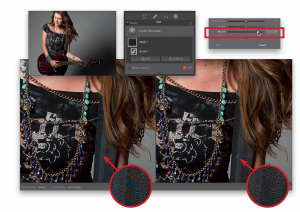
To get rid of a moiré pattern (color banding stripes or weird patterns that appear over clothing, or luggage, or in this case, a guitar strap [notice the pink and blue stripes in the strap, above left?]), click on the Masking tool (the gray circle with the white dashes around it) in the toolbox beneath the histogram in Lightroom Classic’s Develop module (Lightroom cloud: in the toolbox on the right [on a PC, click-and-hold on the tool]), and then in the panel of Masking tools, click on Brush. Now, near the bottom of the panel, increase the Moiré amount quite a bit, and then paint over the moiré pattern to remove it (as seen in the image above right, where the moiré pattern is now gone).

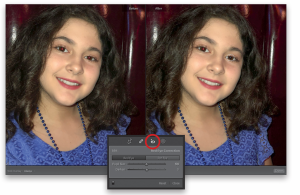
Get the Red Eye Correction tool from the toolbox beneath the histogram in Lightroom Classic’s Develop module, click the tool in the center of your subject’s eye, and drag outward until it matches the size of the entire eye (not just the pupil and iris area, the whole eye). Lightroom will detect the pupil within that area, but if it doesn’t fully remove the red, try dragging the Pupil Size slider in the tool’s panel to the right. If it now looks too gray, just drag the Darken slider to the left. It works the same way with Pet Eye, but the results are tuned to the reflection from pets’ eyes—just click the Pet Eye tab once you have the Red Eye Correction tool selected.

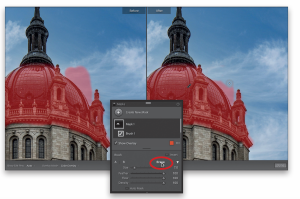
If you’re painting over an area with the Brush tool (like I’m doing here, where I’m painting over the dome of the cathedral), and you paint over the edge (like onto the sky, as I did here in the Before image, above left), you can easily erase that spillover by pressing-and-holding the Option (PC: Alt) key, and your brush temporarily turns into the Erase brush. Now, as you paint over the areas you spilled onto, it removes them from your mask (as seen in the After image, above right, where I’m painting over the spillover and it’s erasing the red tint as I paint). When you release the Option key, it returns you to the regular brush. You can also switch to the Erase brush (and control its settings), by clicking on Erase (Lightroom cloud: the Eraser icon) at the top of the Brush panel (as shown in the inset).