From Beyond Point-and-Shoot by Darrell Young
As a beginner photographer, you may wonder how people are able to capture sharp images of moving subjects. Or you may have seen images in which the subject is blurred to imply motion. Motion control is very important to photographers who shoot wildlife, sports, and action shots of any kind. In some cases, it even becomes important to nature shooters, such as when they want to blur a waterfall and make it look wispy. Let’s talk about how we can use shutter speed to control motion.
Stopping Action When the Subject Never Stops Moving
Many of us like to shoot pictures of things like air shows, racecars, action sports, and flying birds. Since most of these subjects are in continuous motion, you have to use a fast shutter speed, focus tracking, and high-speed continuous shutter release mode to capture an image that is not blurred. We’ll talk more about these camera features as we discuss stopping action in various ways.
In the picture of the seagull, you can see that the motion of the bird has been frozen. I was in a superstore parking lot on an overcast day and several seagulls were flying around above my car. I couldn’t resist jumping out of my car, camera blazing, even though people walking to their cars were giving me strange looks.
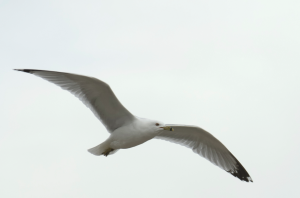
I shot this image at 1/500s shutter speed and ISO 100 using shutter priority mode. The camera adjusted the aperture for me. While the gull flew back and forth, I used the autofocus points (AF points) of my camera’s autofocus tracking system to keep the bird in focus as I followed it with my camera. Autofocus tracking helps keep a moving subject sharply focused much better than you can when you focus manually. I firmly believe in using automation, like focus tracking, when it will improve my images.
As I panned with the bird—that is, I kept the lens trained on the bird while it moved, which required me to move my camera back and forth as it flew—I fired off bursts of shots with my camera’s high-speed continuous shutter release. Many cameras can fire from three to six shots per second (and pro cameras can shoot even faster) when you use what is usually called continuous release mode. You just hold down the shutter-release button and the camera continuously fires the shutter.
Tip: Most photographers won’t tell you that they took 200 pictures of a moving subject in order to get a few usable ones, but that’s the reality of shooting action. Prepare to shoot a lot of images and later delete the ones that don’t make the grade.
Stopping Action with a Medium Shutter Speed and Peak of Action
Shooting a moving subject at the peak of action will often allow you to use a slower shutter speed than normally needed to stop the action. It’s a good method to use when there is a peak of action as opposed to continuous movement.
I took the image of the boy jumping off a cliff into water at a small river that is between two mountains, so the light was not very bright. With dim light, it is difficult to get a fast enough shutter speed to stop action. However, I really wanted these shots, so I used several photographic tricks to get them.
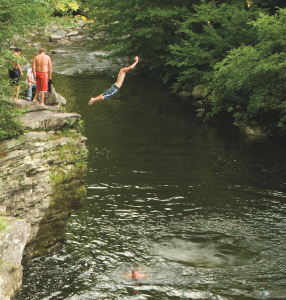
Because of the weak light, I selected a shutter speed of 1/250s and increased the ISO to 800. I had to increase the ISO sensitivity to make the camera more sensitive to light. Otherwise, I would have had to use a shutter speed of about 1/60s, which would not have stopped the action very well. Since I was using semi-automation (shutter priority mode), the camera selected a medium-sized aperture of f/6.3.
A shutter speed of 1/250s is marginally fast enough to stop action, but I didn’t want to increase the ISO sensitivity above 800 (which could introduce noise), so this picture was taken at an exact moment—the peak of action—to prevent blurring of the falling subject. If you look at the boy’s position, you will see that he is above his launch point (the edge of the cliff). He jumped into the air, and the peak of action occurred just as the momentum from that upward jump paused and gravity started taking over.
I fired my camera in high-speed continuous shutter release mode from the moment he started moving. I knew that the peak of action was coming, but since it only lasts a few milliseconds, it can be hard to capture. Because I fired in bursts, I captured several frames before, during, and after the peak of action. I got my shot!
Allowing Blur in an Image as a Creative Effect
When you use motion control you may want to allow a little or a lot of blur in your image, depending on the subject. Let’s look at two scenarios: one where we want a little blur, and one where a lot of blur is appropriate.
A Little Blur Can Be a Good Thing: When you are shooting a close-up of a subject that is moving at a high speed, it is sometimes a good idea to slow the shutter speed down a little bit in order to introduce a small amount of blur, implying movement.
When I shot the second image of a boy jumping into water, I used my zoom lens to get a closer shot, and I decreased my shutter speed to 1/125s so I could shoot a burst of frames around the peak of action while leaving a little blur in parts of the image.

Most of the time, the limbs of humans or animals in motion move much more rapidly than their bodies. In the case of the boy leaping off the cliff, his body is sufficiently frozen, and his feet and hands have some blur from movement. The image looks better than the previous image in which the boy is completely stopped in midair, as if levitating. A little blur implies action. Too much blur would ruin the shot, of course, so you’ll have to shoot a lot of images to get the right amount of blur.
Remember, when you shoot action, use high-speed continuous shutter release and focus tracking in addition to whatever shutter speed you choose.
A Lot of Blur Can Work for Some Subjects: Have you seen pictures where a lovely waterfall or cascade has that beautiful wispy effect? You can achieve this effect by using a slow shutter speed to capture the flowing water. Since the reflected light from the waterfall enters the camera for a longer time with a slow shutter speed, you must limit the light with a small aperture and a low ISO setting. Otherwise, the image would be overexposed from too much light. The nice thing is that a small aperture gives you a deep depth of field so the scenic shot will have good focus throughout, and the low ISO setting makes the image noise free.
The first image below was shot with a fast shutter speed, and the second was shot with a slow shutter speed. Which do you like best? Most people do not like the effect of a fast shutter speed with flowing water because the water seems frozen, even agitated. Instead, they prefer the smooth flowing look of a waterfall that is shot with a slow shutter speed.
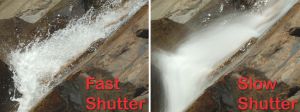
Tip: The human eye maintains an image for about 1/10s, so an image of a waterfall shot around that speed will look like what your eye normally sees. If you are shooting moving water, try to keep your shutter speed at or below 1/15s. You must use a tripod at shutter speeds slower than 1/15s or the entire image will be blurry from camera shake.
When shooting waterfalls and other scenes in wooded areas, it is best to wait until you can shoot on an overcast day. The excessive contrast between sunlight and shadows in the woods can make it nearly impossible to get good images.
For more tips and tricks for beginners check out Darrell Young’s Beyond Point-and-Shoot.
Plus take a look at his latest Nikon and Olympus Manuals!