The following is an excerpt from The Nikon Autofocus System, 2nd Edition by Mike Hagen.
Indoor Sports: Basketball
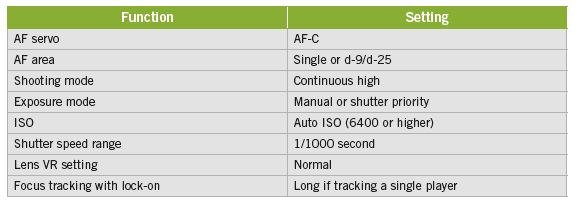
Important Camera Settings
Comments
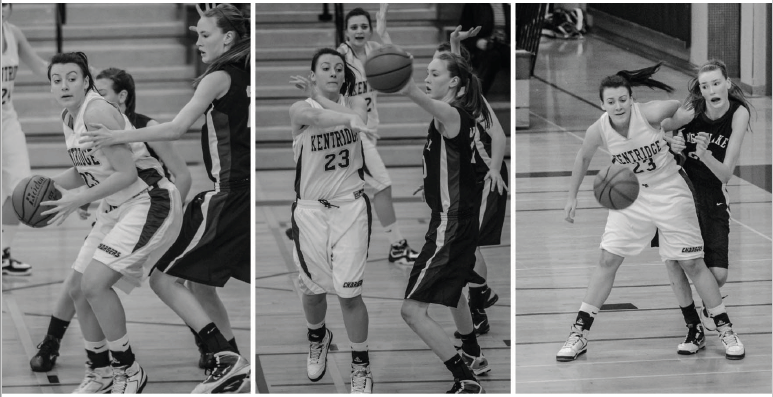
Basketball is one of the most difficult sports to photograph. Usually basketball gyms are dark, the lighting is terrible, and you can’t use flash because the players are too far from where you’re sitting. Getting shots like those in Sports Illustrated is nearly impossible for amateur photographers because professional photographers have worked with the arena before and have mounted their own strobes (flash units) in the rafters. The pros trigger their flashes with radio triggers. The fast pulses of the strobes freeze the motion of the players. For the rest of us mere mortals, we have to work with high ISOs and slower shutter speeds. To get around these limitations, shoot with f/1.8 or f/1.4 prime lenses. If you can sit under one of the basketball hoops, you can use a 35mm f/1.4 lens on one camera body for close action and a longer lens, like a 200mm f/2 or 300mm f/2.8, for shots of players at the other end of the court.
Set the ISO to 6400 or higher, and shoot with a wide-open aperture. The goal is to get the fastest shutter speed possible, preferably 1/1000 second or faster. If this won’t work, then 1/500 sec-ond will do, but your sharpest pictures will occur at the peak of action, like when a player is at the top of a jump. Use AF-C servo. I also recommend single-area or d-9/d-25 because players are close together and the larger focus patterns might start tracking other players in the focus group. Use the Long setting for Focus tracking with lock-on if you are shooting a single player. Shoot in a vertical orientation, and use the bottom focus points for high school and college players. You don’t want them to jump out of the frame when you shoot from a low position or when you try to capture a dunk. Allow vertical space so the players’ hands stay in the frame.
Indoor Events: Dance and Bands
Important Camera Settings
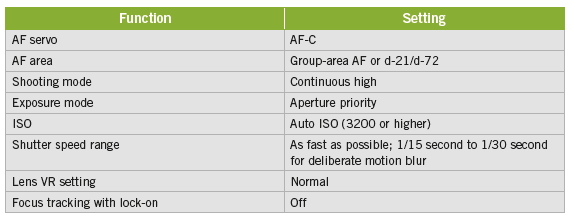
Comments
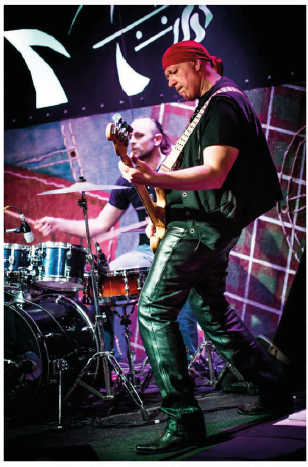
In this type of situation, you’re probably photographing in a studio or on a stage under spotlights or dramatic lighting with lots of different colors and brightness levels. The light is generally low, so your shutter speeds will often vary between 1/10 second and 1/250 second. You’ll need to use every trick in your arsenal to keep your camera as steady as possible. Shoot with your lens wide open to allow the most light into the camera. Try to time the release of the shutter so it coincides with the peak of action, such as the top of a jump when a dancer is still. This will help reduce motion blur from longer shutter speeds. Pan with the motion whenever possible. Roll your finger over the shutter button; don’t stab it, or you’ll get motion blur from camera movement. Also, hold your breath while you shoot for maximum stability. Take a burst of shots, and one of them will probably be sharp.
I suggest group-area AF if your camera has it; otherwise use d-21/d-72. Use AF-C while a performer is moving, and lock focus when the performer pauses. If you use the AF-ON button (back-button focus), simply remove your thumb from the AF-ON button to lock focus when a dancer stops. The dynamic range on a stage can vary as much as 10 to 15 stops, depending on the lighting and where the dancer is located on stage, so pay attention to areas in the scene that may result in blown-out highlights.
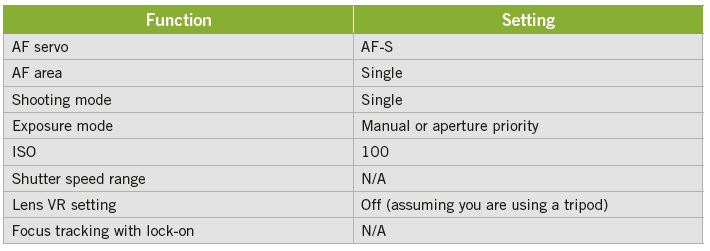
Landscapes
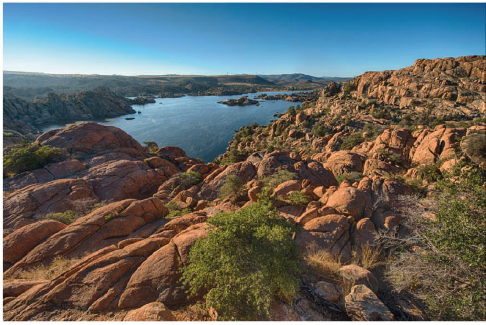
Important Camera Settings
Comments
Landscape photography is all about maximizing the DOF and maintaining sharpness from the front to the back of the frame. AF-S mode works fine for landscapes if you are a front-button focuser. If you are a back-button focuser and use the AF-ON button, use AF-C, as described in chapter 2. Single-point AF makes the most sense for landscapes because the scene doesn’t move, so you can precisely choose a focus point to maximize the DOF. Focus at the hyperfocal distance (chapter 7), and use the hyperfocal distance markers on the lens to set the aperture. Remember that very small apertures results in light diffraction, which leads to reduced image sharpness. You might be tempted to use f/22 or f/32, but past f/16 or so you lose sharpness that you might otherwise gain through additional DOF.
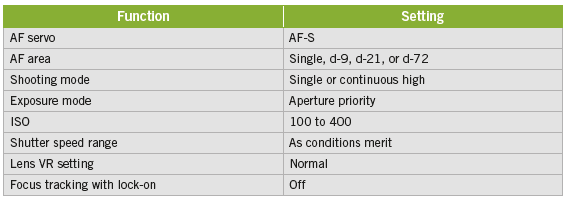
Portraits: Individuals, Groups, Weddings

Important Camera Settings
Comments
The most important thing to focus on when you shoot portraits is the subject’s eye. If you shoot with a fast lens, like the 85mm f/1.4 lens, you need to be very careful about focusing critically so you don’t accidentally focus on the nose or forehead. When you shoot groups, use a smaller aperture like f/8 or f/11 to gain more DOF, and focus about one third of the way into the group to maximize the DOF. In group portraiture, you don’t necessarily focus on anyone specifically; rather, you focus into the group to maximize the fact that one third of the DOF occurs in front of the focus point and two thirds of the DOF occurs behind the focus point. For portrait photography, I generally like to use single-point AF or any of the dynamic AF modes, like d-9, d-21, or d-72, that use a priority focus point. Quite often you need to focus then recompose so the subject is on the left or right of the composition. Therefore, use AF-S mode if you are a front-button focuser, or AF-C mode if you are a back-button focuser.
When you shoot a wedding, there may be times when you need to shoot in continuous AF (AF-C). For example, when the bride is walking down the aisle or when people are dancing at the reception, you need to track their movement with AF-C. However, most of the time you’ll use AF-S mode because a portrait subject will pose on a stool or in a standing position. Again, if you’re a back-button focuser, you can leave the camera in AF-C mode to get the best of both worlds for moving and stationary portraits. I keep my camera in continuous high frame rate so I can shoot bursts if necessary. If you use flash in your portraiture work, I suggest staying in single-shot mode; otherwise your flash units won’t be able to recycle fast enough to keep up with a fast frame rate.