The following is an excerpt from Rachel Eskandari’s Watercolor Botanical Garden: A Modern Approach to Painting Bold Flowers, Plants, and Cacti

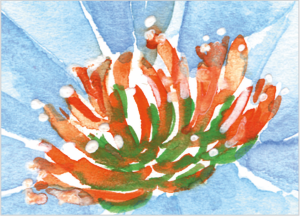
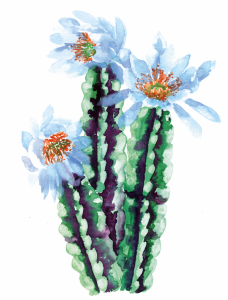 The queen of the night cactus has strong, sweetly scented flowers that have been known to be picked during the night and brought inside to enjoy their perfume-like fragrance. Large and white in appearance, they thrive best in twilight-like lighting of the morning and afternoon sun, and only stay fully bloomed throughout the night.
How to Paint a Queen of the Night
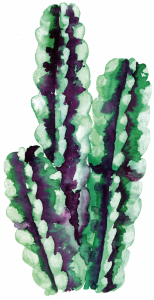
This cactus flower is one of the more challenging flowers in this book. The body of the cactus has a lot of ridges that are important to the shape of this cactus. Along with ridges, painting the layering of the cactus body is a process in itself. The flower is very ethereal, and you achieve this by using an almost transparent blue to layer in the sword-like petals.
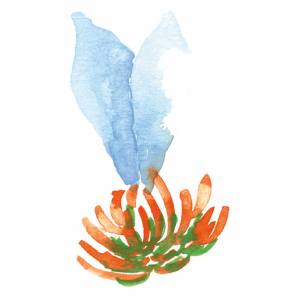
STEP 1
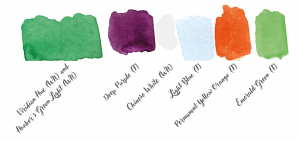
You will start by painting the top section of the cactus body. Using your number eight round brush with a mix of Viridian Hue and Hooker’s Green Light, use the tip of your brush to paint the outline of the shape on the left. To get a light color use a good amount of water mixed with your green. Fill in the shape with the green color mix. If it is still too dark after applying it, dab out the color to expose a lighter green. Study the ridges made on the outside of the shape and how they slightly angle up. Make sure you create curves with no points. Immediately after painting the shape on the left, paint the outline of the right shape and fill it in with the same green color. Keep in mind, when you combine two paint colors that the color ratios may vary slightly when remixing more paint, hence when applied to the paper there may be a slight difference in color hues. Make sure to leave a white line in between the two shapes, which will act as a guide in a later step. You want to do this step rather quickly before the color dries on both shapes. If it does dry, apply some water to the surface of your painting and quickly move on to the next step.
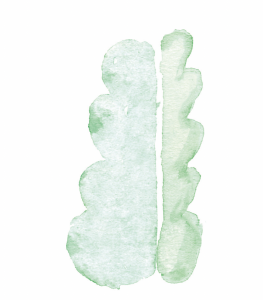
Use the same color mix with a little less water to create a deeper shade, and use it to paint the shadow along the inner edges of both shapes. Allow the bolder green color to bleed into the lighter green color. If the bleed goes all the way to the outer edges of both shapes, use a paper towel to dab out the color on the ridges. You want to maintain the highlights on those outer curves.
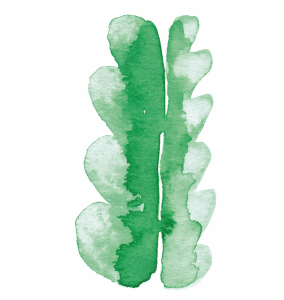
While the green is still moist, load your number three round brush with Deep Purple paint and pull it along the inner edge of the left shape. This will create the shadow needed to separate the two shapes. At this point the white line should be covered and the deep green should not be fully absorbed by the purple. It is important to see all layers as this is what creates depth. Notice how the purple stays on the left shape and does not wander over to the right shape. The purple shadow on the left shape is what helps clearly define the right and left shapes. The Deep Purple paint provides a strong contrast up against the light green shape on the right.
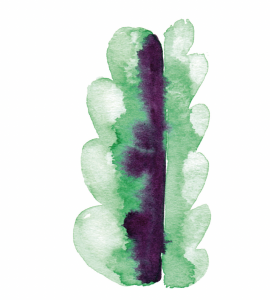
After the right shape has dried, paint the third green shape on the far-right side using the same method as you did for the first two shapes. Leave a sliver of white space to the left of your new shape. Remember to keep all of the curved edges light, which will really help keep definition within the cactus form. While your new green shape is moist, add Deep Purple along the left edge allowing it to bleed into the green.
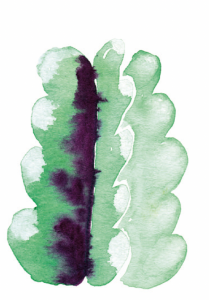
STEP 2
Next, below the section you just completed, you will add a similar section, using the same steps as above but this time the entire section will be a little longer. The edges of the shapes should be similar, and they should angle upward, but they shouldn’t all be exactly the same.
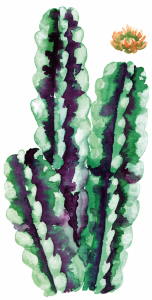
Where the arrows are pointing in the image, I have added more color to fill out the shapes, which creates a better balance. You want to add more color to eliminate the gaps between the two sections.


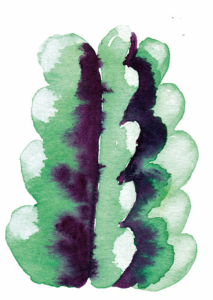
STEP 3
Take your time and paint a grouping of these cacti for the body of the cactus flower. Notice how the middle limb is behind the other limbs. The Deep Purple at the bottom of the shape creates a shadow and emphasizes the fact that it is behind the other two shapes.
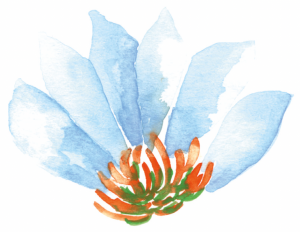
EXERCISE: Now that you have the body of the cactus it’s time to start painting your flowers! I suggest practicing these steps a couple of times before adding them to your cactus.
Let’s start by painting the flower center. The center of this flower is very textured, similar to the center of the Lady Gay peony. Load your brush with a yellow-orange color, and create overlapping curved lines, adding more lines at the top, to create a more rounded top. Start light and then paint in more orange for some added depth. While still wet, load your brush with Emerald Green and create the same line work over the light orange towards the base of the center. The green creates contrast against the orange and acts as the shadow for the flower’s center.

STEP 4
Once you have practiced painting the middle of the flower, several times, you are ready to add them to your cactus grouping. Like in the sample image, you want to paint the center hovering over the cactus limb. By doing this, you are leaving room for the petals to be added to the flower, especially the bottom of the flower. Paint the three flower centers before moving forward.
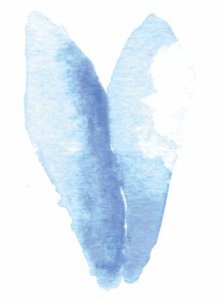
EXERCISE: Before moving on let’s practice painting the petals. The shape of these petals is sword like. They have a distinguishable point and then angle outward and down. It is almost like creating a rounded diamond and stretching out the bottom half. The tip of the petal needs to be curved so there are no sharp points.
Use the sample to work your way through the steps of creating this petal. Starting with Light Blue, create a thick outline of the petal, and then quickly fill it in with the same blue. Immediately after filling it with blue, dab the wet color out with a paper towel to reveal a very light blue. Practice painting this shape several times and grouping petals together.

Sword-like Pointed Long Petals
In a group, you want a little more of the Light Blue for shadow. The shadow should be painted along the back petal edge, where the two petals meet. The difference in value between the main blue and shadow’s blue should be subtle enough to maintain the ethereal look of the flower.
The other petal shapes you need to practice are curved and shorter. For the petal painted from the side, you can either create an outline and fill it in or use the side of the your round brush to paint a thicker brushstroke that thins out toward the end of the petal. The key to this petal is to immediately lift the color out of the top, rounded edge to make the petal appear like it is curling over itself. For the petal painted facing forward and curling up, create a wide petal and lift out the top edge of the petal to create the curl. Then add in more blue to define the interior of the petal.
Petal grouping
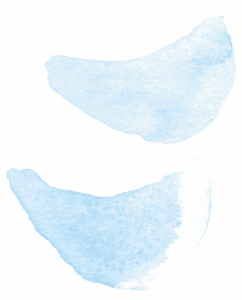
Curved Petal from the Side

Petal Facing Forward and Curling Up
STEP 5
Go back to the flower center you created and start adding your petals in groupings. Start at the top and work your way around the flower center.
As you are painting, pay attention to the shadow placement. This will help better define each individual petal. The tips of the petals should be lighter than their bases.
Next paint the curved petals that go below the center of the flower. Remember these petals are angled this way because they face toward you, therefore you see less of the petal.
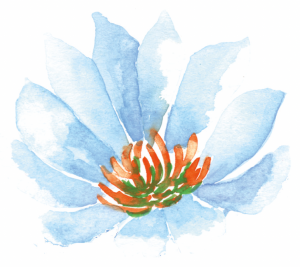
The queen of the night has elongated petals that burst out from the bottom of the main flower. Also, some of them can be seen peeking around the top of the flower depending on the angle of view. They are more separated and thinner. Paint about five of these petals spaced out along the bottom of the flower. Add some extra blue for shadow where these petals meet the main flower.
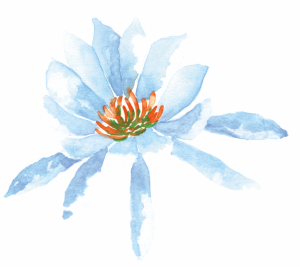
STEP 6
 To pull everything together, add some more detail to the center of the flower. Using the tip of your number three round brush, add some white paint and create small decorative dots scattered around the center. The white will draw your attention to the center, and then from there your attention will shift to studying the full cactus flower.