The following is an excerpt from Glenn Randall’s Dusk to Dawn

Figure 12-1: Milky Way and lenticular clouds over the Titan, Fisher Towers, Utah. August 10, 2016, 11:54 p.m. Canon EOS 5D Mark III, Canon EF 14mm f/2.8L II USM, 30 seconds, f/2.8, ISO 6400. A waxing gibbous moon provided the light on the land.
A moonlit walk in the wilderness is an enchanting experience. The world is familiar, yet transformed. The light seems to have a silvery, bluish quality. Shadows are inky black. When the moon is full, the beam of your headlamp becomes a barrier between you and the magic of moonlight. Turn your headlamp off, and pause for a few minutes. Once your eyes have dark-adapted, a headlamp is only necessary if you’re hiking through a forest or through deep shade in the depths of a canyon. Learning to make evocative images by the light of the moon opens up yet another realm of nighttime landscape photography.
In this chapter I’ll concentrate on techniques for creating images where the stars are rendered as points rather than long streaks or trails. See chapter 8 for a full discussion of shooting star trails, which can be shot regardless of the phase of the moon.
As always, good planning will help ensure a successful shoot. The Photographer’s Ephemeris, Sun Surveyor, and any number of internet sites can provide information on moonrise and moonset times. The Photographer’s Ephemeris and Sun Surveyor go beyond such basic information by giving you the azimuth and altitude of the moon at any time or place. They also provide information on the phase of the moon, usually expressed as the percentage of the moon’s disk that is illuminated.
The day-to-day change in the time of moonrise and moonset is very different from the day-to-day change in the time of sunrise and sunset. In the spring, in the northern hemisphere, the sun rises earlier and sets later on successive days. In the fall, the sun rises later and sets earlier on successive days. The change in the time of sunrise and sunset is small, only a minute or two per day.
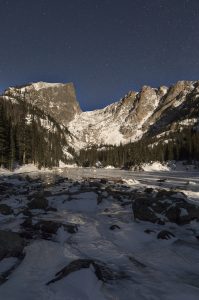
Figure 12-2: Hallett Peak and Dream Lake by moonlight, Rocky Mountain National Park, Colorado. December 5, 2017, 8:17 p.m. Canon EOS 5D Mark IV, Canon EF 16-35mm f/2.8L III USM. Land: two focus positions, four frames per focus position, images stacked in Photoshop, noise reduced with Stack Mode>Median, 30 seconds, f/5.6, ISO 3200. Sky: 15 seconds, f/4, ISO 3200. A waning gibbous moon provided the light on the land.
The moon, by contrast, always rises and sets later on successive days. The change in the time of moonrise and moonset is much larger and more variable than it is for sunrise and sunset. For example, in the northern part of the United States, the delay in moonrise from one day to the next ranges from a few minutes to well over an hour. To make things still more confusing, the difference between moonrise times on successive days is not necessarily the same as the difference between moonset times on those same successive days. If you need the moon to be in a very specific location (shining through an arch, for example), there may be only a few days in an entire year when the shot works. Use the position search capabilities in Sun Surveyor to identify those days.
The azimuth of moonrise and moonset varies tremendously throughout the year. At the latitude of Denver, in the summer, when the sun rises well to the north of east and sets well to the north of west, the full moon rises well to the south of east and sets well to the south of west. Conversely, in the winter, when the sun rises well to the south of east and sets well to the south of west, the full moon rises well to the north of east and sets well to the north of west. This makes sense when you consider that the moon is full when it is directly opposite the sun as seen from Earth. If the sun rises to the southeast, the full moon will set to the northwest. If the ideal sunrise light on your subject occurs at summer solstice, the ideal moonrise light on your subject occurs at winter solstice.
The angle of moonlight as it illuminates your subject at night is just as important as the angle of sunlight during the day. The best angles during the day are generally those that produce sidelight, which creates texture, form, and volume; and backlight, which often adds drama, particularly if the sun is in the frame and right on the horizon. Front light, which occurs when the sun is directly behind you, is usually the least interesting direction of light unless the light itself is strongly colored at sunrise or sunset.
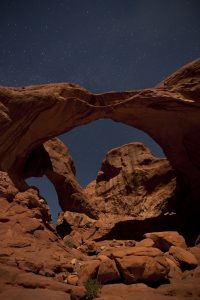
Figure 12-3: Double Arch by moonlight, Arches National Park, Utah. November 8, 2008, 7:28 p.m. Canon EOS 1Ds Mark III, Canon EF 16-35mm f/2.8L II USM, 20 seconds, f/2.8, ISO 1600. A waxing gibbous moon provided the light on the land.
The best angles for moonlight are a bit different. During the day we easily see detail in most shadows; at night, even well-adapted human eyes can rarely penetrate dense shadows, and our cameras struggle to record much detail there if the exposure is correct for the highlights. Try to compose with the moon roughly 30 to 60 degrees right or left of a straight-behind-you position. A scene that is perfectly front-lit (moon straight behind you) looks flat, just like it does in daytime. Front-lit scenes can also create problems with your own shadow intruding into your composition. Perfect sidelight, however, with the moon at exactly 90 degrees left or right of the camera axis, can create too large an area of black shadow to be pleasing. Backlight exacerbates the excessive-shadow problem. Backlight can also create unmanageable flare, particularly if the moon is in the frame and high in the sky. Backlit daylight scenes seem acceptable if the sun burns out to blank white. After all, we can’t look directly at the sun. But a blank-white, irregularly shaped region of flare where a perfectly round and detailed moon should be seems unnatural.
Once you’re in the field, try to find compositions that require you to look up steeply. On moonlit nights, the sky near the horizon may be so bright that you see only a few stars. If the horizon is at the same elevation as you, and your composition includes only a narrow strip of sky, the photo may look like you shot it in daylight, then forgot to retouch those last few pesky white dots in the sky. The sky well above the horizon is much darker, which means you see more stars. As a rule, it doesn’t work well just to include lots of sky because the sky, all by itself, is not interesting enough to carry the shot without the Milky Way, which is invisible on nights with a full moon. Try to fill part of the sky with something interesting. Arches, sandstone towers or other kinds of rock spires, interesting trees, and very dramatic peaks can all make good subjects.
Exposure for Moonlit Landscapes
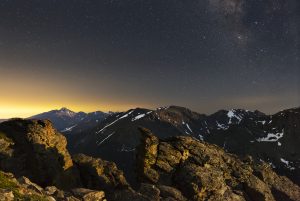
Figure 12-4: Longs Peak from the Rock Cut by moonlight, Rocky Mountain National Park, Colorado. July 1, 2017, 12:52 a.m. Canon EOS 5D Mark III, Canon EF 16-35mm f/2.8L III USM. Land: 10 frames, images stacked in Photoshop, noise reduced with Stack Mode>Median, 1 minute, f/2.8, ISO 6400. Sky: 23 frames, 13 seconds, f/3.2, ISO 6400, images aligned and noise reduced in RegiStar. A waxing gibbous moon provided the light on the land.
Even the light of a full moon is too dim for most camera meters to function. Exposure, therefore, becomes a matter of guess-and-check. As a rule of thumb, the correct exposure for a landscape lit by a full moon differs by about four stops from the correct exposure for the Milky Way. As you’ll recall from chapter 5, the classic dark-sky exposure for the Milky Way is 30 seconds, f/2.8, ISO 6400. That means a good starting point for a full-moon exposure is about 30 seconds, f/2.8, ISO 400, or the equivalent. However, the brightness of the light from the full moon can vary by several stops, depending on the moon’s position in the sky. When it’s near the horizon, your exposures will need to be longer. In addition, the moon is retroreflective, which means that much of the light that reaches it from the sun bounces straight back toward the sun. The result is that the drop-off in brightness when the moon is not precisely full is much greater than you would expect based on the percentage of the moon’s surface that is illuminated. For example, when the moon is full, 100 percent of its visible surface is illuminated. At first and last quarter, 50 percent is illuminated, so you might expect that the moon’s light would be half as bright, meaning you would need to increase your exposure by just one stop. As it turns out, you’ll need to increase your exposure by three stops or a bit more. Shooting under a crescent moon could mean you need to increase your exposure by another three stops.
Fortunately, your camera’s histogram still works even if its meter won’t. Your best bet is to use the guidelines above to decide on a starting point, shoot a test frame, examine the histogram (not the captured image), and adjust accordingly. Of course, if you want to keep your stars reasonably round, you’ll have to remember to employ the 500 rule discussed in chapter 3.
Processing Moonlit Landscapes

Figure 12-5: Longs Peak and Bear Lake by moonlight, Rocky Mountain National Park, Colorado. December 5, 2017, 9:33 p.m. Canon EOS 5D Mark IV, Canon EF 16-35mm f/2.8L III USM, 15 seconds, f/4.5, ISO 4000. A waning gibbous moon provided the light on the land.
As I explained in chapter 6, we see moonlit scenes as bluish, but the color of moonlight is actually warmer than noon daylight. That presents you with a dilemma that is similar to the one you faced when processing Milky Way shots: do you accept the daylight white-balance rendition of the scene, which doesn’t correspond with your expectations and experience, or do you alter the color balance to more closely correspond with the way the scene felt? In this case, however, the issue is land color, not sky color. As I explained in chapter 6, on moonlit-drenched nights, the sky really is blue, and your camera will record it as such if you use a daylight white balance. Moonlight, however, has a color temperature of roughly 4100 degrees Kelvin, so the land will have an overall yellow colorcast compared to a shot of the same scene taken under clear skies at noon, when the light has a color temperature of roughly 5500 degrees Kelvin. (Remember that lower color temperatures correspond to warmer tones. A tungsten bulb has a color temperature of around 3200 degrees Kelvin, which corresponds to a very warm, orange-colored light.)
The contrast of warm-toned land and cool blue sky is very appealing, but it doesn’t really evoke the feeling of moonlight. Here’s how to give your image a moonlit feel, if indeed that’s your goal.

Figure 12-6: The ghost town of Ashcroft by the light of the full moon, near Aspen, Colorado. September 27, 2007, 10:28 p.m. Nikon D70s, AF-S DX Zoom-Nikkor 18-70mm f/3.5-4.5G IF-ED, 272 seconds, f/4.8, ISO 200. I lit the inside of each cabin with one burst from a handheld Nikon flash unit with an 85B warming filter.
First, give the image an overall bluish cast. I suggest using the Temp slider in the Basic panel in Lightroom to change the color temperature to between 4200 and 4800 Kelvin. The exact value will vary depending on the image and personal taste. I find I cool off snow scenes more than summer scenes. It’s important to remember the counterintuitive way that Lightroom interprets the temperature setting. This slider was designed to give images a neutral white balance. An image shot with a daylight white balance under old-fashioned tungsten (incandescent) light bulbs will have a strong orange cast. To correct that colorcast in Lightroom and make whites appear white again, set the temperature to the color of the light source—3200 degrees Kelvin—not to the color you want the image to be. Setting the Temp slider to a warm color like 3200 degrees Kelvin does not make the image look like it was lit with that color of light, but rather takes an image shot under that color of light and makes it neutral by cooling it down.
Even on a moonlit night, the sky is so dark it looks nearly black. You can help create a nighttime feel by darkening the sky until it is significantly darker than a daylight sky. Remember, however, that the sky near the horizon is always brighter than the land just below the horizon. If you make the sky just above the horizon very dark, the land will have to be darker still, and that may result in the land being too dark to be acceptable. Lightroom’s Graduated Filter and Adjustment Brush are two good ways to darken the sky without darkening the land.
It may be tempting to darken the image overall in hopes of creating a nighttime feel. After all, it’s dark out there! It’s all too easy, however, to create an image that is so dark it becomes muddy and unappealing. A better solution for moonlit scenes is to add contrast to the land so that only the shadows become very dark, while keeping the moonlit portions of the land close to midtone. A good first step is to set a solid black point. In Lightroom’s Basic panel, hold down Shift and double-click on either the Blacks slider nub or the word Blacks. You’ve essentially told Lightroom, “Find the darkest pixel in the image and make it pure black, then distribute all the remaining tones evenly through the tonal scale to prevent harsh transitions.” You can also add contrast globally with the Contrast slider or locally with the Graduated Filter or the Adjustment Brush. If objects such as a tree project upward into the sky, you may need to open the image in Photoshop, use the Quick Selection tool to select the sky, add a Curves adjustment layer while the selection is active, and darken the sky by pulling down and right on the center of the curve.
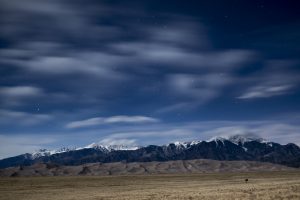
Figure 12-7: Sand dunes and the Sangre de Cristo Range by moonlight, Great Sand Dunes National Park, Colorado. December 15, 2016, 5:18 a.m. Canon EOS 5D Mark III, Canon EF 50mm f/1.4 USM, 30 seconds, f/1.4, ISO 100. A waning gibbous moon provided the light on the land.
Even if you have followed my suggestion to find a composition that allows you to look up steeply, you may find you have so few stars in images shot under a full moon that the image still looks like it was shot in daylight. If that’s the case, you can increase the number of stars visible and brighten them with a variation on the High Pass technique described in chapter 6.
First, do all you can to create a nighttime feel in Lightroom. Now open the image as a Smart Object in Photoshop (right-click on the image, then choose Edit In>Open as Smart Object in Photoshop). If the image is already open in Photoshop as a layered file, target the top layer and press Control-Alt-Shift-E. This invokes the Stamp Visible command, which combines all the layers into one new layer at the top of the layer stack. Now right-click on the Stamp Visible layer and choose Convert to Smart Object.
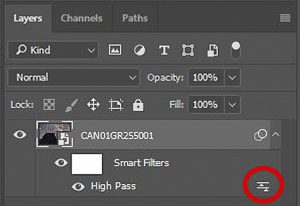
Figure 12-8: The Smart Object layer in the Layers Panel with the Blending Options icon circled.
Next, choose Filter>Other>High Pass. Set a high radius; 180 pixels often works well. Click okay. The image will look awful. In the Layers panel, double-click the tiny icon in the bottom- right corner of the Smart Object layer, as shown in figure 12-8. Change the Mode to Overlay. Adjust the Opacity to taste. I find a setting of 100 is often pleasing for the sky, but way too much for the land. If necessary, use the layer mask that comes with the Smart Filter to restrict the effect to the desired areas. Use the Brush tool and paint on the layer mask with black to hide the effect. To preserve some of the effect, drop the Opacity to 25 to 50 percent before painting. Beware of haloes in the sky along the horizon. You may need to mask out the effect there as well.
Mastering all the techniques I describe in this book will open up a whole new realm of landscape photography for you. Armed with these tools, you’ll be able to plan, execute, and process exciting images of the landscape at night regardless of where you live or the current phase of the moon. As camera technology evolves, making photographs at night will keep getting easier, while the results will keep getting better. Venture into the dark tonight, and you’ll never look back.