The following is an excerpt from Product Photography by Nath-Sakura.

For anyone just starting out, lighting and shooting jewelry, especially if it is metallic and has shiny or glossy stones like diamonds, can seem impossible without hours of post-production work. But careful management of the lighting can allow you to get a good result with the unedited shot itself.
Because most jewelry is small, we always end up working close-up with macro lenses. Thus, even the smallest bit of dust and tiniest imperfections will be visible. It is essential to give the jewelry a good dose of antistatic spray and to handle everything with gloves. The jewelry itself is fixed into place with small pieces of sticky putty.
The Lighting Philosophy
STANDARD METHOD FOR LIGHTING JEWELRY
Because of the size of the objects being photographed, we will, of course, have to use very small diameter light sources. I usually use snoots equipped with honeycombs, but many others in the profession often work with small directional LED lights, which are very effective when you need to manage the lighting on precious stones.
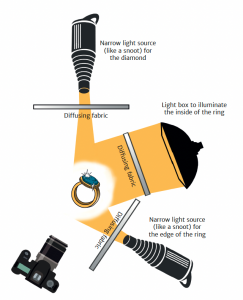
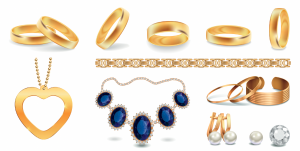
No matter what kind of lighting you are using, the jewelry will need to have each of its parts lighted using different angles, quantities, and qualities of light. For the example of the rings shown here, we can distinguish three different areas:
• The inside of the rings require fairly large diffuse lighting, enough to cover about half of its diameter. Typically, small light boxes are used for this, placed behind diffusing fabric. But depending on the size and shape of the object, a snoot behind a diffuser may also do the trick.
• Then the edge of the rings needs to be lit (see photos below) because the roundness of the ring is an essential element for understanding its shape. To achieve this, a light source is placed at right angles to the edge (a diffused snoot works well).
• Finally, the stones need to be lit so that as many flashes of reflection appear as possible. The way in which diamonds are cut—to allow total refraction—causes them to return most of the rays at a right angle. We therefore have a narrow and very hard light source at a right angle to the stone. If there are several stones, as on the ring on page 162, we can think in terms of arranging several light sources in a corolla shape to illuminate the stones that are located at different angles.
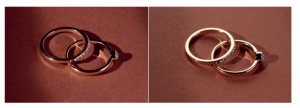
In the first photo, the lighting is localized on the front edge. In the second photo, the rings are backlit using a large diffusing fabric.

LIGHTING EXAMPLE FOR JEWELRY
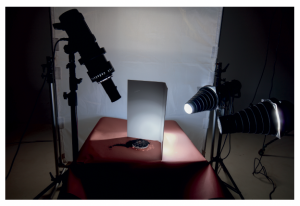
A behind-the-scenes look at the lighting for the ring
shown above.
Implementation
The simplest procedure is to arrange rounded sheets of PMMA plexiglass along the axes that correspond to the desired lighting. Then install the snoots at the necessary positions for lighting the edge, the stones, and the inside and outside faces of the ring. I will just note here in passing that some objects, like simple bands (such as wedding rings), can be lighted using a simple arrangement of light boxes positioned to the side and above the object, but that for most other cases, the lighting will have to be more precise. The lighting of objects this small also requires a good number of very small adjustments of the angles: I recommend that you attach the ring to a mobile background, such as a piece of cardboard, so that you will not have to move every single light source every time you make an adjustment. Then, make sure that every part of the jewelry is well lit by scrupulously observing each of the reflections.
Shines and Colors
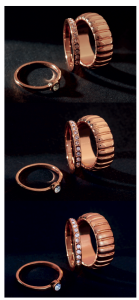
In the first photo, the backlight is too strong and the small diamonds remain dark. In the second photo, we can see dark reflections on the top part of the large ring. These can be
eliminated by placing a white reflector overhead. In the last shot, finally, the light is projected from a snoot, through a diffuser,
directed toward the diamonds.
Jewelry is often made of glossy metal: generally rounded, it acts somewhat like the Christmas tree ornaments we looked at earlier, and it reflects the entire workspace. Thus, you need to make sure that there is no light source coming in to interfere with your lighting arrangement, so it’s important to work in a dark studio. If you are presenting several pieces of jewelry at the same time, you will also have to make sure that they do not reflect each other by choosing an angle of placement outside the families of angles.
It is essential to take the colors of the metals and stones into account; therefore, you need to undertake a complete calibration, using a gray card and a color palette, before shooting. I recommend that you repeat this operation every time the lighting changes or anytime you decide to introduce new accessories or different backgrounds into your image.
Catalogs
For catalogs, the fashion now is to have a white background and present the object in a square format. Rings are generally placed at an angle, balanced on the side using a small plexiglass wedge that is placed as far back as possible from the gemstone (this can easily be erased in post-production). But the presentation can vary depending on the brand, the style, and the medium where the images will be displayed. In the figure on the next page, you can see the most commonly requested angles.
We look for the lighting to be as even as possible, with no pronounced shadows and no environmental reflection— the smoothest possible light. This is why we use diffusers so much, as close as possible to the piece of jewelry. Glossiness is also a requirement, with regular reflection lines across the entire piece of jewelry, and without any jaggedness or changes in texture.
Advertising
There are countless ways to highlight a piece of jewelry in advertising. People are always trying to come up with ingenious new ones, but there are five common methods we can list:
• Jewelry worn by a model, in a lifestyle context. With careful staging, you create an atmosphere by evoking emotion and belonging to a social group. Think, for example, of Fabergé’s 2018 campaign entitled “The Russian Seasons.”
• Portraits of models against a plain background, as in Chanel’s 2016 advertising campaign with Keira Knightley photographed by Mario Testino, or Piaget’s 2018 advertisements. The focus here is on the jewelry and the model’s posture.
• Close-ups of a model (a hand wearing a ring, or a cheek and an ear with an earring, etc.), as in Fred Joaillerie’s 2018 campaigns or in most of Djula’s advertisements, which have made this look one of their trademarks.
• A packshot of the piece of jewelry presented by itself, stripped of any other context, sometimes in extreme close-up, as in Cartier’s 2019 “Trinity” campaign, where the triple ring was presented as a diptych: once in its entirety and once in a very tight close-up of the upper part of the object.
• A staging of the piece of jewelry, as in the 2016 Akillis ads, in which a ring embellished with rhinestones was placed on a charcoal sphere, which was in turn posed on a stand lined with gray sand, all against a black background. Or the 2019 Chopard campaign, in which two rings were suspended from a black ribbon against an anthracite background.
TRADITIONAL PRESENTATION ANGLES FOR JEWELRY

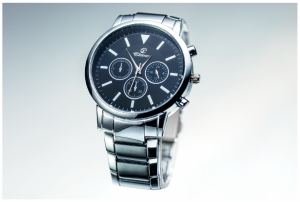
The lighting methods used for watches combine the methods used for jewelry, fabrics, and eyeglasses.
As with jewelry, lighting a watch—emphasizing the outline of the case and giving body to the crystal face without allowing overly visible reflections to erase its inscriptions and hands—requires very precise, well-directed lights and careful management of the diffusions.
Lighting Philosophy
Here, too, we work with great precision, with carefully directed light sources, generally snoots and small honeycombs. To avoid the direct reflections and highlights that tend to come with this kind of lighting, we arrange diffusing screens on each of the sides to be lit.
Rectangular cases can be lit just like standard parallelepipeds, with lights generating differences in tone on each of the three sides of the case, while round cases can be lit just like cylinders, with a single light source placed to create a regular gradient along the edge.
Plexiglass display stand used to hold the watchband closed for the photo setup.
As for the glass, there are different schools of thought. Some prefer to light it so that it disappears: they take advantage of the phenomenon of direct transmission by placing the light source at a right angle to the glass and photographing the watch from an angle. Others, however, including myself, prefer to manage the lighting so that a very slight, soft, gradual reflection appears on the glass. In such a case, you have to position yourself at the extreme edge of the family of angles of a very large and diffuse light source (such as a large octabox arranged behind a diffusing fabric).
Preparing the Watch
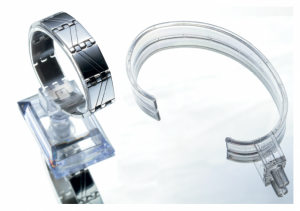
Plexiglass display stand used to hold the watchband closed for the photo setup.
While dusting the watch, the hands are also adjusted so that they do not overlap with any of the inscriptions on the dial (which generally include the brand, the model, and the technical specifications). They are traditionally placed at 10:10, and the second hand at 40 seconds. Pay special attention to the knobs and to the mechanism, if it is visible: they tend to catch dust and small hairs, but a burst of compressed air will get rid of those easily. The watch can be held in a closed position by attaching it around a plexiglass form (see image above). There are also display units equipped with a plexiglass bracelet strap, a clip, and a base to hold the watch in the air, which makes it easier to light.
Lighting the Glass and the Hands
It is easy to make the glass disappear, since all you need to do to make that happen is place the light source outside of the family of angles, but then shadows may appear on the dial, underneath the hands, and on any embossed elements. A better strategy is to place the light source in direct transmission and the camera outside the family of angles: this way the dial and the hands will be perfectly lit, but the glass will not be visible.
The glass can also be lit at the edge of the family of angles with a large diffusing source. This will have the most attractive effect if the dial is black or very dark: the glass will appear just slightly, without any strong reflections that would make the inscriptions illegible.
While the hands do not generally pose any kind of problem, they occasionally have a particular shape (with beveling, inlays, engraving, etc.) that requires lighting that is contradictory to what the glass requires, generally a grazing side light. In a case like this, we can create a composite photo using one lighting arrangement for the glass and one for the hands, putting it all together at the end using editing software.
Lighting the Bezel and the Edges of the Case
STANDARD METHOD FOR LIGHTING WATCHES
Unless you are creating a composite photo, the bezel (the ring or rectangle that holds the glass front of the watch in place) will of necessity be illuminated at the same time as the glass. Thus, it will look different depending on whether or not you have decided to make the glass invisible. And therefore, the look that you want to give to the bezel ends up taking priority. For large metallic bezels, such as those on men’s watches, lateral lighting is usually used to give a sense of chiaroscuro; in that case, you would light the dial and the glass in reflection, in order not to spoil the effect. For narrower bezels, direct lighting is appropriate.
Lighting the Wristband
Most photographers agree that backlighting is the most effective way to light the wristband. It is appropriate for most materials, from metal to leather to textured plastic. Simply place the light source in rim light or behind the wristband, within its axis, at a grazing angle. To obtain an even gradient, however, wristbands made of smooth plastic, like the wristbands on Swatch watches, will benefit from being lit with a very diffuse source, placed at right angles to the edges of the family of angles.
Lighting the Details
For luxury watches with diamonds or other precious stone inlays, we use the method described for jewelry: direct light sources, slightly diffused (in this case, snoots equipped with honeycombs placed behind diffusers), directed toward the stones. If this ends up clashing with the lighting for the glass or the watch hands, then it will be necessary, again, to create a composite photo.
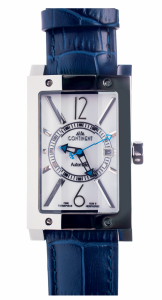
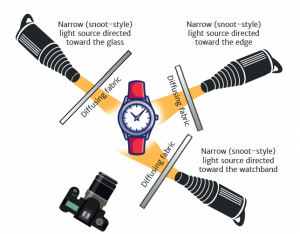
EXAMPLE OF THE LIGHTING OF A WATCH
Catalogs and Advertising
Since the early 2000s, catalogs have presented most watches in the same way: with the dial facing forward and the wristband closed around a rounded support stand (as shown on the preceding page). This method is replacing the previous standard, which involved showing the watch photographed flat, with the wristband open or folded over, from a bird’s-eye view.
In advertising, we use the same techniques as for jewelry: the watch can be displayed on a model’s wrist in a lifestyle context (in which case, a packshot image is also included in the ad as a reminder), as in the French ad for the 2015 Rolex master goldsmith Cellini model; or in a close-up on a model’s wrist, as in the ad for the 1995 Rolex Oyster Perpetual GMT master II, where a tight frame showed the watch on the arm of a man in a suit photographed in a subjective shot, as if the viewer was James Bond himself.
Most campaigns, however, are centered on the object itself, staged with other items, as in the 2010 advertising for the Khésis watch by Chaumet (in which the object was posed on folded origami paper flowers), or else presented alone, as with the FO 264/1 from Festina (a gold watch photographed closed, from the front, against a midnight-blue background in a wide shot close-up, to show the diamonds on either side of the dial).

In this sector, where competition has increased over the last fifteen years with frames changing much more frequently than before, there is also a constantly increasing demand for photography. Let’s review lighting and shooting methods.
Once you understand the laws that govern reflection on surfaces that produce direct reflections, a pair of glasses is not very difficult to light. But the common misconception that there should not be any reflections robs many of the images of life and of nuance. The current trend, on the contrary, is toward showing a slight veil over the lenses, which produces much livelier photos.
Lighting Philosophy
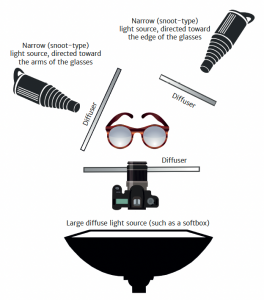
STANDARD METHOD FOR LIGHTING PRESCRIPTION GLASSES WITH FLAT LENSES
Before beginning to arrange the light sources, the project needs to be defined: whether or not the lenses should appear (for prescription glasses; this question does not arise for sunglasses); how the frames should be placed;whether or not the arms (technically called the temples) should be folded; which specific material or color should be emphasized; etc. For prescription glasses, we usually work with a large diffused light box for the lenses and small diffused sources for the temples and edges (see diagram at left). For sunglasses, we usually use backlighting, with a large light source (such as a light box), and a reflection, with a rounded reflector placed in front of the frame, so as to best showcase the lenses with a very even reflection.
Until the mid-2000s, we generally showed glasses frames without lenses in them, which had the advantage of solving the main problems of reflections. Today, however, the tendency is to not only leave the lenses in, but to highlight them. Of course, you still need to avoid overly pronounced or localized reflections; these would draw too much attention, overshadowing the temples and the internal parts of the glasses, such as nose pads, which need to be made visible when this kind of object is presented. This is why we try to obtain a very even reflection that is weak enough in terms of luminous intensity that it is possible to see through the lens.
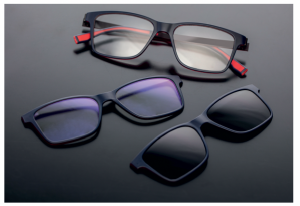
EXAMPLE OF PRESENTATION FOR PRESCRIPTION GLASSES AND
SUNGLASS CLIP-ONS
In glasses photography, it is very important to show the frame and its basic characteristics, while also providing tools for understanding the quality of the lenses, which can only be obtained through rigorous management of the reflections and the associated graphic elements. In this shot, we arranged the light source outside the family of angles of the lenses, which almost do not appear at all.
We use very large lights that cover the entirety of the glasses’ family of angles: 180° for flat lenses and up to 250° for curved lenses (for ski goggles, that can go up to 300°). For the photos presented in this book, I worked using a sixty-inch octabox placed approximately three feet from the frame, behind a 98 x 60-inch diffusing fabric.
For the kind of curved lenses that you find on sunglasses, and on certain lenses for correcting astigmatism, a flat diffusing fabric would not be enough to produce a reflection that covers the entire family of angles. The strategy here, then, is different: we use rounded diffusers that we place very close to the pair of glasses, making a hole in a diffuser for the camera lens.
Sunglasses
Because sunglass lenses are usually opaque, we don’t try to show what could be seen through them (which would be possible using backlighting); instead, we simply highlight the look of the lenses and frames.
Thus, the lighting work consists of giving substance to the front of the glasses, which we light using a rounded reflector (see photo page 147). An elegant lighting arrangement will show an even but lightly gradated reflection, which implies that the light source placed at a slightly descending angle (of about 10° to 20°). For sports glasses and protective glasses, you can also play with a direct reflection trimmed by a barn door, which emphasizes the high-tech aspect that the brands who market this kind of product are looking for.
Viewing Angle and Catalogs
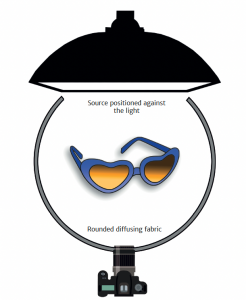
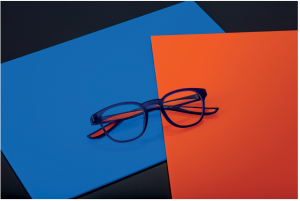
STANDARD METHOD FOR LIGHTING SUNGLASSES OR PRESCRIPTION GLASSES WITH CURVED LENSES
Most eyeglass frame manufacturers now use a slightly descending angle (about 15°) for the shots, showing the frames unfolded in three-quarter view. However, a horizontal shot with the frame shown from the front (sometimes without the temples, though this is considered less than ideal by American and Asian brands) is beginning to become standard, especially for photos meant for non-European markets. Some brands also require other kinds of presentations (see next page, bottom). These are most often photos against a uniformly white (color value 255) background, in a square format, meant for e-commerce.
Unlike most objects, which we light to create a slight shadow cast by the object, eyeglasses are shown in catalogs without a shadow, and in order to manage that, the glasses are placed on an elevated sheet of glass (see the method outlined on pages 151–152).
Obviously, with this technique, the reflection on the lenses disappears, but for the catalogs this is not a problem; in fact, it’s quite the contrary.
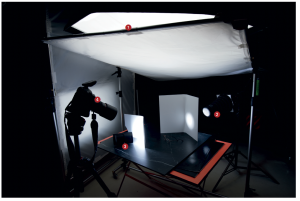
To produce the photo below, I used four light sources. 1. An octabox at a showerhead angle above the scene, with a large diffuser placed to create an even reflection on the lenses. 2. A snoot in backlight behind a sheet of translucent plexiglass
to light the marble slab. 3. A small flash, uncovered, behind another sheet of translucent plexiglass, to eliminate the shadows cast by the snoot. 4. A light box, at the left, behind a large diffuser, to even out all the light.
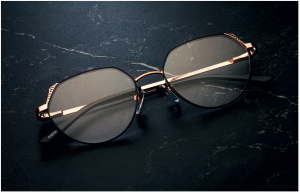
The final photo (setup above), presented without any editing.
Advertising
Advertisements usually show the glasses being worn by a model. Except for certain sunglasses frames, the object is seldom shown on its own or in a staged scene (that kind of photo is generally intended instead for a website or printed catalog).
As for framing, it has been done in every possible way: from close-ups, as in the 1992 Krys campaigns, to the wide shots of the 2011 Atol campaign using Adriana Karembeu, by way of the medium shots of the 2015 advertisements for Optic 2000. The goal is more to show a lifestyle than it is to show the frame itself.
Finally, in terms of lighting, what is required is often the kind of high-key lighting that we use for cosmetics, with large, very soft and diffuse light sources, in very clear-cut environments, demonstrating that “glasses are made so that you can see better.”

STANDARD PRESENTATIONS FOR EYEGLASSES