The following is an excerpt from Declutter Your Photo Life by Adam Pratt.

One of my favorite services we offer at Chaos to Memories is archival scanning. We scan prints, negatives, slides, albums, scrapbooks, and more. I tell our clients that if you can see it, we can scan it. I haven’t found anything that couldn’t be scanned, and I enjoy the variety of formats and interesting stories of the photos we scan.
That said, scanning is tedious work that involves gathering, curating, sorting, and cleaning your photos before you even scan them. The actual scanning is just one part of a multi-step process that requires lots of organization, attention to detail, and technical acuity. If you’re going to scan all your photos, then I suggest doing it right the first time by getting high-quality scans with good equipment. The only thing worse than a tedious job is doing it twice!
Goals
Before you learn about the equipment and process of scanning physical photos, let’s review the goals of scanning.
- Preservation: It’s important to capture your memories before they fade, discolor, or decay. Scanning also makes formats such as negatives and slides easier to view, enjoy, and back up.
- Sharing: One of the challenges of unique physical objects is that there’s only one of them, but when you scan a photo it’s easy to share your memories. Scanned photos can be shared digitally through phones, email, websites, and social media.
- Reproduction: When you capture an archival scan of a photo, you can use the digital file to make new prints and other physical keepsakes, including enlargements, photo books, and wall art. If you apply color correction and digital retouching to your scans, reprints from the scanned files will often look even better than the original photographs.
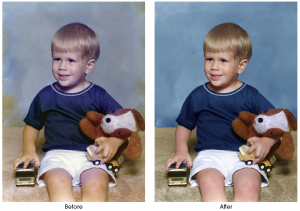
FIGURE 10.1 Archival scanning and expert restoration can give you digital images that are as good or better than the originals.
I’ve been scanning for almost thirty years and I’ve used every kind of scanner to preserve just about every photo format. Scanning requires a tolerance for repetition, attention to detail, and a blend of art and science. Whether you do your own scanning or decide to outsource to an expert you trust, three major factors that affect the quality of a scan are resolution, file format, and image compression. Let’s explore these three factors in detail.
Resolution
Image resolution is the level of detail in a digital image, and capturing the appropriate resolution for different photo formats is essential to getting a good scan. Unfortunately, this fundamental aspect of scanning is a common source of confusion. To make matters worse, even scanner manufacturers add to the confusion with their imprecise use of technical terms such as DPI and PPI. Fortunately, looking at the words clarifies our understanding.
- DPI (Dots Per Inch): Most people use the term DPI when they talk about scanning photos. For example, clients might ask, “Should a photo be scanned at 300 DPI or 600 DPI?” However, there are no dots when you scan a photograph. Dots of ink are used in the professional printing process and DPI is a description of the density of dots of ink on paper, not the quality of a scan. If you use a magnifying glass to inspect a cereal box or newspaper, you’ll see this pattern of tiny dots. When viewed from afar, your eyes mix those dots together and you see a smooth image, but when viewed up close, you can see the individual dots of colored ink from the printing process. While DPI is a commonly used term, it measures the quality of printing, not scanning.
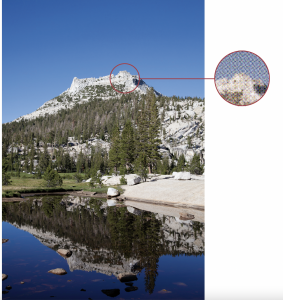
FIGURE 10.2 Dots per inch is a measurement of printing density.
- PPI (Pixels Per Inch): When you scan an image, the correct technical term to use for image resolution is PPI. This measures how many pixels are captured in one inch when you use a digital capture device such as a scanner or camera. For example, if you scan a 4-inch x 6-inch photo at 2400 pixels x 3600 pixels, then you have a 600 PPI scan.
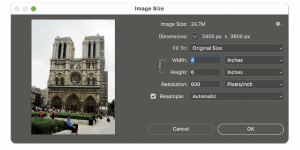
FIGURE 10.3 Pixels per inch is the measurement of image density when digitizing a physical photograph. Divide the number of pixels by the number of inches to calculate PPI.
I don’t mean to be overly particular about the technical terms, but I’ve always found it helpful to use the correct terminology when discussing technical subjects. It helps you sound like an expert, and you can communicate clearly with others about the quality of your scanned photographs.
Now that you understand the difference between DPI and PPI, let’s review recommendations for optimal resolution for scanning different photo formats. These recommended resolutions are based on decades of my own testing, photo industry best practices, and US federal guidelines for digitizing cultural heritage materials.
For reflective media such as photo prints, I suggest a resolution of 600 PPI. This allows you to reprint the image at original size and up to two times the original size if you want enlargements. If you never plan to reprint an image larger than its original size, then scanning at 300 PPI is sufficient.
Now, if 600 PPI is better than 300 PPI, then wouldn’t 1200 PPI be better than 600 PPI? That sounds logical, but it’s not how it works in the real world. The reality is that 600 PPI is the upper limit of detail that can be captured from most photo prints, regardless of the scanner, software, or computer you use. If you decide to scan a photo at 1200 PPI, the process will take longer and your files will be four times larger, but you’re unlikely to capture any more useful visual information. If I was going to err on one side or the other, I’d rather scan at a higher resolution than a lower resolution, but 600 PPI will be the highest effective resolution you’ll want to use for scanning photo prints and other reflective media.
The other major category of photo formats is transmissive media, such as negatives and slides. For these items I recommend scanning at 4000 PPI, which aligns with the US federal guidelines for digitizing cultural heritage materials. This captures all the usable visual information in these formats and allows for larger reprints and many creative possibilities. Scanning slides and negatives at resolutions higher than 4000 PPI is possible, but is probably a waste of time and hard drive space.
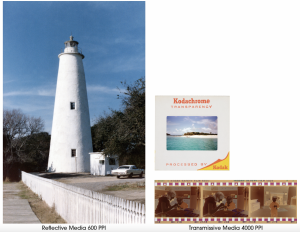
FIGURE 10.4 The target resolution is 600 PPI for prints and 4000 PPI for slides and negatives.
Recommended File Formats
There are a few common file formats used by photo scanners and software that you should consider as you tackle this phase of your project.
- JPEG images at high resolution and high quality are a great choice in most situations. If you plan to scan and save images without many adjustments, then JPEG is a good option at a much smaller file size. However, if you plan to open, edit, and retouch your images many times, then I suggest you use the TIFF format instead.
- The TIFF file format with lossless ZIP compression is a great format for scanning high-quality, high-resolution images. This format has been around since 1992 and is still an industry standard. Because the ZIP compression is lossless, you aren’t throwing away quality each time you retouch these files.
- If you camera scan images with a digital camera, then you should use the camera raw format and convert your files to the DNG format with Lightroom Classic. This format allows you to capture the maximum resolution, bit depth, and quality of your original photo formats.
Image Compression
It’s important to get high-quality scans of your photos, but if you have a lot of high-resolution images, then you also need to factor in the need for lots of storage. And it snowballs from there with bigger backup drives, longer backup times, slower sharing, and increased upload time to cloud services. Poor use of image compression can cause irreversible harm to your digital files, but when used correctly, compression is a wonderful technology. Let’s explore the options so you can make the best decisions for your photo archives.
- TIFF with no compression: When you scan photos you can save them as uncompressed TIFF files. This will retain full quality and full resolution, but the files will be very large and require large hard drives and backups.
- TIFF with lossless compression: Many people mistakenly think TIFF files don’t use compression, but TIFF files actually support multiple kinds of compression. There are two options for lossless compression—LZW and ZIP—which save file size through efficiency and don’t discard any image quality. ZIP compression almost always results in smaller file sizes than LZW, and in a surprise twist, LZW can actually increase file size in some situations. Therefore, I recommend TIFF files with ZIP compression for the highest quality digital files. These images will have smaller file sizes than uncompressed TIFFs, but with no quality loss.
- TIFF with lossy compression: The TIFF file format also supports lossy JPEG compression, which makes even smaller TIFFs, but it does this by discarding some visual information. Not all software supports this compression option, so if you want to use lossy JPEG compression, then save your images as JPEGs.
- JPEG with lossy compression: JPEG compression reduces file size by discarding a variable amount of visual information. If you use aggressive JPEG compression, you can get extremely small file sizes, but you will see visual compression artifacts. If you use high-quality JPEG compression, you can still reduce file size by quite a bit, but with no obvious impact on the visual quality of your photos.
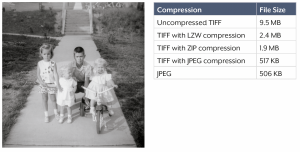
FIGURE 10.5 The visual differences between different compression options are usually
imperceptible, but the file sizes can be quite different.
Summary: If you plan to scan photos and do extensive visual edits or digital restoration, then I recommend using the TIFF format with ZIP compression. If you’re just scanning your photos and saving the files, then I recommend JPEG with high-quality compression.
Negatives versus Prints
Most people are familiar with scanning photo prints, but did you know that film negatives can be scanned with the right equipment? Any negative format (35mm, 120, 110, APS, etc.) can be scanned, including color and black-and-white film. Furthermore, a negative will almost always render a scanned image with higher resolution, more faithful color, and better overall quality than a scanned print of the same image. Negatives normally show less decay over time than prints, and negatives are the original camera capture, so if you have a negative and print of the same photo, I recommend scanning the negative. Just make sure to keep the print and negative together so it’s easy to organize everything when you’re done scanning.
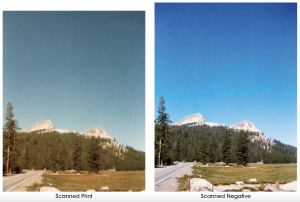
FIGURE 10.6 I scanned a print and negative of the same photograph that I took in
Tuolomne Meadows back in 1989. Scanning the negative results in more image area,
better quality, and higher resolution.
Scanner Options
You have many options to choose from when it comes to scanners, and your decision will include factors such as the photo formats you need to scan, speed, quality, and cost. With these criteria in mind, let’s review the hardware options for scanning your photos.
- Gadget Scanners: In recent years, there’s been a series of “gadget” scanners that promise to scan a variety of formats including prints, negatives, or slides. They typically cost $100–$200 and store digital images directly to an SD memory card. Unfortunately, these offer weak illumination, low resolution, and overall poor image quality. If you’re going to scan your photos, don’t waste your time with these gadgets.
- Mobile Apps: Several mobile apps can scan your prints, negatives, and slides with the camera in your phone or tablet. They claim to capture brilliant, high-quality results, but after extensive testing I can only say the results are terrible. Honestly, I haven’t found a mobile app that can even come close to the quality of a twenty-year-old flatbed scanner, so I wouldn’t waste your time with these apps for anything more than a preview.

FIGURE 10.7 The scan on the top is obviously a better image and has ten times the resolution of the same photo scanned with a popular mobile app (bottom).
- Flatbed Scanner: The most familiar kind of scanner is a flatbed scanner, which looks like a small copy machine. These have a hinged lid, and you place your photos face down on a glass plate. The quality of flatbed scanners is decent, and the price is fair in the $200–$1,000 range. The speed, however, is painfully slow. All flatbed scanners can scan prints, and some have the option to scan some negative and slide formats, which offers more flexibility with a single device. Considering the technology of flatbed scanners hasn’t advanced in the last twenty years and taking into account the slow scanning time, I’d recommend this option only for small batches of photos.
- High-Speed Scanners: Another type of photo scanner is the high-speed, auto-feed scanner, such as the Epson FastFoto models. These scan standard-sized prints at high speed and decent quality for a price of about $600. Unfortunately, these scanners cannot handle delicate photos, mounted prints, oversized items, negatives, or slides. Manufacturers specifically say that auto-feed scanners can damage delicate photos and that mounted photos can damage the scanner, so this kind of scanner is an option if you have only standard-sized loose prints.
Another challenge with these auto-feed scanners is that they can be difficult to keep clean. If you have a speck of dust on a flatbed scanner, it shows up as a speck of dust on your scan, but with an auto-feed scanner, it shows up as a pink or white streak across the entire scan. If you decide to use one of these scanners, make sure you have lots of cleaning supplies and use them regularly.
- Slide/Film Scanners: These are less popular but are dedicated to digitizing film negatives and slides at very high resolution and quality. These scanners typically cost $500–$1,000 and often include automated dust and scratch removal, which yields impressive results. Classic models from Canon, Nikon, and Minolta were discontinued years ago, but new options are available from companies such as Pacific Image and Plustek. If you consider this option, be aware that they support limited film formats, and high-resolution scanning takes a few minutes per image.
- Camera Scanning: In recent years, museums, archives, and photo managers have been adopting camera scanning to digitize any photo format at high resolution, high speed, and high quality. A camera scanning station will cost $2,000 or more, and requires more setup and learning, but using the latest digital cameras yields very high-quality scans. Camera scanning also gives you the flexibility to capture prints, slides, and negatives of any format with one piece of equipment that has a relatively small footprint. In our studio at Chaos to Memories we use camera scanning exclusively and scan dozens of formats, including popular 35mm film, sub-miniature slides, and glass plate negatives from the 1800s.
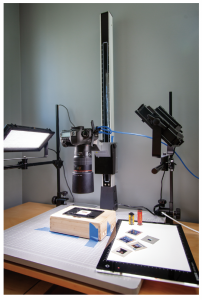
FIGURE 10.8 Camera scanning is a big investment in equipment, but it allows you to use the latest digital-imaging technology to capture the best possible scan of any photo format.
You can setup a camera scanning station with off-the-shelf photo gear including:
- A 24-megapixel (or greater) digital camera—full-frame, crop-frame, DSLR, and mirrorless all work well
- Macro lens with 1:1 magnification and focal length of 50–100 mm
- LED studio lights to illuminate prints
- A light source and film carriers for negatives and slides
- A copy stand to hold everything steady and parallel
- A USB cable to connect your camera to your computer
- Adobe Lightroom Classic to capture, crop, edit, and organize your camera scans
- Negative Lab Pro plug-in for Lightroom to convert negatives
If you want to learn more about camera scanning, you can download my free Camera Scanning Gear Guide from my website at: chaostomemories.com/camerascanning.
- Outsourcing: I love camera scanning, but I realize it isn’t for everybody. In fact, lots of people don’t want to scan at all. A few years ago, I had a client who bought an expensive scanner, scanned one very precious photo, and never used it again. She ultimately sold it on eBay for a significant loss when she realized she didn’t want to spend her retirement years scanning her photos. She hired me to finish scanning her photos instead, and loved the result without all the tedious work.
If you have lots of time, patience, and attention to detail, then you might love scanning your photos as much as I do. As you consider your options, factor in the cost of equipment, time to learn, and energy required to do the work. If you decide to outsource the scanning of your photos, ask about the recommendations in this chapter, including resolution and file formats. Also ask if cropping, rotation, color correction, and high-resolution files are included or cost extra.
Where to Start
After you decide how you’re going to scan your photos, you need to know where to start. There’s no right answer to this, but these are a few approaches to consider:
- If you have photos that are damaged or faded, start with those. You can’t reverse this damage, but you can “freeze” it with an archival scan.
- If there are special photos in your collection that are cherished above all others, then start with those. Even if the project takes a long time, at least you’ll have peace of mind that your most precious memories have been preserved.
- One of my favorite benefits of scanning photos is the ability to share them with others. Therefore, you might start with some of your funniest or whackiest photos that you want to share with friends and family. This can be a great way to connect with others and get them involved in your project.

FIGURE 10.9 It’s good to start with any important, damaged photos from a photo collection so that you are able to scan them before the damage gets any worse.
Scanning Tips and Tricks
Scanning photos is such a repetitive task that every little time-saving trick, even if it just saves a few seconds on a scan, will add up to big time savings over the span of a project. These tips are helpful no matter what kind of scanner you use, what resolution you choose, or if you outsource all your scanning.
- Organize your digital photos (see chapter 12) before you scan your physical photos so you don’t accidentally scan lots of photos that were printed from digital files you still have.
- Wear gloves to protect your photos from oil and dirt on your hands.
- Keep original envelopes, receipts, and boxes for clues about the dates and details of your photos.
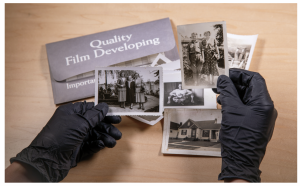
FIGURE 10.10 Always wear gloves when handling photos, and keep any notes or envelopes that might offer clues about the people, places, or dates of the images.
- If you have negatives and prints of the same images, keep them together and scan the negatives.
- Scan like material together for maximum efficiency. For example, scan all your 35mm negatives, then 110 negatives, then prints, so you don’t have to switch back and forth.
- Crop and rotate every scan so you see the photo you care about, not crooked, upside-down, or sloppy images.
- Keep track of what’s been scanned so you don’t accidentally scan it twice. Moving scanned photos from shoeboxes to nice archival boxes is good for your photos and an easy way to keep track of your progress.
- Instead of scanning all your photos into one big folder on your computer, work in small batches. Organizing scanned photos into subfolders that correspond to envelopes or rolls of film makes the project more manageable.
Adding Scanned Photos to Your Photo Archive
In chapter 6 you learned how to use Adobe Lightroom Classic to organize your digital photos into a chronological system that’s easy to understand. The beauty of a chronological system is that it’s easy to blend your digital and scanned photos into the same archive. If you follow my last scanning tip about working in batches, then naming the folders of scans with a consistent format makes the process even easier.
For example, if you scan a bunch of photos from Christmas 1993, then putting those scans into a folder named “1993-12-25_Christmas” makes your photos easy to find, they’ll be chronologically sorted, and they’ll use the same consistent date system as your digital photos. I realize sometimes your scanned photos won’t have an obvious date or clear subject, but you can still use the same system. If you have some miscellaneous photos from the summer of 1995, you can put them in a folder named 1995-07-00_summer. The “00” is a non-existent date that communicates ambiguity but still sorts logically with all the other date-based folders.
Next, move all your subfolders of scanned photos to one parent folder and name it something obvious like Scanned Photos. Then copy that folder into your Photo Archive folder using Finder (macOS) or File Explorer (Windows).
Now switch back to Lightroom, open the Import dialog again (File > Import Photos and Video), select your Scanned Photos folder in the Source section on the left side of the dialog, and choose the Add option at the top. Click Import in the bottom-right corner, and Lightroom will import all your scanned photos, while retaining the existing folder structure. If you want to change the dates of your scanned photos so they reflect the dates when they were taken instead of the dates they were scanned, then you’ll want to check out chapter 13 (page 152).
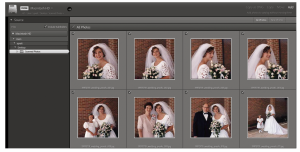
FIGURE 10.11 Import scanned photos into Lightroom Classic with the Add option in the Import dialog to retain your existing folder organization.
Video Conversion Best Practices
This book is all about preserving and organizing photos, but you probably have video memories you also want to enjoy again. The equipment required for this work is so specialized and expensive that you should probably outsource this to a trusted expert. These are the best practices we use for our Chaos to Memories clients:
- Film reels such as Super 8, Regular 8, and 16mm can be captured as high-definition digital video files. We use a sprocketless capture system, which significantly reduces the risk of damage to old film.
- Analog tapes such as VHS, Hi8, and Betamax can also be converted to digital video files. We typically use a resolution of 640 x 480 pixels, which is plenty to capture all the detail of the original format.
- Digital tapes such as MiniDV can be captured as digital video files with no quality loss at original resolution, which is almost always 720 x 480 pixels.
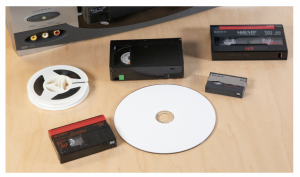
FIGURE 10.12 Home movies come in a variety of formats, including film reels, videocassettes,
and DVDs.
Capturing the full resolution of the original video is important, but sometimes people request the “highest-quality video” without realizing what they’re asking for. If you’re preserving original video from significant cultural events or national history, then you might capture a sequence of uncompressed TIFF files or uncompressed AVI files. These are technically the “highest-quality video,” but the file sizes are enormous, the playback is challenging, and sharing is almost impossible without large hard drives. Instead, we convert all home movies to MP4 digital files with high-quality H.264 compression. These files are small enough to store and share, universal (so they should be accessible in the future), and retain high-enough quality to be edited. You might not be familiar with the technical jargon of MP4 and H.264, but these are the same video standards that drive major video services like YouTube and Netflix, and they’ll be supported by any good video-conversion software.
After your movies are converted to digital video files, giving them a name that includes the original capture date (when known) and the subject is more intuitive than naming them tape12.mp4. For example, if we convert a tape from Christmas 1993, we name that file 1993- 12-25_Christmas.mp4. You might not always remember when a video was shot, but if you look for timestamps on the video, labels on the cassettes, or postmarks on film reels, you can find a lot of useful clues.
Finally, make sure to mark every tape or reel after it’s been converted so you know what’s complete. That way you or others won’t accidentally convert the same tape twice.
Sample Scans
Scanning is an important part of the workflow, but it’s also very repetitive. That’s why it’s important to choose the right equipment, scan at the best resolution, and choose the optimum file format for your scans. I strongly recommend starting with some sample scans and checking important details such as resolution, quality, and file size. You don’t want to scan 10,000 photos only to realize you used the wrong resolution or had a speck of dust on your scanner.