The following is an excerpt from The Beginner’s Guide to Astrophotography by Mike Shaw.
Stars and Constellations
You can capture a landscape astrophotography image with stars and constellations on any clear night (Figure 4.7), from almost anywhere on Earth, even from bright city centers. Refer to Table 4.1 for recommended settings. And don’t forget your fog filter—the secret to starry night sky images where the stars POP!
Constellations
Do you have a favorite constellation? Mine might be Orion (Figure 4.8). Try capturing it with different focal-length lenses to see which one you like best. Also, see if you can create a themed nightscape—for example, Canis Major with a puppy or Aquarius with a river. And whom would you pose under, Cepheus or Cassiopeia?
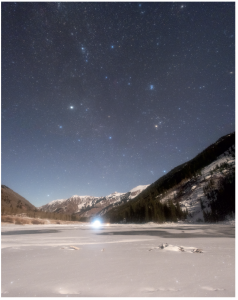
Capella (bright mid-left star) and the other stars of several winter constellations glow over the headlamps of midnight ice skaters in the Rocky Mountains near Aspen, Colorado.
24mm, ISO 8000, f/3.2, 10 sec, three-image panorama
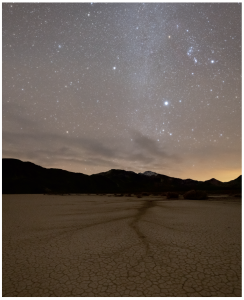
The bright stars of Orion (upper right) gleam in the dark skies over the Racetrack Playa in Death Valley National Park, California. Three-image vertical panorama, 14mm, ISO 12,800, f/3.2, 25 sec
My 24–70 mm zoom lens is my favorite lens for capturing constellations. I find that most constellations fit well within the available fields of view of this focal length range.
First, I’ll adjust the zoom setting until the composition looks good. Next, I’ll find a bright star somewhere else in the sky to help me set my focus. Once set, I’ll carefully swing my camera back to the constellation, reframe the composition, and then capture the image.
Tip #1: A Tiffen Double Fog 3 filter or Alyn Wallace’s Starglow filter are great accessories to use with constellations to bring out the stars.
Tip #2: Try shooting constellations during the darker half of nautical twilight. Most of the brighter stars will be visible, as will the foreground, without the distractions of the dimmer stars.
Asterisms
Asterisms like the Big Dipper, Teapot, Summer Triangle, and Orion’s Belt are recognizable groups of stars that are part of constellations (Figure 4.9 (a,b)). Many make outstanding landscape astrophotography subjects.
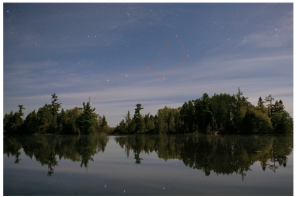
The Big Dipper (outlined) is a very recognizable asterism in Ursa Major’s constellation.
24mm, ISO 10,000, f/2.8, 5 sec
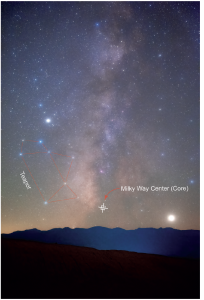
The Teapot in Sagittarius (outlined) often appears during late nautical twilight and is a beloved indicator of the Milky Way’s galactic core (marked).
40mm, ISO 12,800, f/3.2, 15 sec
Star Trails
Star trails are a terrific way to showcase the night sky’s motion. Capture a sequence of images from a fixed tripod position for an hour or longer. Before starting, set your focus on a bright star or planet. If none are visible, autofocusing on a distant mountain, building, or cloud will work fine. Just switch back to manual focus before starting your star trail sequence.
I recommend starting your sequence halfway through the evening nautical twilight. Use the exposure settings you expect for the darkest time of night, even though several initial images will likely be overexposed. You can decide later which of the initial photos you will use as a starting point for your composite star trail image. This is much easier than trying to time it in the field!
I usually capture my images in the RAW file format, import them into Lightroom, and edit one of the images in the middle of the sequence to taste. I synchronize the rest of the images to the edited image, and then batch export a series of new JPEG versions into a new folder for processing into a star trails image.
Next, I blend my images into a star trails image using StarStaX (https://markus-enzweiler.de/software/starstax/).
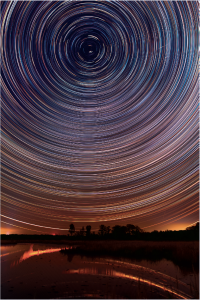
a) Star trails are fun, straightforward projects. North-facing star trails in the northern hemisphere produce beautiful circles centered on the north celestial pole.
24mm, 900 images @ ISO 1600, f/3.2, 10 sec
You can also create a star trails image in Photoshop by following these steps:
1. Open Photoshop and select File > Scripts > Load Files into Stack.
2. Select your star trail images in the pop-up window. Click OK.
3. In the Layers window, click on the top layer to highlight it. Scroll down to the next-to-last layer, hold down the shift key on your keyboard, and click on that layer. All but the bottom layer should now be highlighted in the Layers window.
4. Change the “Normal” blend mode to “Lighten.” Your star trails should then appear!
5. Select Layer > Flatten Image to merge all the layers.
6. Select File > Save to save your star trails image.
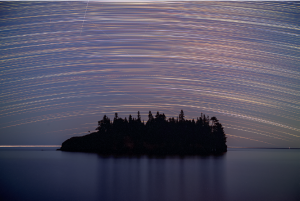
b) The celestial pole lies below the horizon when facing south, so we only see the tops of the circles or arcs.
48mm, 1420 images @ ISO 5000 f/4.0, 5 sec
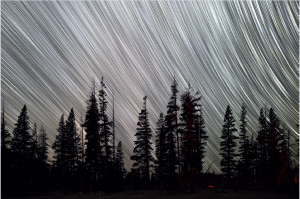
c) Facing west, star trails reveal the motion of the stars as they plunge below the horizon.
20mm, 250 images @ ISO 12,800, f/2.0, 10 sec
Tip: Facing north creates circular star trails in the northern hemisphere (Figure a), and facing south makes star trail arcs (Figure b). The opposite is true in the southern hemisphere. Facing east or west produces slanted star trails (Figure c).
To create circular star trails, ensure your lens has a wide enough field of view (Table 3.1) to capture the celestial pole, whose altitude is the same as your latitude. For example, I used a 24-mm focal length lens in portrait orientation (73.7° angle of view) to capture the star trails in Figure a from my 45° latitude in central Minnesota with plenty of space above Polaris to capture complete circles, and below to include the foreground.