The following is an excerpt on Visualization from Bruce Barnbaum’s book The Art of Photography 2nd Edition.
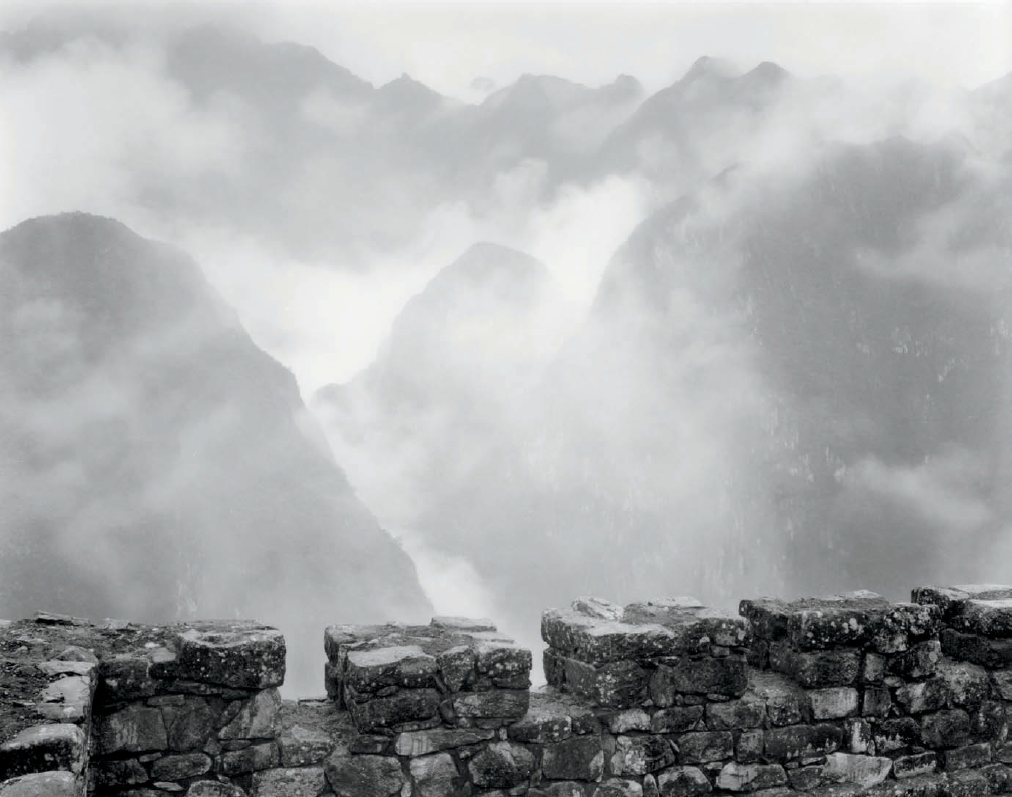
Figure 4-1: Machu Picchu in the Mist – The Inca understood spectacular landscapes, locating major centers in awesome settings, but none comparable to Machu Picchu. My intent was to highlight the mystical scenery with little more than a reference to the structural remains for context.
The concept of photography as a form of nonverbal communication is a philosophical one. But it’s a very important truth, based on the fact that we all show our pictures to others and we all want to get a response. That alone proves it is indeed a form of communication.
The meaning of composition and its specific elements are theoretical. Both are forerunners of actual photography. They form the foundation for fine photography— and for all visual art—and they must be understood by all creative photographers.
The actual making of a photograph starts with visualization, which consists of five steps:
- Photographic looking and seeing (two very different things)
- Composing an image
- Envisioning the final image
- Suggested procedures for those who have difficulty envisioning the final image
- Planning a complete strategy to attain the final image
Let’s look at each of these steps in turn and then we’ll look at some alternative approaches.
Step 1: Photographic Looking and Seeing
Visualization starts with looking and seeing—in-depth looking and seeing, rather than the casual perusal that we all do in our everyday lives. We go about our daily tasks in a routine manner, allowing visual input to slide in and out of our eyes and brain. It is not important to note every detail about a doorway in order to walk through it without smashing your shoulder on the doorjamb. If we stopped to analyze our visual input at all times, we would never accomplish anything. But when we turn to the effort required of photography, our seeing must be much more thorough and intense.
In photography, we accomplish nothing unless we analyze everything, even if the analysis is a quick—almost instantaneous— effort. We must search for those elements that can be put together to form a photograph.
A corollary to this is that when you look for things to photograph, you start to see everything more intensely. You and your eyes are not just wandering aimlessly, for if you randomly look without carefully inspecting and thinking you see nothing and learn nothing. Photography requires work. The work begins with careful looking, analyzing and thinking. Soon you start to see things in areas you would have overlooked previously. Of course, when you put these “overlooked” items into a photograph, you have to make that photograph compelling enough that the viewer wants to stop to look at it! Let’s face it; if your photograph is as easily overlooked as the items themselves, you’ve accomplished nothing.
You’ll find it important not only to look carefully, but also to draw on your interests to provide deeper, more personal meaning to what you see. I feel that this combination of elements has given me greater appreciation of my surroundings and has led to photographs I may not have made otherwise. My experience is not unique. Yours will probably be similar if you follow your interests.
“Looking” is one thing; “seeing” is quite another. Two people can look at the same thing and one will see a great deal while the other sees nothing. (Of course the person sees something, but finds no meaning.) Just as an experienced detective can inspect a crime scene and find numerous clues that the average person would overlook, so the perceptive photographer can see compositions where others look but see none. The difference between seeing and not seeing is insight. Insight is the element that separates the detective from the layman, the great photographers from the ordinary ones. Whenever you gain further understanding and insight into the subject matter you’re photographing, you’ll make photographs that progressively penetrate deeper into the essence of that subject. Furthermore, as you gain insight into your own areas of interest (i.e., what excites you, why it excites you, how it excites you), you’ll discover new areas to photograph—perhaps not immediately, but in due time.
Of course, much of this is inevitable. I don’t know a landscape photographer who doesn’t learn about geology, natural history, weather patterns, and other things related to the landscape. Portrait photographers gain insight into people and how to work with them more effectively as time goes by. The same is true of photographers in every other specialty.
Look at the astounding work of Henri Cartier-Bresson to see how he gained insight into events as they unfolded, developing an uncanny ability to snap the shutter at “the decisive moment.” With increased insight, you’ll be able to analyze a situation more quickly to determine whether it’s worth pursuing and how to best approach it.
Step 2: Composing an Image
Once you’ve decided to make a photograph, you proceed to the second step of visualization: composing the image. At this stage you choose your camera position and lens focal length (see chapters 2 and 3). You determine whether the image is strongest where you have the camera, or whether you can strengthen the visual relationships by moving it to the left or right, up or down, or forward or backward a few inches or several feet.
Consider several things while studying the scene. First, how well do the objects relate to one another compositionally— their overall balance, the relationship between positive and negative spaces, and the thrust or movement of forms and lines within the composition? Do the objects have cohesive forms, or is one or more objects distinctly different and out of character? That may be precisely what you want, but always be aware of what you want as opposed to what you actually have! For color photography, look at the objects as abstract masses and analyze their color balance and the blending of colors within the composition. (This will be fully discussed in chapter 6.) For black-and-white photography, consider the gray tonalities and their relationships. Beware of tonal mergers, especially those that may not be apparent to the eye in a colorful scene.
Second, in both color and black-and-white, search for distractions in the foreground and background. Look for “dead areas” where nothing is happening compositionally to enhance the image. Reduce and eliminate those problem areas wherever possible. As the noted American painter and teacher Robert Henri said, “The eye should not be led to where there is nothing to see.”
Third, envision the contrasts of the final print and see if your desired tonalities are even possible under the existing circumstances. It is rare that the scene—and the lighting on it—gives you exactly what you wish to show in your envisioned print. You may want to brighten one area or darken others. These alterations may be possible. If you’re aware of the shortcomings while you stand behind the camera, you can begin to formulate a plan to cope with them in the exposure and development of the negative and in the printing of that negative.
For example, in 2009 I made my first trip to Peru and the storied Inca ruins at Machu Picchu. Though I had seen many photographs of it, and thought I knew what to expect, I was stunned by the reality—or shall I say the unreality— of it. My first photograph there was intended to show the almost dreamlike quality of the setting: mountains upon mountains upon mountains, mostly hidden in the mists of the Western Amazon cloud forest. But contrast was low in those distant mists, so I had to envision how I could enhance that low contrast while revealing a bit of the Inca ruins— just enough to put them in context—and then allude to the remarkable setting that appeared like an apparition (figure 4-1). A full discussion of the technical steps needed to properly expose a film negative or a digital capture and then enhance the contrast is found in chapters 8 through 12.
Analyze the light on the scene, seeing how it is at the moment versus how it could be if it were perfect for your intentions (chapter 5). In other words, is it highlighting exactly the things you want highlighted, and is it doing so in the intensity you would prefer? Outdoors, where you likely cannot control the light, see if unfavorable lighting conditions can become favorable (e.g., if passing clouds might move to locations that would improve the relationships of light and shadow). Indoors, where you may or may not have complete control of the location of lights, the type of lights (e.g., diffuse, direct, reflected, spotlights, floodlights, and flash), and their intensity, you must optimize the lighting to suit your purpose.
Also determine whether any filters can enhance the image (see chapter 7 for a complete discussion of filters). Filters are valuable tools that can alter the tonal balance between items of various colors in a black-and-white photograph. Digitally, you can alter relationships between colored objects later via channels in Photoshop or ACR (Adobe Camera Raw) or Lightroom. Try to be aware of how you can accomplish that while you’re behind the camera, for that’s a critical part of visualization. In traditional color photography, filters can either retain or alter the color balance that you want for the overall scene. But color balance can be altered greatly during printing, both traditionally and digitally.
Finally, select the optimum aperture and shutter speed to give you the depth of field you want, along with the ability to stop or blur any motion in the scene. These considerations must be made carefully to obtain a proper exposure for your negative, transparency, or digital exposure. All of these issues must be solved while you’re behind the camera. You can’t alter the camera position or the lighting after you’ve left the scene. You have to determine right there on the spot whether or not they’re working for you.
Step 3: Envisioning the Final Image
It should be obvious from the title of this subsection, as well as the writing that precedes it, that these three steps are done simultaneously rather than in succession. For example, Step 2, composing an image, depends on envisioning the final print in order to determine if a filter will enhance the image, or what type and intensity of light is best for your purposes, or if contrast needs to be increased, decreased, or remain the same. (See the next section for recommendations if you have trouble envisioning a final print while standing at the scene, and see chapters 8, 9, and 10 for discussions of contrast control with traditional film photography, and chapters 11 and 12 for digital photography.)
It turns out that the most difficult part of visualization is envisioning the final print you wish to make while looking at the scene—i.e., translating the scene into the photograph.Unless you made a tabletop model to photograph or are posing subjects for portraiture it’s highly unlikely that you created the scene in front of your camera; yet, you are always the creator of the photograph. The scene is three-dimensional; your photograph is two-dimensional (even though it alludes to three-dimensionality). The scene has color in it; your photograph may be black-and-white. If so, you may want to increase or decrease the inherent contrast of the scene. You may want to darken or lighten portions of the image in relationship to other portions. If you’re working in color, you may want to alter the contrast, light/dark relationships, and the overall hue of the scene, as well as intensify or subdue the color saturation.
There are profound differences between the actual scene and your image. In fact, the differences are considerably more profound because your response to the scene also depends on nonvisual sensory input—sounds, smells, temperatures, breezes, and the feel of things near you, as well as your state of health and your state of mind. These things are not visual, yet they all contribute to your reaction. So how can you possibly distill all this sensory input into an 8 Å~ 10, 11 Å~ 14, or 16 Å~ 20 two-dimensional image with any hope of capturing the original? In a very real sense, it cannot be done! The photograph is distinctly different from the scene, and as a result it is foolish to attempt to “capture the scene.” Instead, attempt to convey the mood that the scene impresses upon you.
Be aware of the fact that even our language tends to confuse us about the profound differences between the scene and the photograph. For example, we often look at a photograph and hear, “That’s my son Billy playing football” or “That’s the cabin where we stayed at Grand Canyon.” Of course, it’s not Billy, but a snapshot of Billy, and it’s not the cabin, but a picture of the cabin. Thus, our very words tend to confuse the photograph and the scene. Beware of this trap! Do not confuse the two! (See figure 4-2, which is not the Arni Marble Quarry in the mountains of northern Italy, but a photograph of it as I envisioned it in April 2001.)
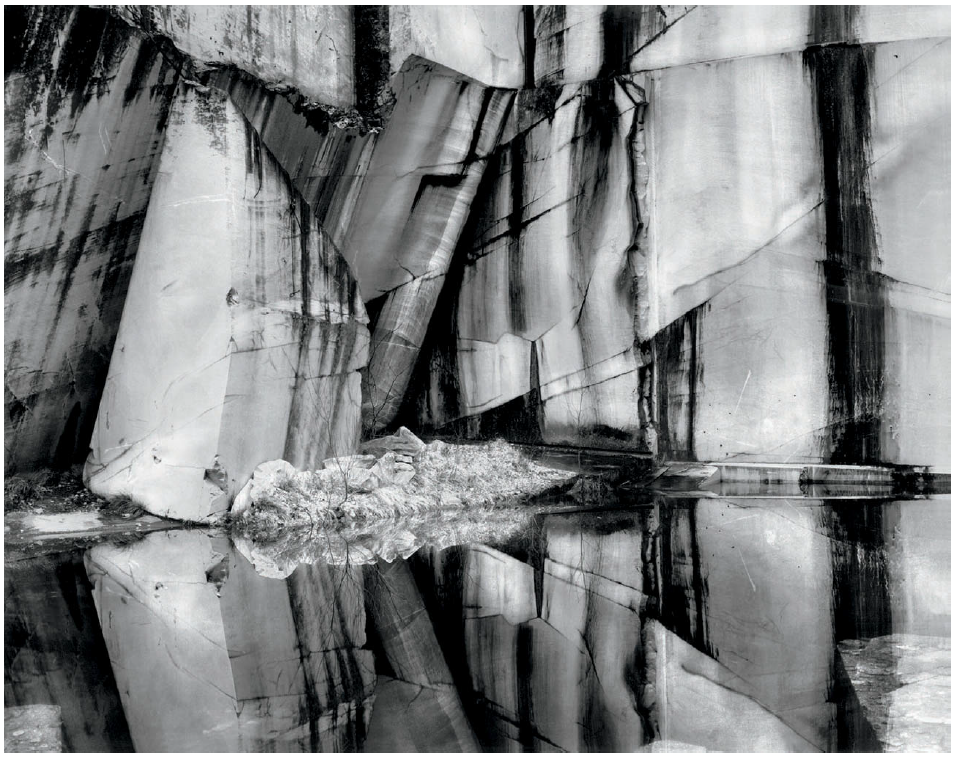
Figure 4-2: Arni Marble Quarry – The mirror reflection transformed the 500-year-old quarry—perhaps the source of some of Michelangelo’s greatest statues—into a kaleidoscope. Without the reflection, the photograph would have lacked the explosive force. To produce the effect, the reflection is printed at significantly higher contrast and much lighter than it would have been without darkroom manipulation. This is not the scene I saw, but one I created through exposure, development, and printing.
We must be able to distill from the scene those elements that can translate to a visual image capable of conveying the desired mood. This involves the elements of composition discussed in the previous chapter, along with the elements of understanding of your own viewpoint discussed in chapter 1. By combining your perceptions of the scene with your reactions to it, then using the tools of photography to present your interpretation to the viewer, you may be able to convey the mood you actually felt. You may even be able to heighten that mood.
As it turns out, most people are stuck at the level of “reproducing” or “being true to” the scene. True photographers go well beyond the scene, using it as a springboard for their own creative/interpretive goals. If your goal is to replicate nothing more than what you’ve seen, your opportunities for creativity are limited. Those who take pictures without looking at the compositional elements or thinking about the final print (or those who shoot because the husband or wife said that we really should have a shot of this!) are just taking snapshots. Rarely do passing tourists think about lighting, or how the light will change in another hour or tomorrow morning. Rarely do they consider the underlying elements of composition. Usually, the motivation is to shoot now because they won’t be there later, so “better get it now!” Too often that attitude leads to exceptionally boring snapshots.
I suggest that it’s better to have a good memory of a wonderful scene than a bad photograph of it, which will eventually become your memory of it. If you’re willing, able, and desirous of going beyond the scene, your creative potential is unlimited. Not only can you show the viewer what is important to you, you also can create whole new worlds. Minor White said, “We photograph something for two reasons: for what it is, and for what else it is.” Those are words to live by.
Creative photographers realize that conditions may not be ripe for an effective photograph even while they enjoy the most magnificent scenes. Ansel Adams did not photograph Yosemite Valley every time he was there, though I am sure he marveled at it each time. He photographed when extraordinary conditions made it photographically meaningful.
Step 4: Suggested Procedures for Those Having Trouble Envisioning a Final Image
The ability or inability of an individual to envision a final image while standing in front of a scene varies widely. It has been found that some people cannot envision the scene in front of them if they simply close their eyes. Others may not be able to envision the final image to be derived from the scene—especially if it is planned to be a black-and-white image. Some have no ability to envision the final image, even though they may be able to recognize a fantastic scene filled with great photographic possibilities. This presents unique problems for those who cannot envision the final image while standing at the scene. I’ll confine my thoughts to the photographic issues of those who cannot envision the final image, or have great difficulty doing so, while standing at the scene.
I should start by pointing out that being able to envision a final image is something you have to work at. It is rarely an ability that comes naturally. You may have that ability, but just like trying to hit a base hit from the pitch of a skilled pitcher, you have to work at it. So, if you initially have problems envisioning that final image, don’t quickly give up and say you just can’t do it. Instead, work hard at learning from the images you’ve made how you went from that scene (assuming you can remember it with some clarity) to the final image you produced. Even if the final image fails to please you, you can learn to envision that final image by reconstructing how you went from your starting point (the scene) to your end point (the final image).
Some aspiring photographers may correctly conclude that they simply cannot make that translation. Without that imaging ability, how can you determine in advance if you need a red filter to darken a blue sky? How can you determine with any accuracy if you want to increase or decrease contrast in your image? In fact, how can you determine if you want a black-and-white image while looking at a scene in color (as all scenes are in reality)?
Using traditional methods with film, such decisions are required while you have the camera in hand, or in front of you on a tripod. It seems to me that digital processes may be the appropriate path to take photographically if you cannot effectively translate the scene in front of you to the final image you want to make.
Using film, the decisions have to be made in the field. Digitally, the scene is simply recorded (or “captured,” to use a term I abhor). But from a RAW file, you can decide later if you want increased or decreased color saturation, increased or decreased contrast, a red, yellow, green or any other filter for a black-and-white image, and you don’t have to commit yourself at the scene. In fact, you can try any combination of these variables after the fact, without any loss of starting again from the unaltered original RAW file. The RAW file remains unaltered, for you to try out any number of possibilities leading to the final image that pleases you, and you can save every one of the options along the way, eventually choosing the best combinations among them. Of course, a digital black-and-white filter used in postprocessing will not yield the same results as its “equivalent” filter put in front of the camera lens for film photography. It may be close, but not the same. It will be different, but neither “better” nor “worse.” It is simply different. Film has its own characteristics (as do the papers it will be printed on); digital has its own. While digital and traditional processes may be similar, they are rarely identical. But with digital, you can try any number of combinations after recording the image, rather than making those decisions in advance while out in the field.
Using digital procedures may be the best way to overcome visualization deficits, though I must admit to certain doubts about this recommendation. As you’ll read in the next section, I believe that art derives from a rather clear view of the final product before the project begins. This applies not only to photography but all art forms, including painting, sculpting, composing music, writing, etc. So, while working with digital procedures after the fact may be the ticket for those with limitations in visualization, I wonder if creating a final image without the ability to envision that endpoint at the start will yield the best results. It may. And I suppose it’s possible that it could end up being as good as one envisioned from the start, but I have doubts. At the same time, I recognize that the envisioned result is not always the one you or I end up with. Often, the goal changes along the way as you work your way toward that final result and you see other possibilities during the process. That is not uncommon.
Recognizing the options for change along the way, it may be possible to begin a project with no clear vision of a goal, and end up with a wonderful image. Perhaps it can be done repeatedly. With that possibility in mind, I recommend digital processes as a means to that end because those options exist in a way that traditional processes cannot match.
Step 5: Planning a Strategy for a Final Image
The final step of visualization using traditional methods is planning a strategy for achieving your final image, or if using digital processes, trying any of the options before settling on the one that works best for you. This involves determining your optimal exposure and development of the transparency, negative or digital exposure, along with the method of printing it to achieve your goals. This may also include visualizing how you may crop out unnecessary portions of the image, especially if they simply don’t fit the format ratio of the camera you have in hand (figure 4-3). (For example if you’re using a square format camera, not all images have to be printed as full frame squares, and this hold true for all other camera rations, as well.) If you can envision the final image, this means, in essence, that while you’re behind the camera—standing at the scene—you’re thinking about how to print that photograph in the traditional or digital darkroom. (The technical aspects of these considerations are found in chapters 8 through 12.)
At first, the notion of thinking about the printing process while standing behind the camera may strike you as distinctly odd, or maybe even distinctly impossible. In fact, it’s essential. You’ve done much of the work already: you decided to set up your camera at a specific point in space and aimed it in a specific direction with a carefully chosen focal length lens. You may have put a filter on that lens to help achieve your desired image. You chose an exposure (i.e., a combination of aperture and shutter speed) to properly record the image and determined how to develop that negative (for black-and-white film). Digitally, you may have made more than one exposure for full image making, so you must think of how to combine them into the final image. Under these circumstances, the only remaining decision is how you’ll print it. Once you learn to do that, you’ll be mapping out a complete strategy from beginning to end for achieving the image you want. You’ll be integrating the whole process rather than doing it piecemeal.
This is how art is done. It’s impossible to imagine Bach, Beethoven, Brahms, or Shostakovich writing random notes for a major composition without a rather complete feel for the entire work. It would be equally impossible to imagine Dante, Shakespeare, Dickens, or Twain starting any major book or play without a complete idea of where the writing is going and how it will get there. Did Michelangelo start hacking away at a hunk of marble without envisioning a final product? Do you think Rembrandt, Van Gogh, Cezanne, Picasso, or O’Keeffe started dabbing paint on a canvas in the upper-right corner, then continuing toward the lower-left corner arbitrarily, or do you think each of them had a very complete idea of the finished painting right from the start? The answer is obvious. So, in the same way, it’s up to you to work through the entire process in your mind to avoid making bad decisions that could derail the whole process.
Let me give a simple example and briefly outline both a traditional film approach and a digital approach.
Let’s examine the traditional approach first. Suppose you’re looking at a landscape with brilliant cumulous clouds towering above. The ground (i.e., the landscape below the huge clouds) may be an area of low contrast, but the clouds are extremely bright. If you’re shooting film and recognize while you’re behind the camera that you can darken the clouds by “burning” them when printing (i.e., giving them more exposure under the enlarger), then you don’t have to worry about the contrast when you expose and develop the negative. But if you simply look at the full contrast range without giving thought to the printing stage, you might decide to lower the overall contrast to encompass the brightness of the clouds—which would have the unfortunate effect of making the low contrast on the ground even lower.
This would give you a rather “muddy” print. That’s not what you want. When you think about printing while standing behind the camera, it creates a feedback loop that helps you determine your best exposure and development at the scene.
If you’re shooting digitally, you will need to study your histogram to see if the full scene can be encompassed using a single exposure. Even if it is contained within the range of the histogram, it could be pushing the limits at both ends. The problem is not at the high end on the right side of the histogram, where you simply have an abundance of tonal information that can be separated later in post-processing. The real problem lies at the left edge, where meager information in the dark tones will end up as irritating “noise,” with useless pixels filling in for missing information. In that case—and certainly in the case where the limits of the histogram are exceeded—you may need multiple exposures: one for the darker ground and perhaps several for the brilliant clouds.
Later, in post-processing you can composite several exposures and then work on the local contrast of each portion on the computer (chapter 11). Always keep in mind that the total range is still black to white, so you can’t overlap the tonal range within each of the several layers, or you end up with visual nonsense. You have to stay within the bounds of the logic of light in any given scene. Within those bounds, your deep insight will allow you to optimize the layers so that one flows smoothly into another, and the image you present to the viewer is both alive with tonal brilliance and believable.
If you study the scene for compositional elements while simultaneously projecting forward to the final print, even while swooning over the scene, you can avoid the trap of making “record shots” (snapshots that simply tell everyone, “I was here”). When you think in terms of the final print right from the beginning, your percentage of successful exposures will rise dramatically. Without such foresight, you are simply exposing for the scene and hoping for a photograph. You’ll be lucky to get one!
Always keep in mind that you control the final image. As you begin to comprehend the extent of that control, you will see not only good scenes that can translate into fine photographs, but also ordinary scenes that can serve as a basis of equally fine photographs. Photography is a creative endeavor. The final image is your creation. Do not limit yourself to replicating the scene as you see it; start to think in terms of interpreting the scene and creating a work of art, a personal statement.
This article is an excerpt on Visualization from Bruce Barnbaum’s book The Art of Photography 2nd Edition.