The Difference Between Hard and Soft Light December 7, 2016 – Posted in: Photography – Tags: hard light versus soft light, nick fancher, studio anywhere, studio anywhere 2, what is hard light, why shoot in hard lightw
This passage was excerpted from Studio Anywhere 2: Hard Light by Nick Fancher
HARD VERSUS SOFT
Preferences are subjective. Especially when it comes to the needs of a client. One client loves candid, on-the-fly shots while another prefers more polished, composed images.
One Creative Director prefers natural light while their predecessor was only pleased with studio lighting. What I’ve learned to do is not get too comfortable in one particular niche of the industry and not take it personal if a client changes their mind after seeing my images mid-shoot. Maybe at first they thought that they wanted hard light, but after the shoot begins, they start asking for me to minimize shadows, and by the end of the shoot, I may end up firing a softbox through a scrim (FYI, that means extra, extra, extra soft light).
One of my regular clients is Jeni’s Splendid Ice Creams, a high-end ice cream boutique that started in Columbus, Ohio, over 10 years ago but has expanded across the country. They brought me on to help elevate their brand through photography. They showed me images of what they’ve been producing—which was really solid, beautiful work—but expressed a desire to start pushing in a new direction. They really liked my vibrant colors and hard shadows and thought we’d make a great team. They were right. But every shoot doesn’t consist of me just winging it, lighting according to the mood I’m in that day. I’ve learned that sometimes they still do want beautiful, soft light. So for the sake of time, money, and ice cream, I’ve learned to sometimes give them both soft and hard options for the same setup.
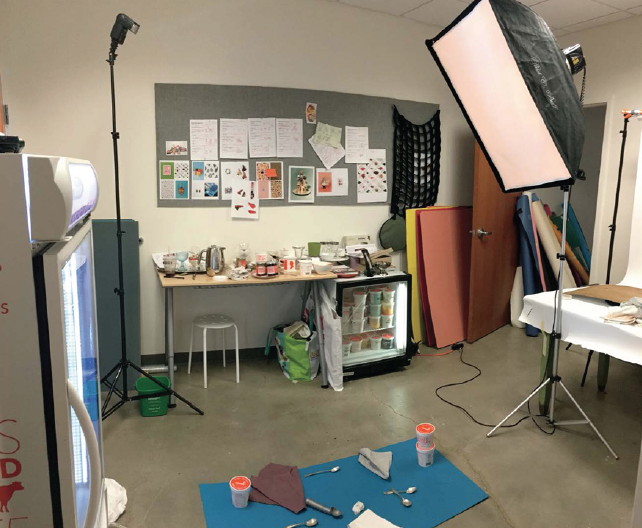
In the figure below you can see my setup. I have an unmodified flash on a stand to the left, giving me hard light. I am also using the Jeni’s studio Paul C. Buff Einstein light, seen on the right, modified with a softbox to give me soft light.

This setup was for a Jeni’s Ice Cream product shoot. I was providing them with both a hard
light (light on the left) and a soft light (light on the right) option for each image.
The next image is the hard light image. Note the presence of the hard, black shadows and how they take up space between the products, leaving less blue space. The shadows actually become a style element in the image.

The hard light shot. The presence of hard shadows adds another element to the image,
lessening the blue space between objects and creating a fuller image.
In contrast, the soft light image below is almost shadowless. This results in more of the blue backdrop occupying real estate in the final image. I actually prefer the hard light image. How about you?

The soft light shot. The shadows are softer and even non-existent in some spots, leaving
more space for the blue background.
Discover easy-to-follow techniques and approaches to working with hard light in Studio Anywhere 2: Hard Light by Nick Fancher.


