The following article is an excerpt from Make Great Photos by Alan Hess.
There are two basic ways to support your camera when taking photos. The first is to hold it in your hands, and the second is to lock it down in a support like a tripod. The way you support your camera has an effect on the sharpness of your images. The camera will certainly be steadier when you use a tripod than it will be if you hold it in your hands. The longer the exposure, the more critical it is to have the camera supported by the tripod so that it doesn’t move during the exposure.
This means you can take those really long exposures without worrying about the camera moving. The downside to using a tripod is that you lose mobility, and unless you have a specialized gimbal tripod head, it is very difficult to track a moving subject. It also takes time to set up a tripod and you could miss the shot. Here are some things to keep in mind about tripods:
• Legs and Head: There are lots of options when it comes to tripods because you can buy the legs and tripod head separately. That way you can get exactly what you want. I like to use a 3-way tripod head, so I have one of those on a set of tall tripod legs. I’m over 6 feet tall, so I need a tripod with long legs so I can use it comfortably. Make sure that your tripod can be set high enough for you to use comfortably.
• Materials: The materials that the tripod legs are made from can have a big effect on the weight and stability of the tripod after a while. Traditional wood tripod legs are very stable, but can weigh a lot. Some of the newer materials are really light and strong,
but can also be expensive. When considering which tripod to purchase, make your selection with your usage in mind. If you do not need to carry your tripods to locations, you might not need to worry about the weight, whereas if you have to hike for miles before using the tripod, the weight and portability is most important.
• Locking Mechanism: The tripod legs have one of several different types of leg locks. Pick a type that is comfortable for you to use. The two main options are twist locks and lever locks. I like the lever locks because I use my tripod on the beach a lot, and they are easy to clean.
• Weight: You need to use a tripod that can support the combined weight of your camera and lens. A lightweight tripod might be more convenient for carrying around, but if it doesn’t support your gear properly, it defeats the purpose of using it.
I usually do not set up a tripod unless I know I am going to be doing long exposures. Know, too, that there are times that a tripod is not allowed or it’s impractical to use one. In these situations, you should be able to hold your camera steady to get the best results. When you handhold a camera, there are certain things to keep in mind for getting the sharpest images.
• Minimum shutter speed: There is a rule (more like a guideline) that photographers use to avoid camera shake, which is the small vibrations inside the camera that can make your images blurry. The guideline is to use a shutter speed that is at least 1/focal length. So, if you are using a 200mm lens, the slowest shutter speed you should use is 1/200 second. If you use a 60mm lens, the slowest shutter speed you should use is 1/60 second. This is just a baseline shutter speed to deal with camera shake—you still need to take into account the speed and movement of the subject.
• Hold it steady: The best method of holding your camera steady is to support it from the bottom and keep it close to your body. Make sure that the camera is as stable as possible and doesn’t move when you take the photo. There is a technique I use (you can see it demonstrated by Joe McNally here on YouTube: https://www.youtube.com/watch?v=EDsx3-FWfwk) in which I turn my body sideways and use part of my shoulder to steady the camera. This allows me to get sharp images with slower shutter speeds
(Figure 3.26).
• Shoot a set of 3–5 images: This is my favorite technique because it works really well and doesn’t take any extra gear or special planning. Instead of taking a single photo, put the camera in continuous mode and take a burst of three photos. The chances are the middle photo will be the sharpest.
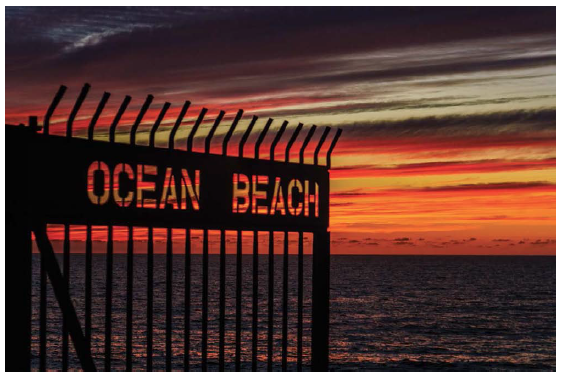
Figure 3.26 I did not have a tripod with me, but I really wanted to capture the amazing sunset. I steadied myself and took this image using a 1/15-second shutter speed using the Joe McNally method. It worked great.
1/15 second; F/5.6; ISO 400
Timers and Remotes
There is one more piece of equipment that will allow you to get the sharpest possible images, especially when using a tripod or other camera holder: a remote trigger or timer. There are two types of remotes, wireless and wired, and both do the same job. A remote trigger allows you to activate the shutter button without touching the camera (Figure 3.27), and you can set a timer to automatically trigger the shutter button after a set amount of time. In both cases, you do not have to worry about the camera shake caused by handholding the camera or pushing the shutter release button. It doesn’t matter what type of remote you use; it’s just important to have a way to trigger the camera without actually touching it.
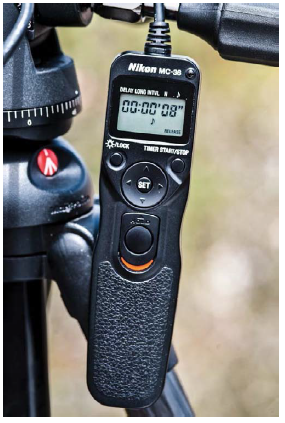
Figure 3.27 I use the Nikon MC-36 cable release to take long exposure photos. It allows me to trigger the shutter release and keep it open for as long as I want without touching the camera.