
4 Photoshop Special Effects Hacks from Scott Kelby August 18, 2016 – Posted in: Photography – Tags: how do i do that in photoshop, lens flare in photoshop, photoshop, photoshop hacks, scott kelby, softlight in photoshop, tilt shift in photoshop
You can do some pretty cool stuff in Photoshop, with most tiny tweaks taking no time at all. However, for some of us (myself included) it’s hard to know exactly where to start. There are so many options, methods, and approaches out there to editing an image that sometimes we’re left wondering, now what? or am I doing this right at all?
Luckily my friends, Scott Kelby has delivered the holy grail of Photoshop resources. His new book, How Do I Do That in Photoshop? breaks down all those things you want to do in photoshop in to easy, one-page tips, that any level of photoshopper can understand. Trust me!
To prove it, I’ve listed four Photoshop special effects hacks from Scott Kelby, excerpted directly from How Do I Do That in Photoshop. Scroll down and see for yourself just how easy navigating Photoshop can be.
Four Photoshop Special Effects Hacks from Scott Kelby
1. Creating a Lens Flare Effect
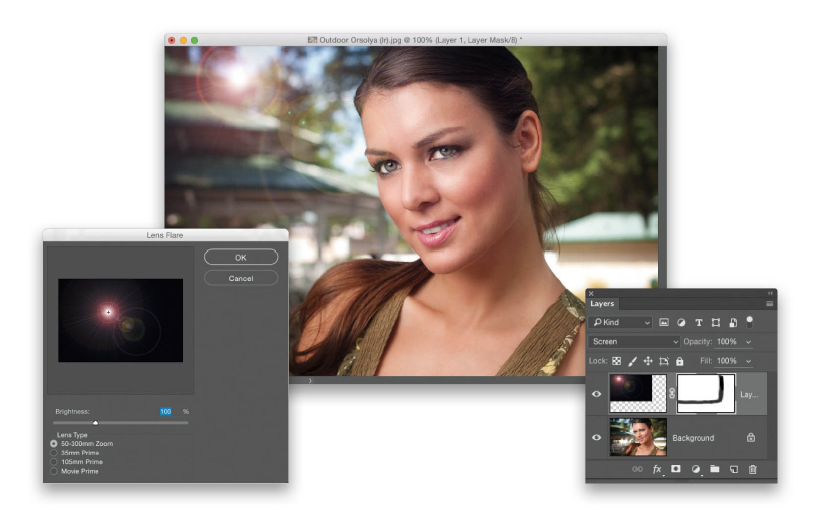
Add a new blank layer by clicking on the Create a New Layer icon at the bottom of the Layers panel. Press D to set your Foreground color to black, then press Option-Delete (PC: Alt-Backspace) to fill this layer with black. Next, go under the Filter menu, under Render, and choose Lens Flare. When the dialog appears (seen above left), you can mess around with the settings if you like, but the default settings are probably the best. So, at this point, just click OK and it applies a lens flare to the black layer. Now, to get that lens flare to blend into your image, go to the top of the Layers panel and change this black layer’s blend mode from Normal to Screen, and the lens flare becomes part of your image. You can reposition your lens flare using the Move tool (V), but depending on how you reposition it, you might see a hard edge along one or more sides. If that happens, click on the Add Layer Mask icon at the bottom of the Layers panel (it’s the third one from the left), get the Brush tool (B), choose a large soft-edged brush from the Brush Picker up in the Options Bar, and then paint in black over the hard edge to blend it.2. Creating a Spotlight Effect
2. Creating a Spotlight Effect
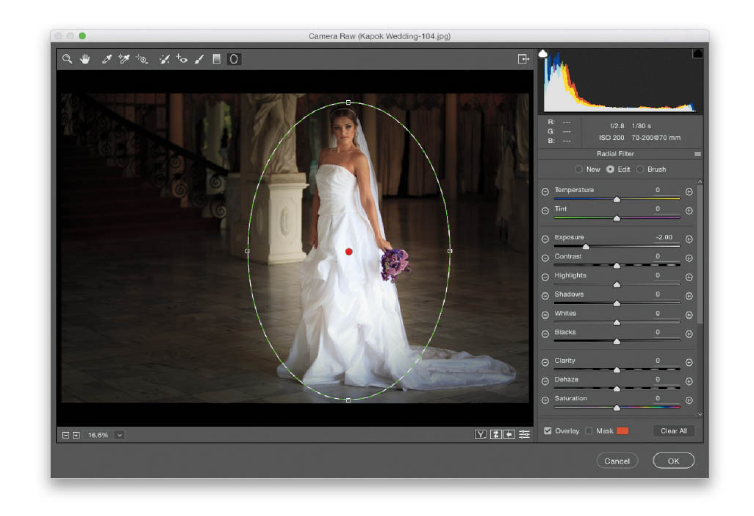
Create a Spotlight Effect? There are two ways to do this, and the one I use most often is this: Go under the Filter menu and choose Camera Raw Filter. Click on the last tool in the toolbar at the top—that’s the Radial Filter (J). In the Radial Filter panel on the right side of the window, click on the – (minus sign) button to the left of the Exposure slider four times. This resets all the other sliders to zero, but lowers (darkens) the Exposure to –2.00. At the bottom of the panel, make sure Effect is set to Outside, and then click-and-drag the Radial Filter over the part of the image you want to have a spotlight effect added to. As you drag, it creates an oval shape, and because you chose Outside for where the effect is applied, everything outside that oval is darkened by 2 stops (–2.00), and it creates that spotlight effect. To resize the oval, click-and-drag any of the little control handles on the top, bottom, or sides of it. To rotate it, move your cursor just outside its border, and it changes into a double-headed arrow. Now, you can just click-and-drag up/down to rotate it. The other method for creating a spotlight effect is to open an image, then go under the Filter menu, under Render, and choose Lighting Effects. This adds a spotlight effect, but the default one is pretty bad. I recommend going up to the Presets pop-up menu (in the left side of the Options Bar), and choosing Flashlight. Once it appears over your image, you can click-and-drag the spotlight where you want it. To change the size, click-and-drag the outside circle. To change the brightness (intensity) of it, click-and-drag around the white part of the inside circle.
3. Creating a Soft-Focus Background Effect
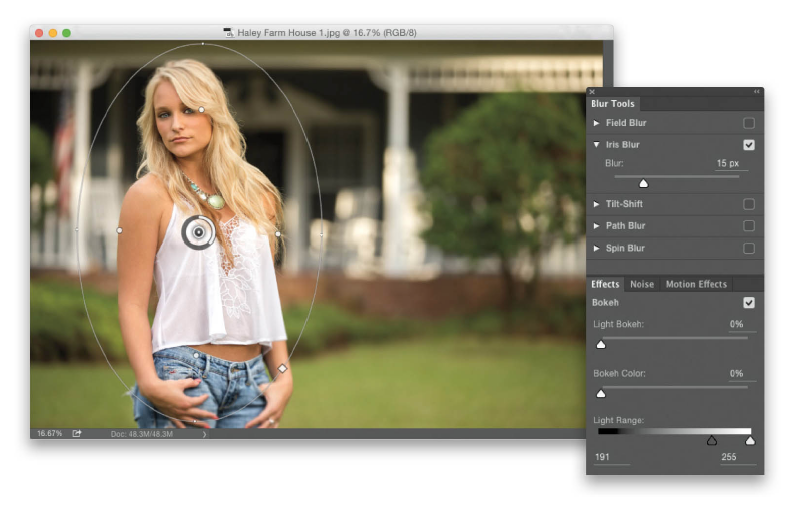
Go under the Filter menu, under Blur Gallery, and choose Iris Blur. When you do this, it creates a large oval in the center of your image with a slight blurring outside the oval. To resize the oval, click-and-drag on the edge of it. To move it, click on the pin in the center and drag it where you’d like it. To rotate it, move your cursor near one of the control points on the oval, and it changes into a double-headed arrow. Now, you can just click-and-drag up/down to rotate it. You can increase the amount of blur by going to the Blur Tools panel (which now appears on the right side of your screen) and dragging the Blur slider to the right (or just click on the white part of the ring around the pin and drag). This is kind of designed to emulate the soft-focus, shallow depth-of-field from shooting a telephoto lens with a wide aperture (creating a bokeh effect when you have bright areas in the background). Because of that, in the Effects panel (which also appears on the right), you can control the brightest out-of-focus areas, as well as the color of the bokeh and range of light where it appears. Drag the Light Bokeh slider to the right a bit, and you’ll instantly see how it affects the bright areas in the blurred background area. I normally don’t mess with these sliders, but it’s nice to know they’re there…ya know…just in case.
4. Creating a Tilt Shift Effect
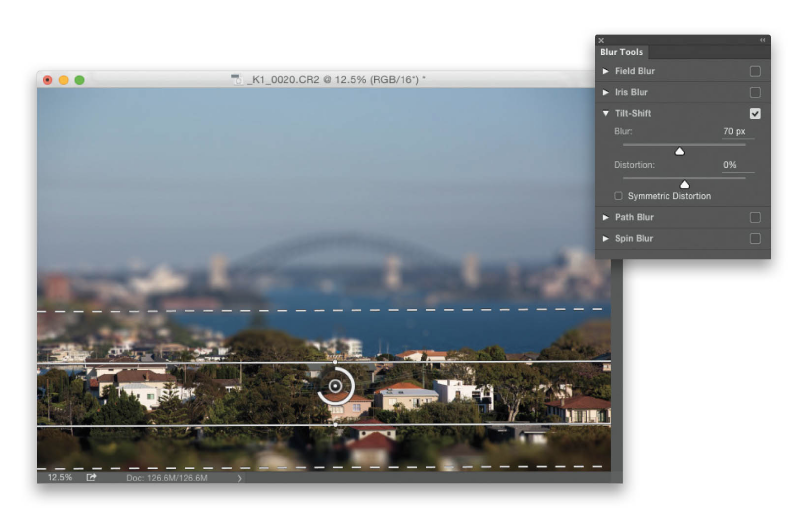
Go under the Filter menu, under Blur Gallery, and choose Tilt-Shift. This brings up the Blur Tools panel on the right side of the screen, and you’ll see four horizontal lines appear over your image. The area inside of the two solid lines in the middle is sharp, the two dotted lines on either side are transition areas where it blends from sharp to very blurry, and everything outside those dotted lines is very blurry. The area inside these lines is where the effect is most visible, but for this effect to work, honestly, it really depends on the type of image. The images that seem to work best (and make the scene look most like a toy model) are those that were taken from a high vantage point, looking down into a town or scene. With that type of image, it usually looks really good. You can increase the intensity of the effect by going to the Blur Tools panel and dragging the Blur slider to the right (or just click on the white part of the ring around the pin in the center and drag). You can rotate the lines by moving your cursor near a control point on one of the solid lines, and your cursor will change into a double-headed arrow. Now, just click-and-drag to rotate. To move them, click on the pin and drag it where you’d like it. To expand the transition area (the area that goes from sharp to blurry), just click directly on the lines and drag in/out.
Like these? Guess what? There are over 150 more tips to explore.
Check out Scott Kelby’s full book, How Do I Do That in Lightroom? The Quickest Way to Do That Thing You Want to Do, Right Now! well, right away!