

Lighting Ratios, The Easy Way October 7, 2015 – Posted in: Photography – Tags: lighting ratios, portrait, portrait photography, portrait photography tips, Rocky Nook, tim meyer
By Tim Meyer, author of The Portrait, 2nd Edition
Photographic lighting ratios have been confounding photographers since they were first defined. There are many photographers today who refuse to consider the subject and sometimes label it unimportant because of this confusion. Whether understood or not, photographic lighting ratios are a part of today’s photography, especially portraiture. Photographers either control them or lose control of their imagery.
The term photographic lighting ratios describes the difference in exposure between the highlight side of the subject and the shadow side of the subject and is usually expressed as a ratio (such as 2:1, where the highlight side has one stop more light [or twice as bright] as the shadow side).
The confusion comes in because there are at least two distinct ways to measure lighting ratios. Each way can produce apparently different results. Add that to the fact that sometimes in describing measuring lighting ratios, instructors inappropriately mix the two methods which invalidates the results.

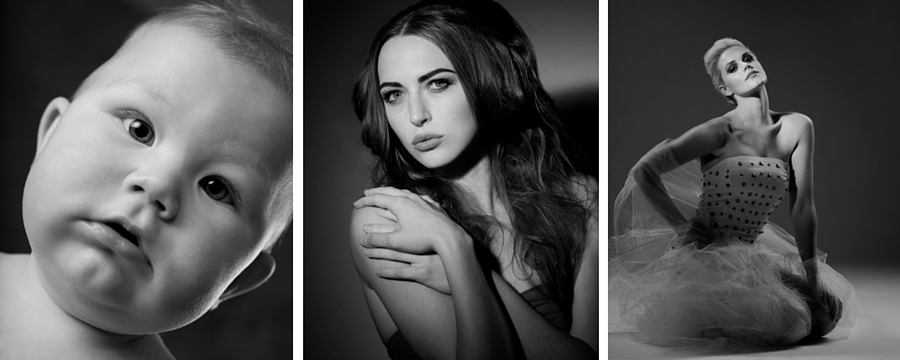
Figure One © Tim Meyer
So, let me distill it all down to what I consider the most practical approach to the subject. Simply put, ratios describe how much brighter the highlight side of your subject is than the shadow side of your subject. In a 2:1 ratio, the highlight side is twice as bright as the shadow side, a 4:1 is four times brighter, and an 8:1 is eight times brighter. In Figure 1, you can see how different ratios appear on a common subject.
The questions become which one fits best the style of work that you like to produce, and how do you consistently achieve each of the looks? The answer about style is dependent on your subject matter and the effect you are trying to achieve. Conventional wisdom states that the lower the ratio the “flatter” the contrast. This works well in traditional work and is also seen in much of the beauty lighting used in commercial work. The higher the ratio, the darker the shadow becomes, increasing contrast and often the drama of the image. A high contrast can be used to great effect, but can also become decidedly non-traditional with the higher ratios.

Figure 2, 5:1 ratio, © Tim Meyer
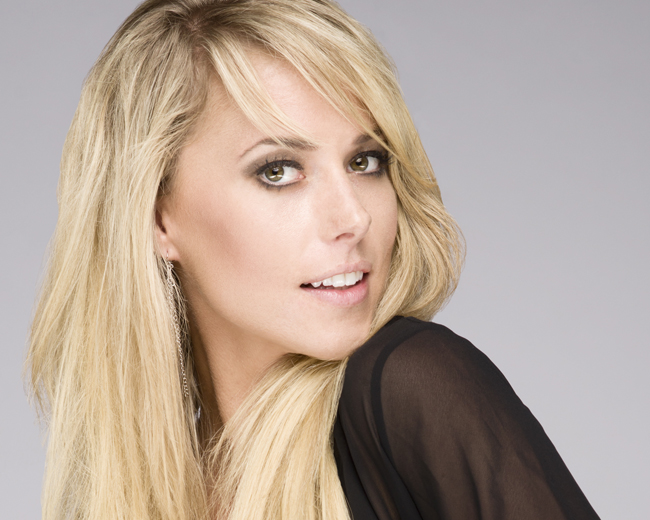
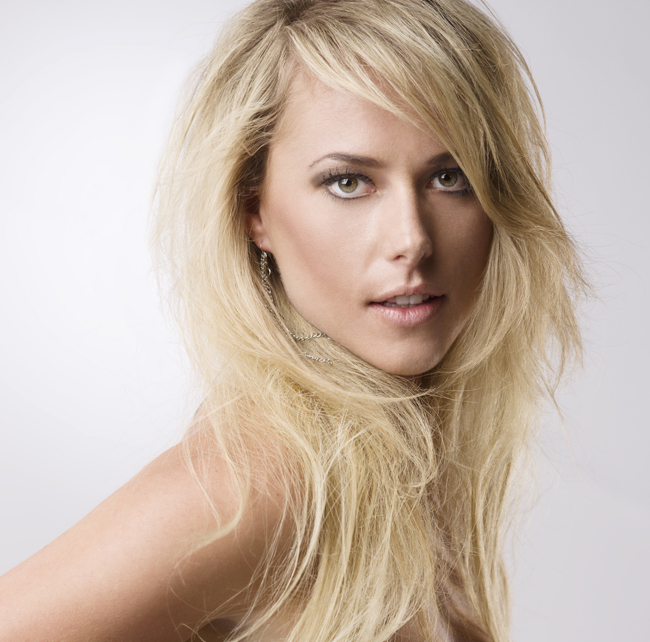
Figure 3, 2:1 ratio, © Tim Meyer
As mentioned in my earlier point about controlling lighting ratios, if you do not control them, you lose your ability to affect the style of your imagery in a consistent way. Lighting ratios are not the only consideration in determining style in imagery, but they play an important role.
As for how to set up or determine what your lighting ratio will be, I would suggest the following method. In today’s modern cameras, it is possible to meter ambient or continuous light selectively on both sides of the face using the spot-metering mode. (Check your camera’s manual to change your settings to this mode. I am unaware, however, of any camera that will do this with flash or strobe lighting.) Take a meter reading on the shadow side of the face and compare it with a reading taken on the highlight side of the face. Alternately, and my preferred method, would be to use a hand held light meter when trying to determining lighting ratios. My favorites are the Sekonic L-358 or the new Litemaster Pro L-478DR. Using the meter in the incident light mode (refer to the manual), measure the light on the shadow side of the face by pointing the dome of the meter towards the camera from the shadow side of the face. Make sure that none of the light from the highlight side hits the dome. Take note of this exposure. This is the shadow side exposure.
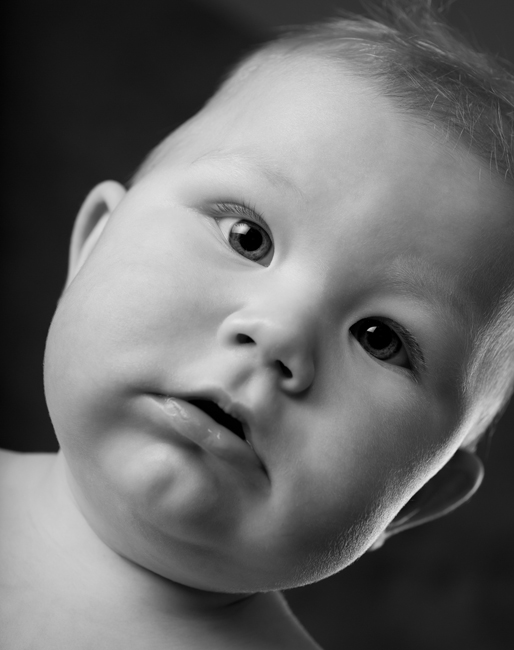
Figure 4, 4:1 ratio, © Tim Meyer
Now place the dome near the highlight side of the face where it is illuminated by both the shadow and highlight side illumination. There is a giant controversy as to whether to point the dome of the meter towards the camera or towards the main source of the highlight side illumination. Either will work effectively, but I find for the kind of work that I do, I point the dome of the meter towards the main source of the highlight side illumination. Take note of this exposure. This is the highlight side exposure.
Compare the shadow side and highlight side exposures. The difference in F-stops between the two will determine your ratio. Below is a chart to convert that difference into lighting ratios.

I am a portrait artist and use lighting ratios extensively to influence the look of my work. In Figures 2-6 you will see some example of my images with the lighting ratios listed. How you use lighting ratios is up to you. Just use them consistently and powerfully.
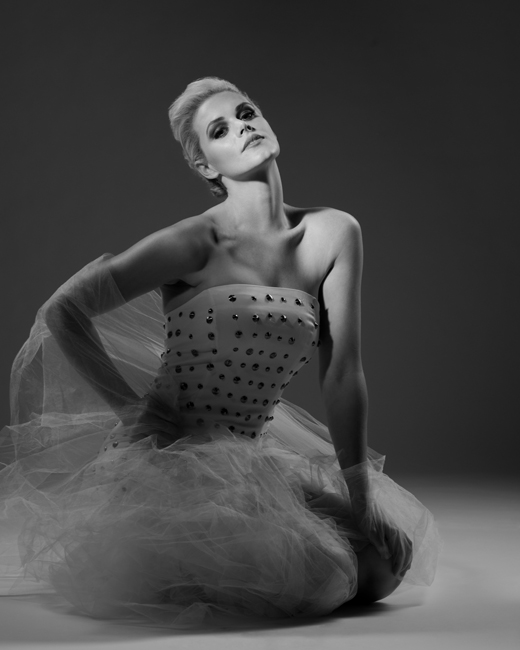
Figure 5, 8:1 ratio, © Tim Meyer
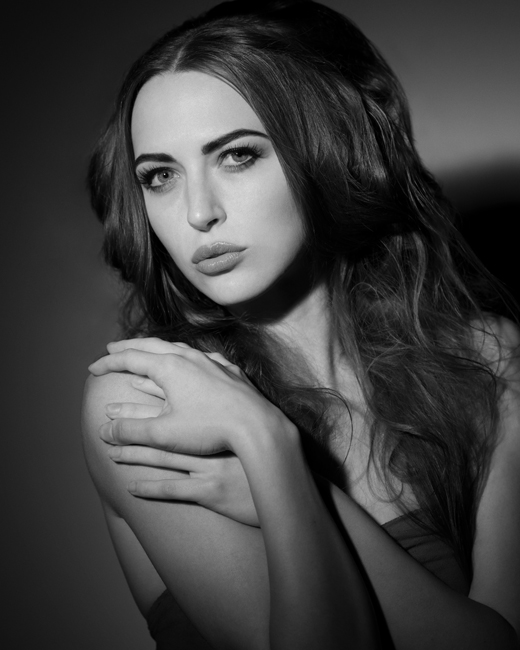
Figure 6, no fill, © Tim Meyer
Want to Learn More? Check Out The Portrait, 2nd Edition now!
Drawing from over 30 years of experience, Tim Meyer (M.Photog.Cr.) mixes our rich artistic heritage with today’s styles. His images enlighten and inspire. In addition to numerous exhibitions of his fine art work, Tim’s professional photography has been internationally recognized for its innovative style and technique. He is the Lead Instructor at Brooks Institute and maintains a nationally acclaimed portrait and wedding business, Meyer Photography.
Tim teaches internationally for the MAC Group and is honored to be sponsored by H&H Color Lab, Big Folio and Triple Scoop Music.
His writings on photography and art have been published internationally, and his book, The Portrait – Understanding Portrait Photography, co-written with Glenn Rand and published by Rocky Nook, Inc., is available worldwide.