The Bird-Friendly Backyard February 15, 2019 – Posted in: Photography – Tags: backyard bird photography, bird photography, birds, Mastering Bird Photography
From Mastering Bird Photography by Marie Read
The Bird-Friendly Backyard
Bird-friendly gardening will increase the avian diversity in your backyard. Many books have been written about this topic, a couple of which are in the Resources section. To get you started, a few basic suggestions follow.
Birds need shelter as well as food and water. Plant evergreen, coniferous trees as year-round cover in bad weather and safe places for birds to hide from predators. Conifers provide safe nest sites, too. Make a brush pile of downed branches where ground-dwelling species can hide.
Provide natural foods for birds by growing plants native to your area (figure 9.1). For seed-eating species such as sparrows, finches, and chickadees, popular choices include sunflowers, coneflowers, and black-eyed Susans. To entice hummingbirds, plant columbines, bee balm, cardinal flowers, penstemon, salvia, or trumpet vines. Fruiting trees and shrubs, such as elderberry, serviceberry, winterberry, viburnum, and crabapple are magnets for waxwings, robins, catbirds, and bluebirds. With a little luck, you may be able to photograph birds actually feeding on these plants (figure 9.2), otherwise the colorful gardens can form great backdrops for artificial perches (figure 9.3).
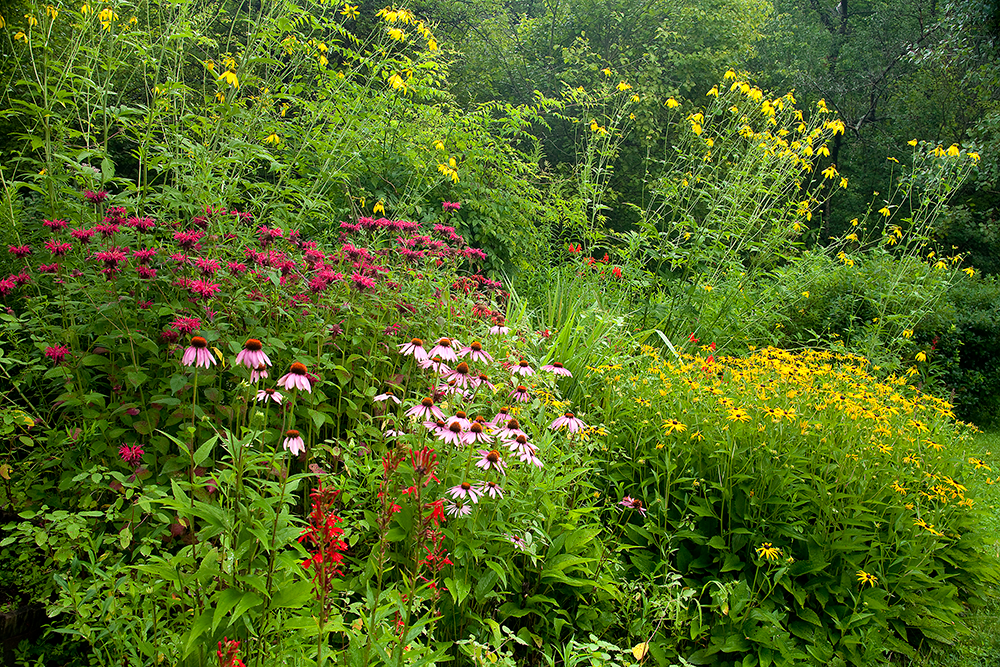
Figure 9.1: The author’s bird-feeding garden in summer: coneflowers, black-eyed Susans, bee balm, and cardinal flowers.
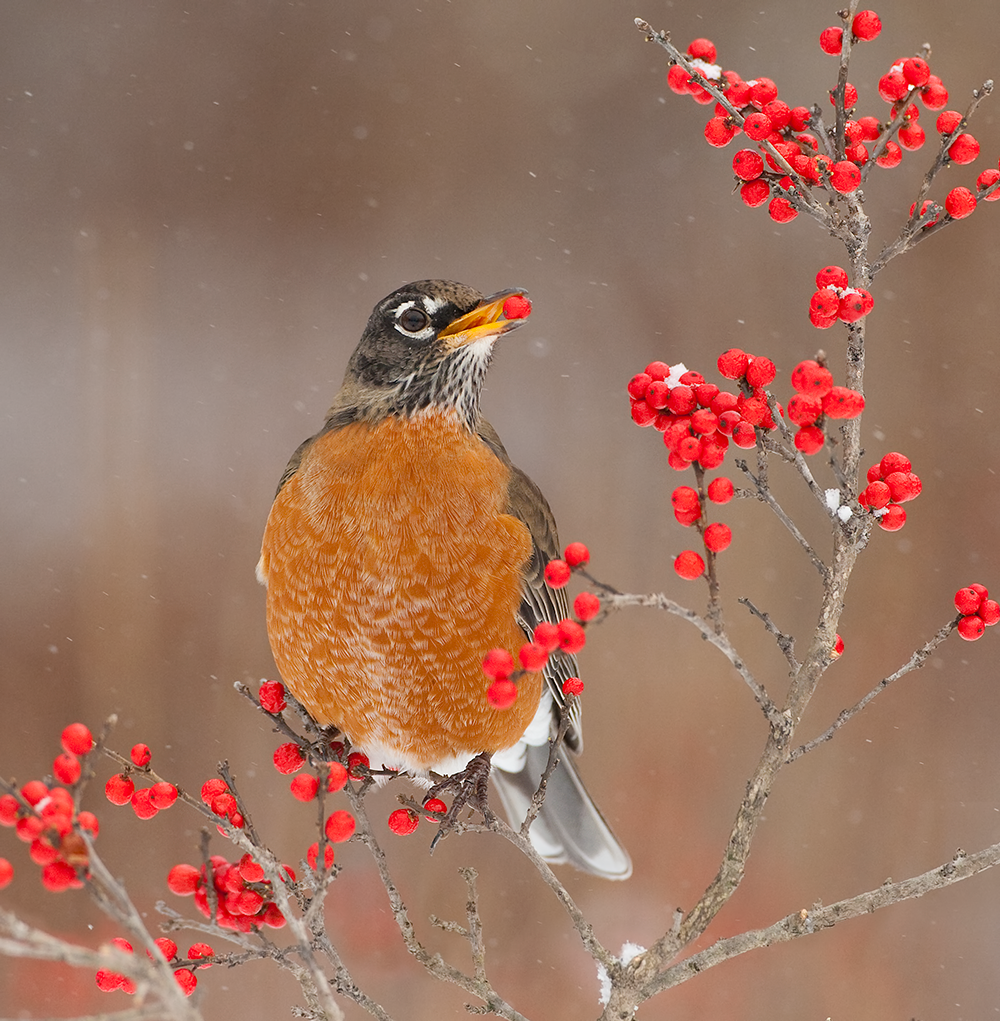
Figure 9.2: American Robin feeds on winterberry fruit in the author’s backyard. Canon EOS 1DMark III with 500mm f/4L IS USM lens, Gitzo tripod, 1/800 sec., f/5.6, ISO500.
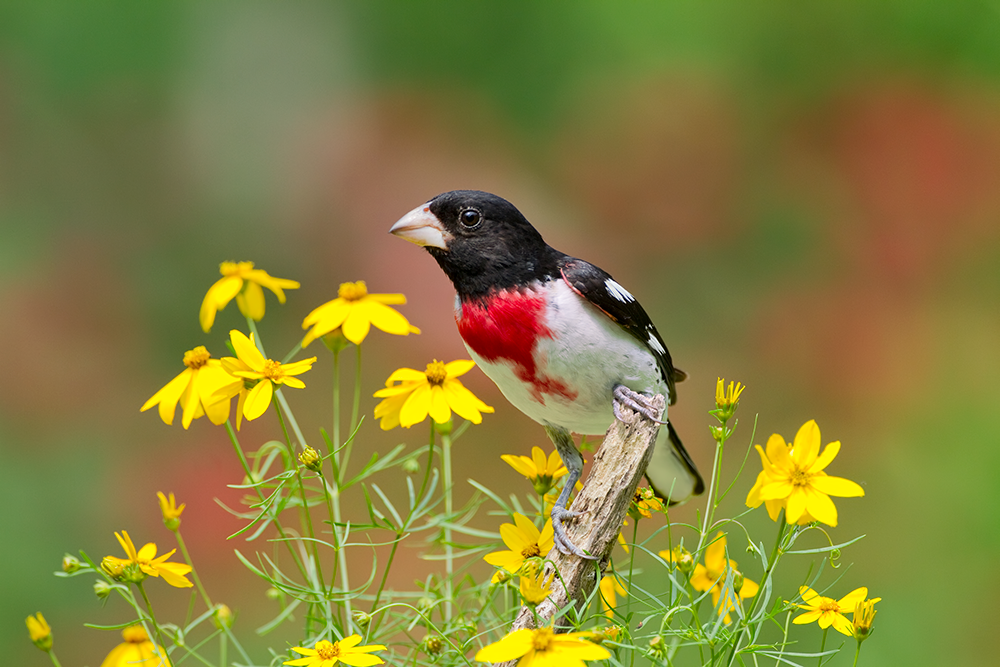
Figure 9.3: Rose-breasted Grosbeak male on a set up perch decorated with coreopsis flowers, with garden flowers forming a colorful background. Canon EOS 7Dwith 500mm f/4L IS USM lens, Gitzo tripod, 1/640 sec., f/5.6, ISO400.
Use bird-friendly landscaping and gardening practices. For instance, when it’s time for yard cleanup—don’t! Leave it messy. Leave spent flowers standing so that finches can eat the seeds. Use fallen leaves as mulch instead of bagging them up for removal—ground-feeding sparrows, towhees and thrashers will scuff through them in search of prey. Leave dead twigs and grasses to provide nest material, and leave dead tree trunks and limbs in place for woodpeckers to forage and excavate nest holes. Insects are essential bird food, especially for raising healthy young, so avoid spraying insecticides.
Keep birds safe: Outdoor cats kill millions of birds annually, especially vulnerable fledglings, so keep cats indoors. Doing so saves birds, and keeps cats healthier and safer, too.
Take Advantage of Existing Plantings
A backyard bird photography studio can be as simple or as ambitious as you like, ranging from a single perch next to a feeder to an elaborately constructed set. But the easiest way is to place a feeder next to an existing tree or shrub, as I did to capture the male Northern Cardinal in figure 9.4. Evergreen trees make attractive perches, especially during drab northern winters. You can photograph birds wherever they choose to land naturally in the tree or, in winter, draw them to a specific spot by sprinkling seeds on the snow-covered branches. Make sure the seeds don’t show in the photo (or clone them out later if you wish).
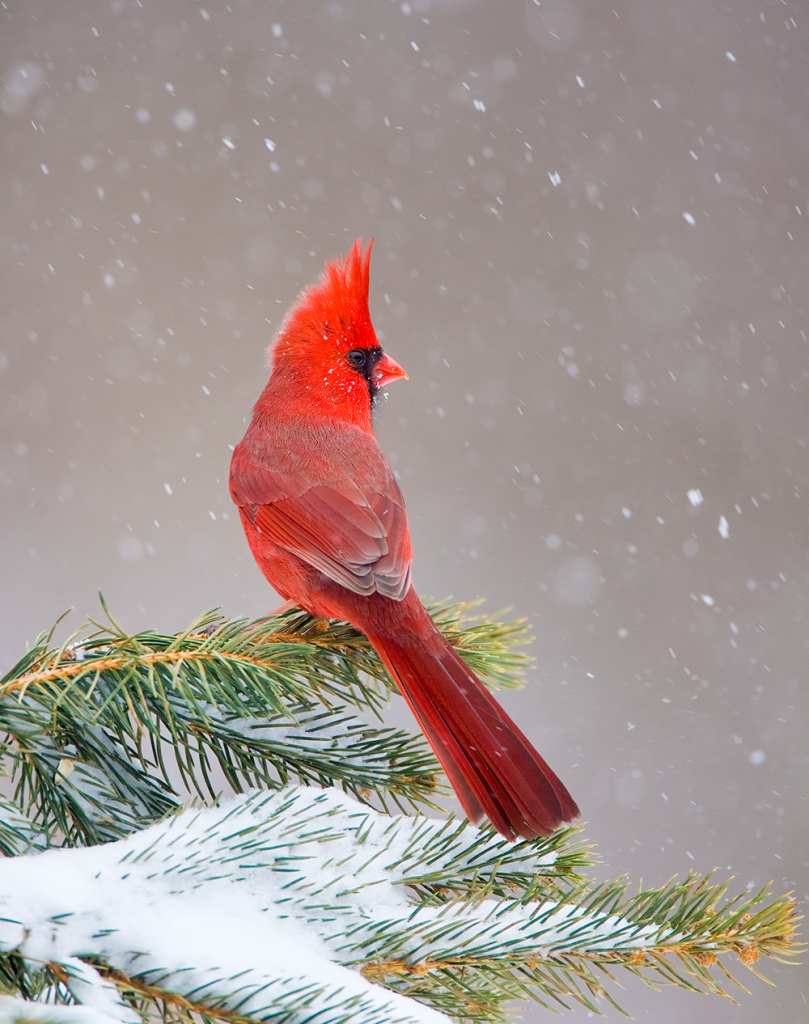
Figure 9.4: Northern Cardinal male perched in a conifer during a snowstorm. Canon EOS 1Ds Mark II with 500mm f/4L IS USM lens, 1.4. teleconverter, Gitzo tripod, 1/640 sec., f/5.6, ISO400.
Evaluate the location of your tree or shrub when placing the feeder. Look for low branches with uncluttered surroundings and pleasing backgrounds. Check that those branches receive good lighting and then place the feeder nearby (figure 9.5). For flexibility, use a feeder pole with a free standing base (sometimes called a “patio base”) rather than a pole that must be twisted into the ground. That way it will be easy to fine-tune the feeder location if needed (plus your lawn will not end up full of holes!).
Next, decide where to position yourself and your gear. In most backyard situations where birds are used to people, a telephoto lens in the 300–400mm range is often adequate to capture a frame-filling subject, unlike in a field situation where birds may be skittish and a longer telephoto is needed. Even so, to be close enough yet still have birds relaxed and acting naturally, it helps if you are concealed. That means hiding in some kind of photography blind or other structure. It could be your house, a garden shed, or another structure from which you could photograph through an open window. Otherwise, purchase a blind from an outdoor store or photography supply company or construct your own. (See chapter 4 for more about photography blinds and their uses.) Get a comfortable seat, set up your gear, and you’re good to go!
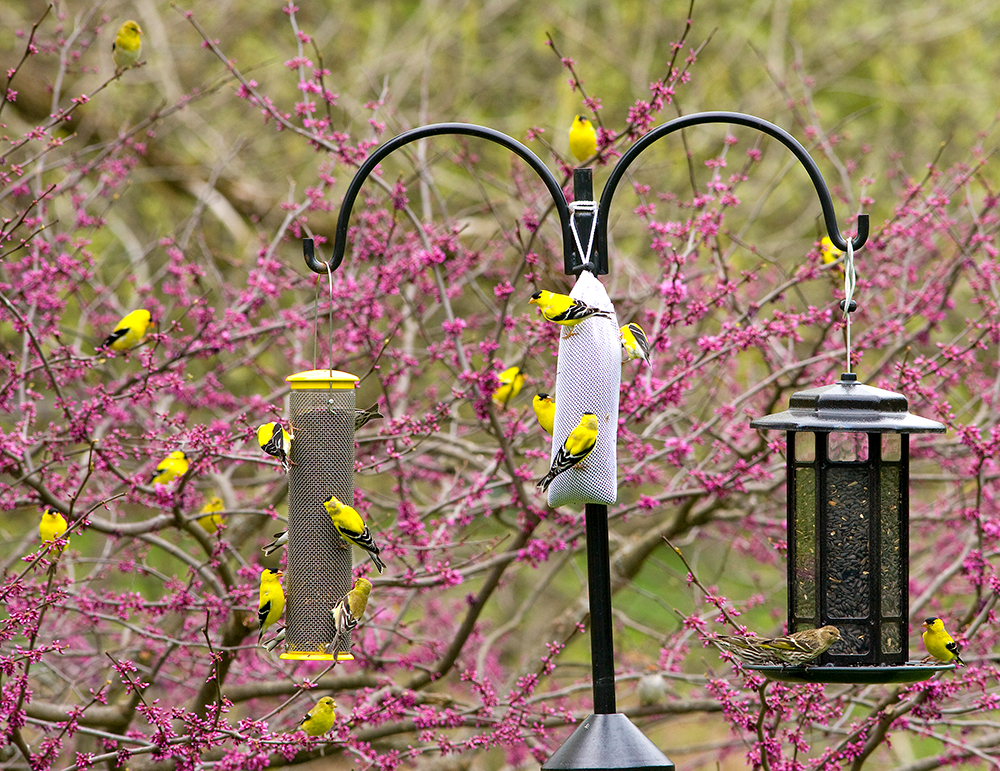
Figure 9.5: American Goldfinches crowd onto feeders hanging next to a redbud tree. Note that when actually shooting, I remove all but one feeder so that birds must perch in the tree and wait their turn to feed.
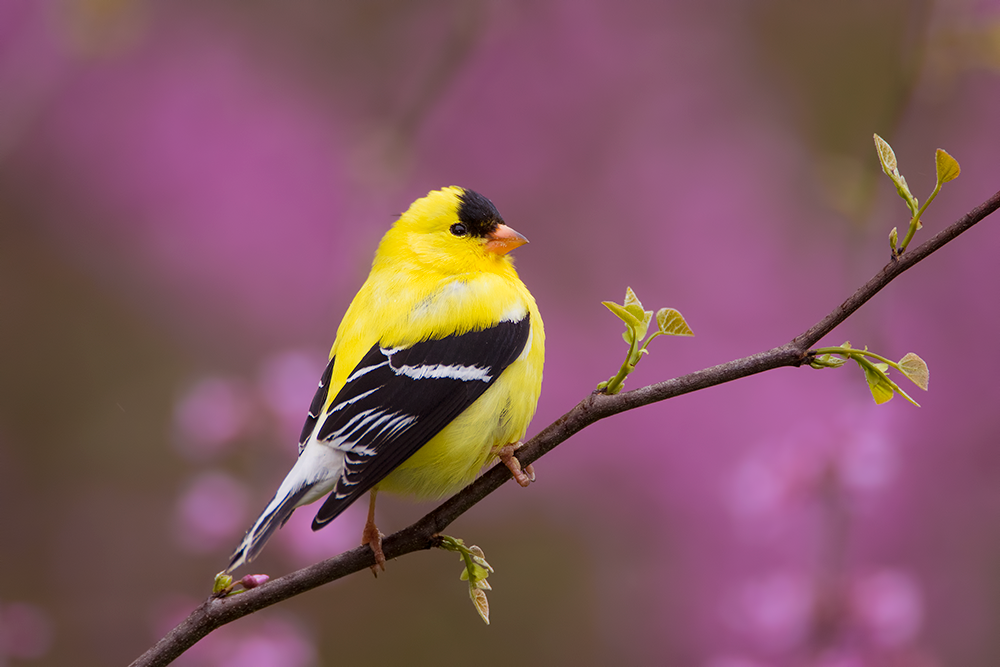
Figure 9.6: American Goldfinch male in eastern redbud. Canon EOS 7Dwith 500mm f/4L IS USM lens, 1.4. teleconverter, Gitzo tripod, 1/500 sec., f/5.6, ISO800.
Pay Attention to the Background
Once birds are regularly visiting the tree, you’ll discover that certain branches become favorite perches. If you don’t like how they look, you can either reposition the blind or move the feeder to encourage birds to use a different perch or another part of the tree. Tie back or prune off any distracting twigs as needed.
When you finally have a bird in your viewfinder, take a good look behind it before you press the shutter button to make sure there are no distractions in the background. Recall from chapter 7 that bold lines in the background can be particularly distracting. Avoid having stray twigs, shadows of trunks or branches, or other obvious lines behind the bird, especially if they lie directly behind its head or neck. Bright highlights in the frame can draw attention away from the main subject, too. To keep distractions out of the frame, fine-tune the position of the blind or try raising or lowering your tripod.
Elements behind the bird can be OK as long as they’re far enough away to be out of focus and not distracting, as is the case with the flowers behind the American Goldfinch in figure 9.6. Resist the temptation, though, to always insist on a featureless, single-color background. If you do so you risk your photos appearing contrived or suffering from the “bird on a stick” syndrome! I much prefer to have some texture and interest in my backgrounds.
When photographing close to human habitation, at some point it’s inevitable that a recognizably man-made element will get in the way and ruin the shot: an obvious roofline or unattractive aluminum siding intruding into the frame, for instance. Sometimes a slight change in viewing angle (either side to side or up and down) is all that is needed to keep the offending distraction out of the frame. Other ways to solve the problem are to get closer to the bird, add a teleconverter, or use a wider aperture (smaller f-stop number) so that less of the background is in focus. For a long-term solution, use your ingenuity to come up with a way to disguise the human artifact or block it from view. For instance, to block the view of a tool shed behind one of my photo setups, I put a wooden plant trellis on which I grow vines.
Backyard Setups
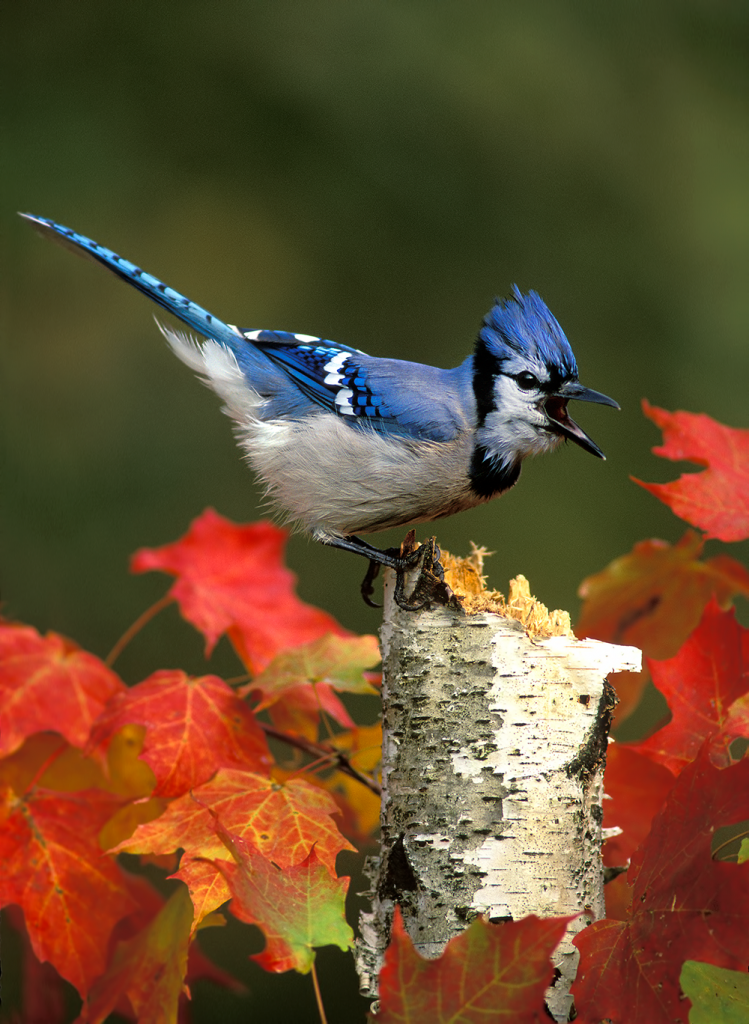
For ultimate control of your subject’s surroundings and background, you’ll want to use artificial perches. Place them where they will get optimal light and then use bird feeders to entice birds to land on them. Some of my favorite and most-published images have been photographed this way, including the calling Blue Jay in figure 9.7, which has appeared on book and magazine covers and in calendars.
To capture the image, first I sank a metal fence post into the ground and wired a birch trunk to the front of it, far enough away from the pine trees in the background that they would be out of focus. I moved a bird feeder close to the trunk, expecting the local jays would land on the trunk before proceeding to the feeder. Once they were doing so consistently, I beautified the trunk by attaching sprays of maple leaves to it (using bungee cords) and then I hid in a photo blind nearby. Quick reflexes let me press the shutter button the instant this jay arrived. The fact that it’s calling was sheer luck!
Figure 9.7: Blue Jay calling in autumn. Nikon F5 with 500mm f/4 IS lens, 1.4. teleconverter, Gitzo tripod, Fuji Velvia film, camera settings not recorded.
Selecting and Arranging Perches
Be on the lookout for fallen branches and snags to serve as perches. The right perch can make the photo (figure 9.8). Avoid straight, horizontal branches—images of birds on them are commonplace. Instead, make a collection of perches with character: gnarled, lichen-covered branches, curved boughs, snags with interestingly textured bark, moss-covered logs, odd-shaped pieces of driftwood, or fallen sprays of pinecones. Where it is appropriate and legal to do so, you can cut sprays of live foliage or flowers, either for birds to perch on directly or to use as perch decorations. When you’re arranging your perch, remember that diagonal shapes and lines add drama and interest to images.
Find solutions for perch supports online or from home-and-garden stores: garden fence posts, bird feeder poles (with free standing base or with an auger that screws into the ground), Christmas tree stands, and cinder blocks, to name a few ideas. Attach perches to supports using wire, bungee cords, cable ties, or twine.
A vertical tree trunk baited with suet is ideal for photographing woodpeckers and nuthatches—birds that forage while clinging to bark (figures 9.9 and 9.10). Attach a wire suet cage to the trunk to initially attract the birds, but when you want to actually shoot, remove it temporarily. That way the feeder isn’t visible in the frame and your subjects don’t have messy suet fragments stuck to their bills! The birds will still come and search for food for a short time but, to keep them interested, replace the feeder as soon as you notice a decline in activity or once you’re satisfied with your images.
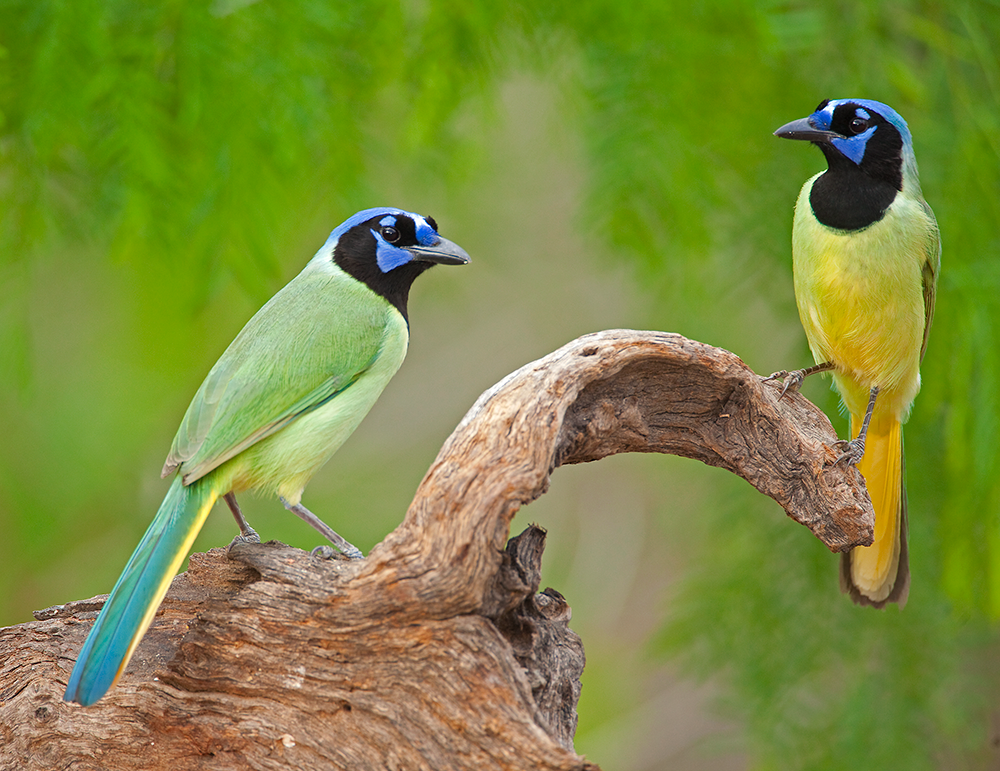
Figure 9.8: Green Jays on an unusually shaped perch against a natural background of newly leafed-out mesquite. Canon EOS 5DMark II with EF 500mm f/4L IS lens, 1.4. teleconverter, Gitzo tripod, 1/250 sec., f/5.6, ISO800. Rio Grande Valley, Texas.
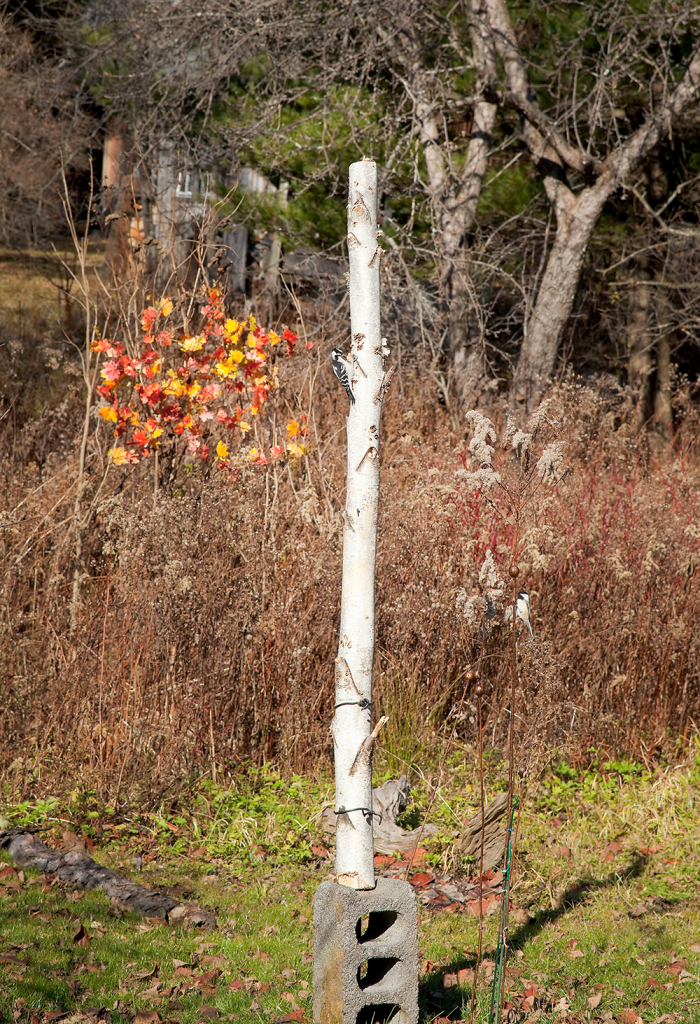
Figure 9.9: Abackyard setup for woodpeckers and nuthatches. Abirch trunk wired to a fencepost is supported on a cinder block to raise it to the correct height. Note the artificial background, made up of sprays of fall leaves arranged on shrubbery.
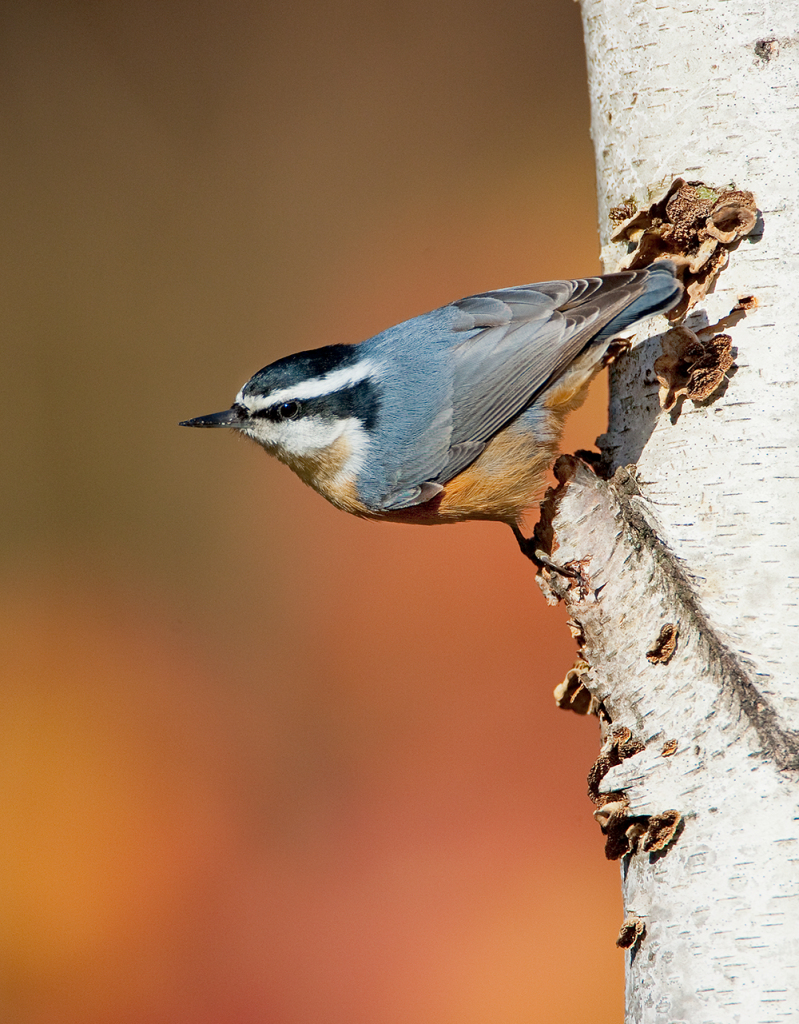
Figure 9.10: Red-breasted Nuthatch male photographed at the setup shown in figure 9.9. Canon EOS 1DMark III with 500mm f/4L IS USM lens, 1.4. teleconverter, Gitzo tripod, 1/2000 sec., f/7.1, ISO320.
Locate your perch where it can receive optimal lighting and where you can position a blind with the sun directly behind you. An uncluttered background beyond the perch is equally important. Check through your lens to make sure the background is far enough away that it appears softly blurred, which will enable the subject to stand out.
Some backyard photographers set up multiple perches at once, but I prefer to use just one. The reason is that if you offer birds many perch options you can’t be sure where they will land, and, since small birds rarely stay put for long, they may jump off the perch before you can aim and focus. At most, I work with two perches at once in order to photograph birds with different feeding styles. For example, within shooting range of my blind I might have both a vertical trunk for woodpeckers and nuthatches and a branch for cardinals and chickadees next to a sunflower feeder.
To decorate perches, strive for a natural look, especially if you’re using live flowers or foliage. Avoid leaning flower stems flat against a perch—plants don’t grow that way naturally. Instead separate stems from the perch slightly by inserting a small fragment of wood or other material as a shim between the stem and the perch, or put the decorations on a separate support. Use florist’s wire or grocery bag twist ties to attach and critically position flowers and leaves, orienting them in ways that would be typical if they were growing in the wild.
Nothing says “artificial set up” like droopy vegetation. Keep flowers and foliage fresh by putting each cut stem in a floral tube of water. Purchase floral tubes from florists or craft stores. Alternatively, place multiple stems in a larger container of water next to the perch: Insert each stem in a block of florist’s foam to hold them upright and arrange them artfully around your perch. (Who knew that the Flower Arranging class you took long ago would come in so handy!)
The Perfect Place
Sometimes, despite your best efforts, those darned birds just won’t perch where you want them! Here are a few means of coercion.
- Limiting birds’ access to food encourages them to perch while waiting their turn at the feeder, so avoid placing multiple bird feeders near your perch. If the remaining feeder has multiple feeding ports, cover all but one.
- Birds are more likely to land on an obstruction-free part of a branch. For example, to photograph a Baltimore Oriole, I chose to set up a branch that was naturally flower-free for part of its length (figure 9.11). As I expected, the oriole landed on the flower-free part (figure 9.12) before hopping onto the cut orange that I’d used to attract it. The bird’s vocal performance was a nice surprise! If your perch has many leaves or flowers, try clipping one or more of them off to open up the perfect landing spot. Disguise the clipped part, if necessary, by rubbing a little mud or soil on it.
- To entice woodpeckers and nuthatches to precise spots on natural or set-up tree trunks and snags, press fragments of suet, peanut butter, or individual sunflower seeds into crevices in the bark, or drill small holes in the wood and do the same. For a natural appearance, make sure the food isn’t visible in your photographs.
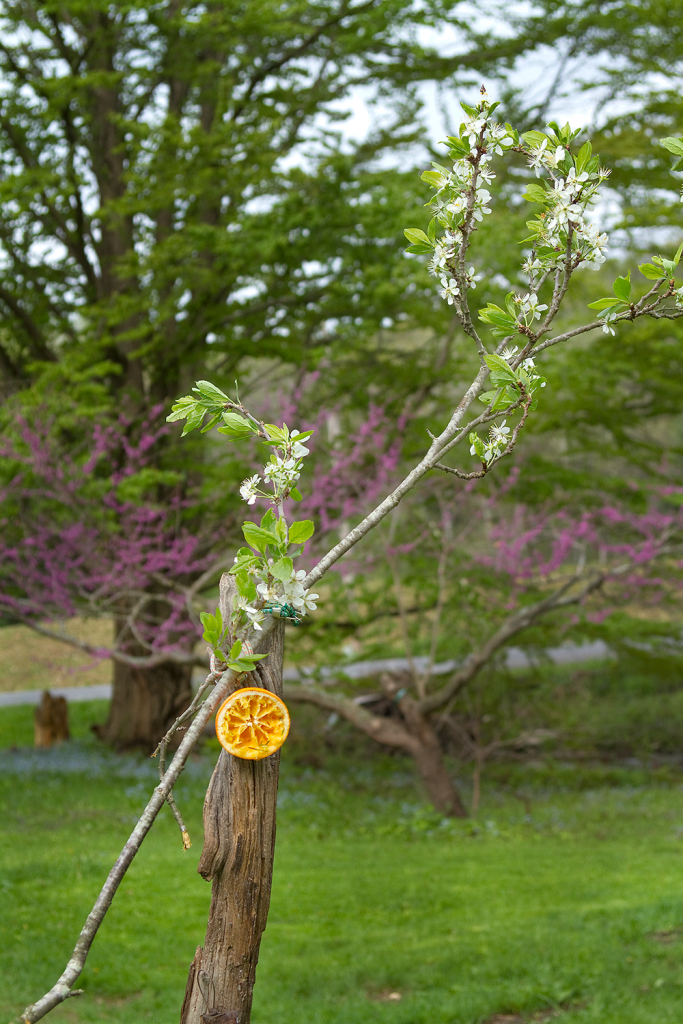
Figure 9.11: Asetup for orioles using a cut orange. An apple tree branch tied to a support snag by means of a bungee cord serves as the perch, and the orange is attached to the upright using a nail. The redbud tree in the distance forms the background.
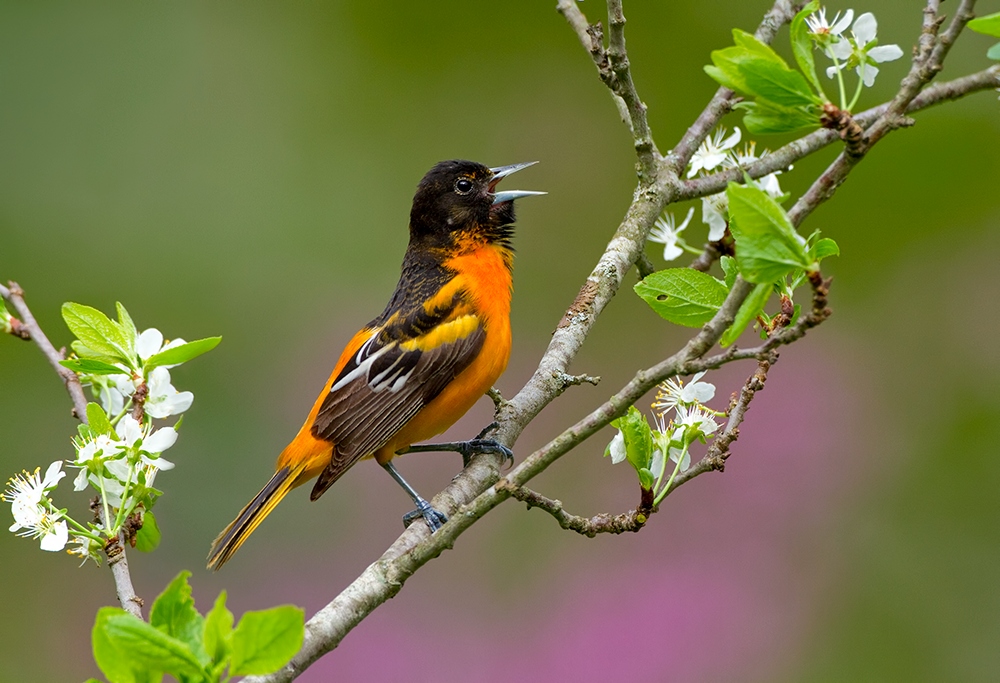
Figure 9.12: Baltimore Oriole singing on apple tree branch, photographed at the setup shown in figure 9.11. Canon EOS 7Dwith 500mm f/4L IS USM lens, Gitzo tripod, 1/500 sec., f/5.6, ISO500.