
Tips for Shooting Landscapes at Night November 4, 2016 – Posted in: Photography – Tags: glenn randall, how to photograph stars, night photography how to, night photography tips, shooting landscapes at night, shooting the milky way
From The Art, Science, and Craft of Great Landscape Photography By Glenn Randall
Today’s high-end DSLRs have made it possible to make landscape photographs at night that were simply impossible in the film era. Film lacked the sensitivity to record the night sky as we see it, with apparently stationary stars. Exposures on even the fastest (most sensitive) film were usually so long that the stars made visible streaks as the earth rotated, rather than being rendered as points of light.
True, some photographers used tracking devices to counteract the earth’s rotation, but these were specialized tools not widely used by most shooters. The sensors in today’s best DSLRs, by contrast, are so sensitive at their highest ISOs that photographers can capture the night sky using exposures short enough to record the stars as pinpricks of light. In short, we can now use readily available equipment to make photographs that capture some of that sense of wonder we all felt as children gazing up at the star-filled night sky.
Photographing the Milky Way
Of all the wonders of the night sky, the most spectacular subject for photographers who lack a telescope is surely the Milky Way. The only hardware required is a sturdy tripod, a DSLR with good high-ISO capabilities, and a wide-angle lens—the faster the better. This chapter will provide the other key ingredient: the information you need to make your own spectacular photos of the Milky Way.
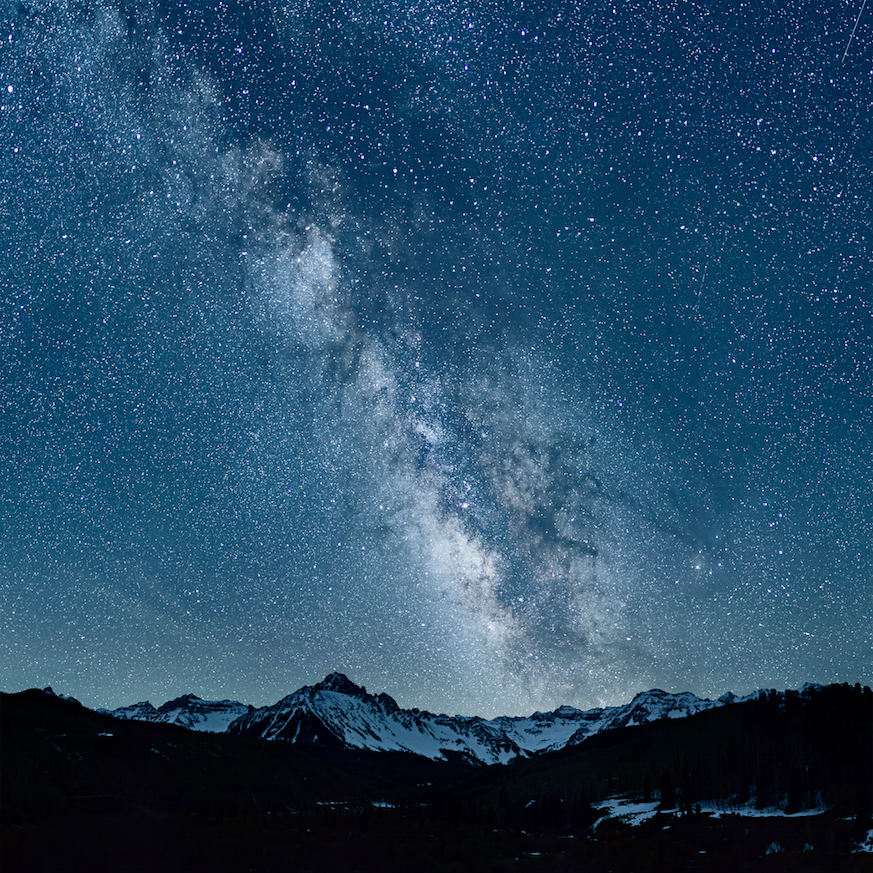
Let’s start with a refresher on your college astronomy class. We live in the Milky Way Galaxy, which is shaped like a plate, not a sphere. Our solar system lies part way between the center and the rim. The Milky Way is the band of light formed by billions of very distant stars that you see as you look along the galactic plane. You can see the Milky Way every clear, moonless night of the year, but it’s not equally bright in all directions. If you look away from the center of the galaxy, you are looking through a region with relatively few stars. If you look toward the center of the galaxy, however, your line of sight leads past many more stars, plus clouds of interstellar gas and dust, so the Milky Way is much brighter and has more interesting structure.
The center of our galaxy, the most photogenic part of the Milky Way, lies in the direction of the constellation Sagittarius. Like any celestial object, Sagittarius appears to rise and set as the earth rotates. Sagittarius always rises at an azimuth of 125 degrees and sets at an azimuth of 236 degrees at the latitude of Denver, but the time of rising and setting varies throughout the year. Sagittarius is most prominent in late spring, summer, and early fall (roughly April 1st to October 15th), and is not visible in winter because it is only above the horizon during the day.
Even the brightest part of the Milky Way is relatively dim. Get as far away from city lights as possible, and shoot on a clear, moonless night when the sky is as dark as it will get. That means shooting during the interval between astronomical dusk and astronomical dawn, when the sun is more than 18 degrees below the horizon. There are many websites and phone apps that provide moonrise and moonset times and the times of astronomical dusk and dawn.
The sky is always brightest near the horizon. It gets darker as you look higher into the sky. That’s true at night as well as during the day. To make the best part of the Milky Way stand out against a dark sky, shoot when Sagittarius is as high in the sky as possible. Sagittarius reaches its highest elevation above the horizon, an altitude of 24 degrees as seen from the latitude of Colorado, when it is due south. As with any landscape, the best Milky Way photographs include more than sky. When planning your shoot, think about compositions in which you are looking roughly south at something interesting. Arches, sandstone towers, and dramatic peaks make good land elements. You don’t need to worry much about foregrounds; the depth of field is so shallow at the wide-open aperture you’ll be using that you won’t want anything in the frame closer than about 15 feet, even with a 16mm lens. See the table below for the depth of field of selected lenses focused at infinity.
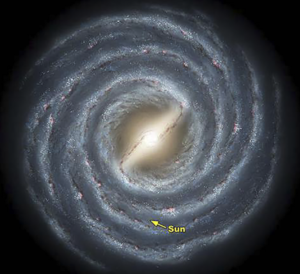
An artist’s conception of the Milky Way Galaxy, viewed from above. Image courtesy of NASA.
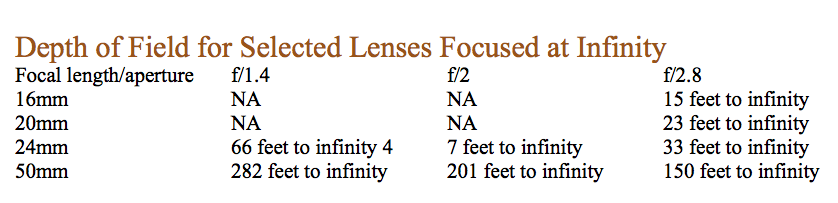
Depth of field for certain lenses mounted on full-frame cameras and focused at infinity. The circle of confusion is .02mm. This is a widely accepted standard for sharpness on the sensor.
To nail down the position of Sagittarius more precisely, download a desktop astronomy program. Skygazer (my current favorite), Stellarium, and Starry Night are three of the top contenders today. There may be others by the time you read this. The best of these programs can pinpoint the position of Sagittarius at a particular time on any particular night, anywhere in the world. They can also show you the angle the Milky Way makes with the horizon, which varies depending on the time of night and the season of the year. For example, in the Northern Hemisphere, the Milky Way arcs up and left when Sagittarius transits. Transit is the time when the constellation is due south and as high in the sky as it will get, which is normally a good time to shoot. You’ll generally want to position your most important land element—the mountain, tower, or arch—in the bottom-left part of the frame so that the Milky Way arcs up and over it. Like all constellations, Sagittarius is large in an angular sense. The brightest gas clouds in the Milky Way are actually about 10 degrees to the right of the position that Skygazer reports for Sagittarius. You’ll need to take this into account if you want to position the Milky Way precisely, as I usually do. (Hey, my dad was a civil engineer—couldn’t you tell?)

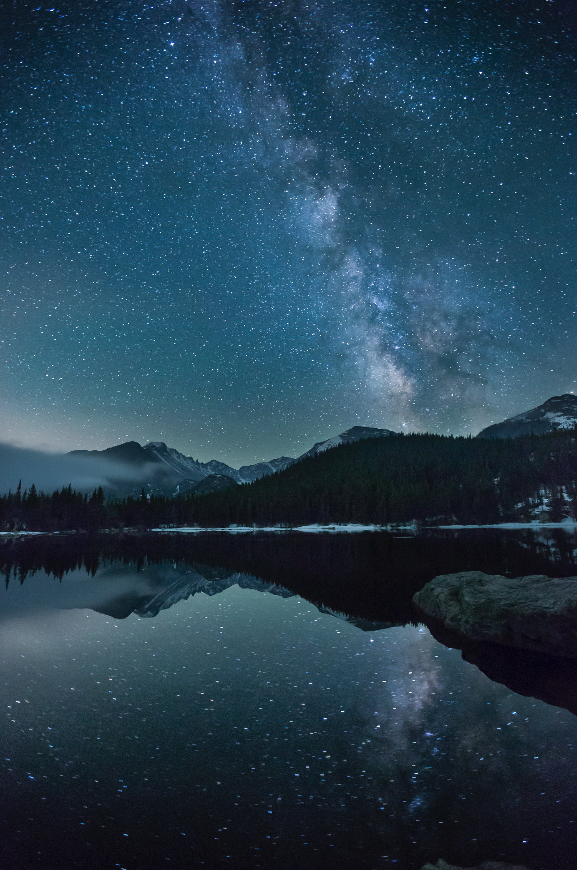
The Milky Way and Longs Peak reflected in Bear Lake, Rocky Mountain National Park, Colorado. I shot two frames with a 16mm lens at f/2.8, ISO 6400, and merged them with the modified Rembrandt Solution. I exposed the sky frame for 30 seconds and the land frame for 90 seconds. © Glenn Randall
Focusing and Composing at Night
Once you arrive at your chosen location, you face the next challenge: focusing at night. Auto-focus is useless; turn it off completely so you don’t accidentally trigger it. Nor can you simply set the lens to the infinity mark. That’s usually not sharp enough either. Most modern lenses rotate past the infinity mark to allow you to focus at infinity even in extremely hot or cold conditions, so you can’t just turn the lens barrel until it reaches its physical limit. Instead, point the camera toward a bright star, set the lens to infinity to get close to proper focus, engage live view, magnify the view to 10 degrees, and focus manually on the star. You may need to disable exposure simulation in your live-view menu to actually see a star. If you arrive at your shooting location before dark, use live view to focus on something at infinity during daylight hours. In either case, be sure to tape the lens to lock-in infinity focus, then check focus again by shooting a test frame. Include a bit of the skyline when testing at night. It’s often easier to check the sharpness of the skyline than the sharpness of a star.
Once you’re confident you’re focused at infinity, you can compose your shot. It’s easier to compose if you first let your eyes adapt to the dark. I use the red LEDs on my headlamp when working at night to preserve my night vision as much as possible. Even better is to use no light at all by learning how to find the appropriate buttons on your camera by touch. Composition is largely a matter of guess-and-check, since you probably won’t be able to see the Milky Way clearly through the viewfinder, although you may be able to distinguish horizon from sky. Level the camera left-to-right with a hotshoe level or your in-camera level (if you have one), point it in approximately the right direction, and shoot a test frame. Adjust as needed and try again.
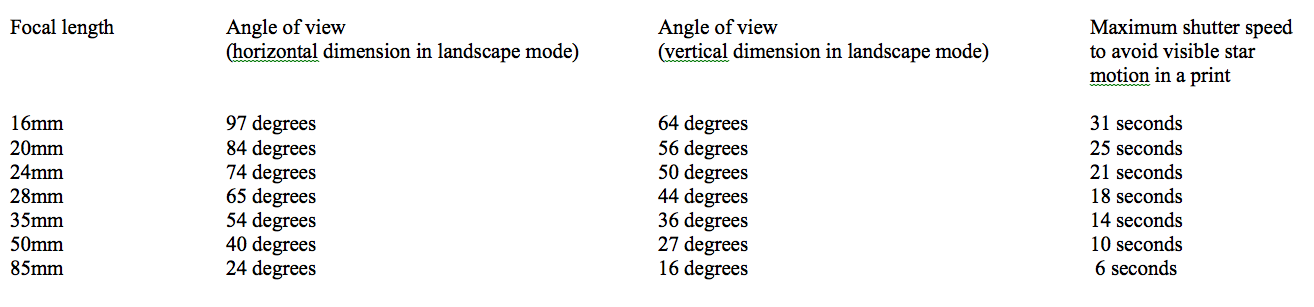
A good starting-point exposure for the Milky Way on a moonless night is 30 seconds, f/2.8, ISO 6400. But here’s the catch: you need a 16mm lens on a full-frame camera to use such a long exposure without the stars forming streaks due to the rotation of the earth. The shorter the focal length, the longer the exposure you can use before the stars move noticeably. Refer to the maximum shutter speed chart (next page) to determine the longest non-streaking exposure you can use with different focal-length lenses. If you don’t have this chart with you, you can divide 500 by the focal length of your lens to determine the longest acceptable shutter speed. For example, if you’re using a 20mm lens, your longest non-streaking exposure according to the 500 rule would be 25 seconds.

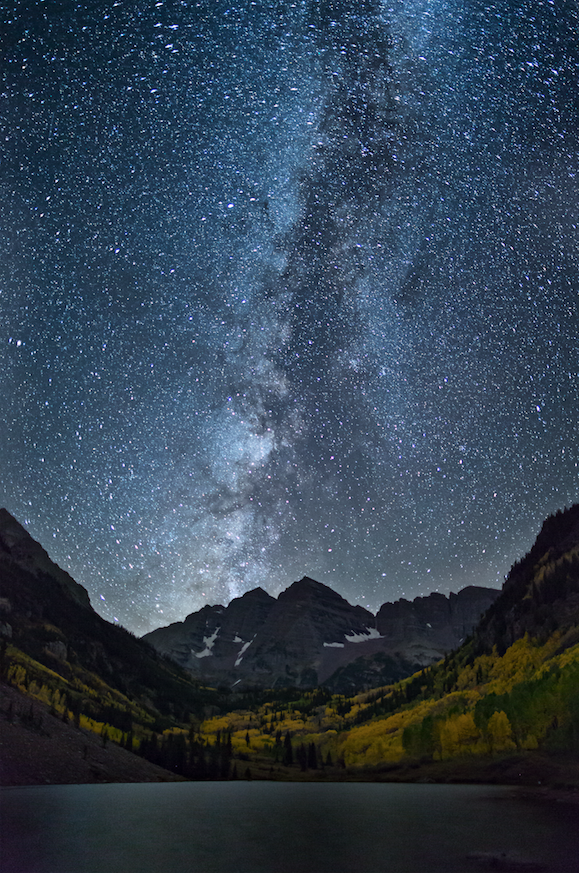
The Milky Way over the Maroon Bells, Maroon Bells-Snowmass Wilderness, Colorado. I shot two frames with a 24mm lens at f/1.4, ISO 6400, and merged them with the modified Rembrandt Solution. I exposed the sky frame for 20 seconds and the land frame for 80 seconds. © Glenn Randall
Maximum Shutter Speed Chart
This chart lists the longest shutter speed you can use with different focal length lenses before the stars make noticeable streaks. The chart assumes you are using a full-frame camera with a sensor the size of a 35mm slide. If you are using a camera with a “sub-full-frame” or APS-C sensor, multiply the focal length printed on the lens by the appropriate crop factor or multiplication factor, then use the result as the focal length for the purpose of this chart. For example, if you are using a 16mm lens on a camera with a 1.5 crop factor, multiply 16 by 1.5 to get 24. The longest exposure you can make with that lens without visible star motion is 21 seconds. Note that this chart assumes you are viewing a print made at normal resolution for a high quality print (file resolution of 240 to 300 ppi). If you zoom in to 100 percent on your monitor, you will see some very short star trails.
Did you like these tips for shooting landscapes at night?
—Well be sure to check out The Art, Science, and Craft of Great Landscape Photography by Glenn Randall, too!